About Searches | ||
| ||
Types of Searches
You access the main search function from the global toolbar. By default, the main search page is Saved Searches, but you may see a different main search page, depending on your installation setup and the roles you are assigned.

Click ![]() from the global toolbar
to go directly to the main search page or select the type of search you
want to perform from the drop-down list. By default, the menu list contains
search options for all installed ENOVIA products and search options that
are shared across applications.
from the global toolbar
to go directly to the main search page or select the type of search you
want to perform from the drop-down list. By default, the menu list contains
search options for all installed ENOVIA products and search options that
are shared across applications.
ENOVIA products can be configured with several types of searches. When you select a search option, you could see any one of these search dialogs:
- Form search. Enter search criteria at the top of the page, and the results display at the bottom of the page.
- Advanced (Full-text) search navigation or form. These search tools let you progressively narrow down the search results based on indexed values.
- Search and select. In many dialog boxes, you need to click an ellipsis button to select a value for a field, such as an Organization or Person. In some cases, the real-time or full-text search opens. In other cases, a standard search dialog opens.
The search results depend on your assigned roles and access privileges. For example, suppose you are searching for parts. If design responsibility is assigned for a particular part, that part will be shown only to the part owner and to users who have read/show access and are members of the organization that has design responsibility for the part.
![]()
Advanced Search Navigation Mode
The advanced search page in navigation mode includes the criteria for refining the search and the result on the same page.
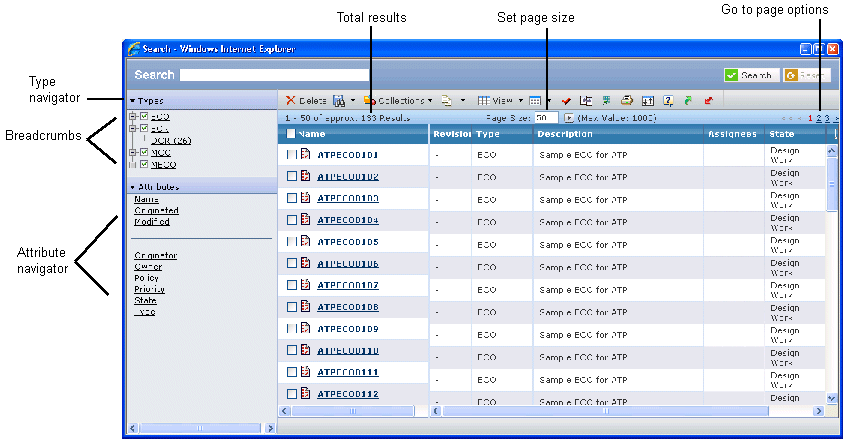
Depending on how your system is configured, you may need to select types or enter attribute values before any results are shown. In addition, the configuration also controls whether or not the count values for attributes and results display.
Pagination Tools
The advanced search tools can be customized in many ways. Depending on how your system has been customized, the pagination tools look either like this:
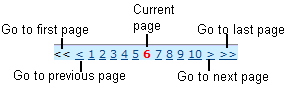
Your system might be configured to only show the next / previous / first arrows. 
The pagination tools work much the same way as an Internet search engine. You can also click a specific number to go to that page. If the results contain more than 10 pages, the numbers slide to show the current set of pages, with the current page in the center of the list.
To change the number of objects listed on a page, enter a number in the Page Size text box and click the button next to the box.
![]()
Advanced Search Form Mode
The advanced search page in form mode shows the criteria fields at the top and the search results on the bottom of the page.
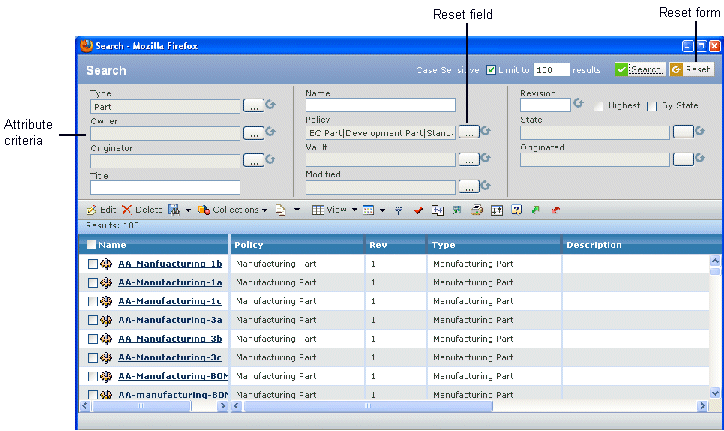
The page may also have Submit and Cancel buttons if the search page was opened by a browse button or an Add Existing menu.
The Reset button at the top resets all search criteria to those specified when the search page was opened. Depending on where you opened the page, some criteria might not be cleared. For example, if you need to fill in the Design Responsibility field and click the ellipsis button, the search page shows Organization as the Type when this page opens.
You can click ![]() to reset the criteria
for that specific field, instead of resetting all fields on the page.
to reset the criteria
for that specific field, instead of resetting all fields on the page.
When entering a Revision, you can enter a specific value, or choose the Highest or By State check boxes. If you check By State, make sure you also select an option for the State field.
You also can choose to run a case sensitive search (check box at top) or a case insensitive search. If you clear or check this box, the system remembers that and uses the same choice for subsequent searches.
![]()
Search Criteria
When entering data in fields in the ENOVIA products that have browse buttons, you can often start typing the value you want, and the field displays matching values. You can then select the needed value. Not all fields are configured for typing values: if the box does not let you put your cursor there, you need to click the ellipsis (browse) button to select the value for that field.
The box beneath the field shows values that match what you type. As you continue to type, the list of matching values is narrowed down. The format of the matching values depends on the type of data. For example, when entering a person's name, the matches show the first name, last name, and username. Most name fields allow you to enter text contained in the first hame, or the last name, or the user name. When entering an organization name, only the organization's name shows.
If the list shows the word More, continue typing to narrow down the list of possible values. The message "No Results Found" indicates that the value you typed does not have a match in the database.