Creating an Engineering Change | ||
| ||
Use one of these methods to open the create page:
From the global toolbar, click
 > Product
Line > Create Engineering Change.
> Product
Line > Create Engineering Change.Or:
From the structure view of a Requirements Specification, check one or more rows and select Actions > Raise Engineering Change from the page toolbar.
Or:
-
From the global toolbar, click
 > Product
Line > Engineering Changes.
-
Click Create Engineering Change from the page
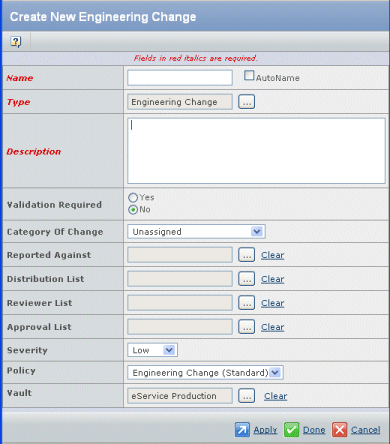
Actions menu or toolbar. The Create New Engineering Change page opens.

-
From the global toolbar, click
Enter the following fields:
Field Name Description Name Type a name for the engineering change or check the Autoname check box. Names are case-sensitive and spaces are allowed. You can use complete names rather than abbreviations, making the terminology in your system easier for people to understand. Generally, name lengths can be a maximum of 127 characters. Leading and trailing spaces are ignored.
Type To select an object type other than Engineering Change, click  and select the type.
Description Type a description for the engineering change. Validation Required Allows the engineering change owner and Quality Engineer to enforce validation of the change. If Yes, at least one test case must be related to the engineering change. In the Validate state, any related test cases must be executed. The engineering change cannot be promoted to the Formal Approval state until the related test cases have a Pass status. Category of Change The category for the change. Values include: - Vendor Requirement
- Unassigned
- Product Improvement
- New Product Introduction
- Marketing Requirement
- Facilitate Manufacturing
- Drafting Error
- Cost Reduction
Reported Against The object this change is reported against. Click  and select an object.
Product type objects are the default object type.
and select an object.
Product type objects are the default object type.Distribution List Click  and select the member
list(s) to be used as a distribution list for notifying users.
and select the member
list(s) to be used as a distribution list for notifying users.Reviewer List Click  and select the route
template(s) defined with the Route Base Purpose of "Review" to be used
as a reviewer list. This includes enterprise and personal route templates.
If you do not select a Reviewer List, Business Process Services creates
a default route with no tasks/persons defined for this Engineering Change.
You then need to edit that route as required.
and select the route
template(s) defined with the Route Base Purpose of "Review" to be used
as a reviewer list. This includes enterprise and personal route templates.
If you do not select a Reviewer List, Business Process Services creates
a default route with no tasks/persons defined for this Engineering Change.
You then need to edit that route as required.Approval List Click  and select the route
template(s) defined with the Route Base Purpose of "Approve" to be used
as an approval list. This includes enterprise and personal route templates.
If you do not select an Approval List, Business Process Services creates
a default route with no tasks/persons defined for this Engineering Change.
You then need to edit that route as required.
and select the route
template(s) defined with the Route Base Purpose of "Approve" to be used
as an approval list. This includes enterprise and personal route templates.
If you do not select an Approval List, Business Process Services creates
a default route with no tasks/persons defined for this Engineering Change.
You then need to edit that route as required.Severity Select a level of severity from the drop-down list. Default values are Low, Medium, and High. Policy Select a policy from the drop-down list to govern the engineering change. Vault Click  and select the vault
to store the engineering change object.
and select the vault
to store the engineering change object.Click Done.