Checking in the Active Model | ||
| ||
Click ENOVIA V6 > Checkin > Active Model in the CATIA V5 application.
An activity bar is displayed as the Checkin page is built for the active model and is displayed in the browser.

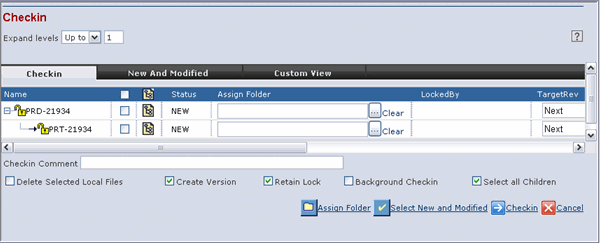
The Checkin page has a tree table for the CATIA V5 documents. The tree table for the objects selected has various columns displaying the information specific to the object in each row. Multiple root nodes are displayed in the Checkin page if the design for the selected objects for checkin have multiple root nodes.
Embedded components in an assembly are displayed as a part of the assembly structure in the tree table for the CATIA V5 documents.
The left side of the tree-table control shows the tree. It displays the object structure (compound document) in the form of a tree. This tree also displays the lock status for the object using the following icons:
 icon indicates that no user has locked the object.
 icon indicates that another user, whose name is displayed in the Locked
By column, has locked the object.
icon indicates that another user, whose name is displayed in the Locked
By column, has locked the object.The read/write status based on whether the model is locked or unlocked in ENOVIA during Check In is set in the Global Configuration Object by the Integration Administrator. See ENOVIA Collaborative Design for CATIA V5 Installation and Administrator's Guide for more information on setting up Global Configuration Objects,
Name. Displays the name of the design.
If you are trying to check in a structure that contains 2 or more embedded components with the same name under different parents, then an error message is displayed and check in is not allowed. You must ensure that the names of the embedded components are unique before you try to check in a structure.
Selection Checkbox--The first column is a checkbox column, which allows you to select the objects for checkin. You can select the objects for checkin even if you do not have the lock for the design. Upon checkin, the lock for the design is automatically acquired if you have the permission to lock and checkin the design.
To check in a structure with embedded components, the embedded component and its parent should be selected together. If you try to check in without selecting the embedded component and its parent together, an error message is displayed and check in is not allowed.
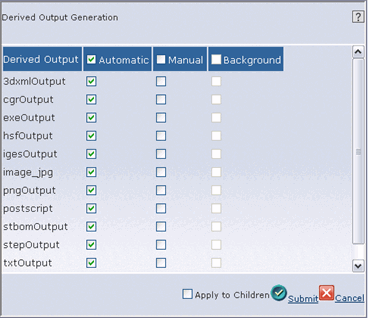
 Derived Output--This is used to select
the derived outputs for the CATIA V5 Document. The CATIA V5 Document
can have more than one derived output. To specify the required derived
output formats,
 -
Click
 to open a pop-up dialog listing the available derived
output.

-
Select the required formats. For more details on Automatic, Manual,
and Background columns see ENOVIA Collaborative Design for CATIA
V5 Installation and Administrator's Guide.
See Modifying the Default Settings for steps to set the default derived output formats from the Preferences page.
-
Click Submit.
SmartBOM must be installed to save CATProduct files as .stbom or .exe .
Target Name. Shows the name for the CAD object if it already exists. This is displayed only if your system is configured to assign a part to the CAD object when it is checked in.
Status--The Status column displays the status of the object as:
- New: if the object does not exist in ENOVIA
- Modified: for the subsequent checkin of updated designs
- Exists: for the designs that are not modified
Assign Folder--Folder in which the object is stored on checkin. Click Browse and the Select Folder page opens. Select the folder from the list of available folders displayed.
Assign Part--Used to assign an Engineering Central part to assign to the new CATIA document. The name of the selected Part is used to name the CAD object and any associated Drawing object on the page. See About Check In for more details.
Note: Assign Part feature is not available for Bulk Loading.
Locked By--Displays the User Name of the person who has locked the design. Displays '--' for new designs by default..
Target Revision--You can check in with any target revision you want by selecting the target revision or clicking Next to start a new revision cycle. In the case of a new CATIA V5 design checkin, this is set by default to Next. For example, if the policy has the revision sequence of A, B, C, the first checkin results in the revision A.
DesignType--Select the DesignType you want to apply to the object where the available design types are displayed as a dropdown list. See About Check In.
DesignPolicy--Select the required policy from the drop down list under the DesignPolicy column. This column is valid only for new designs.
The policies available by default are,
- Design Policy
- CATIA V5 Design Policy
CATIA V5 Design Policy is displayed as the policy by default for the respective CATIA V5 types.
Your Integration Administrator creates these administrative objects for you. If you change the value in DesignType column, then the policy list in DesignPolicy column is automatically updated.
If the object you are checking in is not new, then the Design Policy columns are not displayed and the exact type and policy of the object the user is checking in is displayed.
If upgraded from version V6R2009x or older, the CATIA V5 Design Policy may not be selected by default on the Checkin page and must be selected manually. CATIA V5 Design Policy is not selected by default because the Preferences page contains the old "Design Policy" as the default policy, and this setting is maintained during ENOVIA Collaborative Design for CATIA V5 installation. To make the CATIA V5 Design Policy as default policy during checkin, the Integration Administrator must define CATIA V5 Design Policy as the default policy on the Preferences page..
State--Displays the current state of the design in the lifecycle.
Current Revision--Displays the Current Revision of the model being checked in. Displays '--' for new designs by default.
Version--Displays the version of the design you are working with. Displays '--' for new designs by default..
Specification--Displays the description of the associated part listed in the Assign Part column. This is displayed only if your system is configured by the Integration Administrator to assign a part to the CAD object when it is checked in. For more information, see SettingUp and Configuring section of ENOVIA Collaborative Design for CATIA V5 Administrator's Guide. For more information about assigning parts, see About Check In.
Description--Displays the description specified by the user for the design.
-
Click
The bottom panel of the Checkin page has the following options:
Select New and Modified--Click to select the objects with MODIFIED or NEW status in the Status column.
The status of embedded components within a structure is forced to match the status of the its immediate parent component if the Status of the parent is 'MODIFIED'. Also, the status of an Embedded Component will be that of its parent only if its Status is not NEW.
Assign Folder--Click to assign a location for all the objects to be stored on checkin. Click Browse to select a folder. All the models are stored in this folder on checkin.
During check in, the following options are available,
Check in Comment--Enter your comment for check in. The comments are stored as an attribute in the database. You can search for your model based on these comments.
Delete Local files--Select this check box to delete the local files on the disk of the designs that are checked in.
Create Version--Select this option for the integration to create a new version every time check in is performed. If this option is not selected then the design is checked in to the same business object and the earlier copy of the file is lost.
Retain Lock--The default behaviour of the integration is to remove the lock on the design once a user checks in the design. Select the Retain Lock check box to retain the lock after check in. This effectively means that the user does not need to checkout/lock again to checkin again.
Background Checkin--Select this option to run the check in process in the background. This enables you to continue using CATIA V5 during the check in process. A success message is displayed once the checkin is complete. A BackgroundCheckinSuccessLog<date>_<time>.htm log file is created for each checkin, and the location of the log file is the default directory. For more details on log files, see ENOVIA Designer Central Installation and Administrator's Guide.
Select all Children--Select to select all the children recursively when the parent component is selected for checkin.
Click Checkin to checkin the selected designs or click Cancel to cancel the Checkin.