Checking Out and Loading Objects | |||
| |||
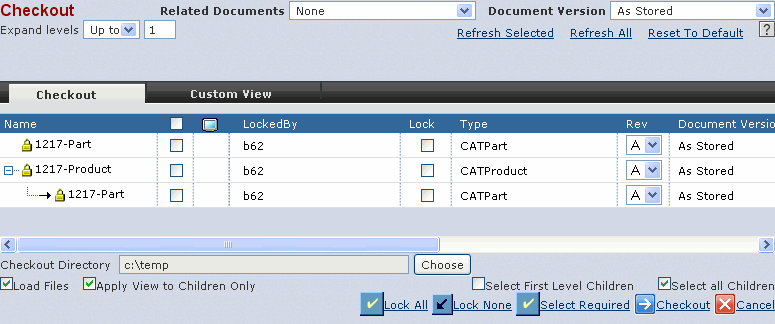
From the page Actions menu, click Actions > Checkout to open the Checkout page.

For each design the Checkout page lists,
Checkout Tree. The left side of the tree-table control shows the tree. It displays the object structure (compound objects) in the form of a tree.
The sequence of objects of a structure displayed in the Checkout tree may not match the sequence of objects displayed in the tree in CATIA.
Selection checkbox. The first column is a checkbox column, which allows you to select the objects for checkout.
Note: If you try to checkout a structure with embedded components by selecting only the parent component and not selecting one or more embedded components in the structure, then a warning message is displayed. However, checkout is allowed.
Preview. Click
 for the preview of the object if the object was
previously checked in with preview.
 Locked by. If the object being checked out is locked by any user, this column indicates the name of this user.
Lock checkbox. Select this checkbox to lock the object during checkout.
Local Checkout. Select this checkbox to check out the selected objects to the Checkout directory in your local machine.
The other columns include "Design", "Revision" and "Version" which help you to identify the CATIA V5 object during checkout.
Embedded component and its parent must be checked out with versions/revisions 'AsStored'. A warning message is displayed incase of any mismatch, and checkout is allowed.
Access Status Column.
- The Access Status is shown as VIEW, EDIT if the user has permissions for Checkout, Lock, Checkin, Revise and Modify for the object.
- The Access Status is shown as VIEW if the user only has permissions to Read and Checkout the object
Document Version. This column displays the current lateral view applied to the objects in the Checkout page.
The following options are available in the Checkout page for selecting objects for Checkout:
Local Checkout All. Click this option to select all the objects on the Checkout page for checking out locally.
Local Checkout None. Click this option to cancel the selection for local checkout for all the objects on the Checkout page.
Select Required. Selects all the objects, which must be included in the structure for proper loading of the CATIA V5 model in CATIA V5.
Lock All. Click this option to select all the lockable objects on the Checkout page for checking out with a lock.
Lock None. Click this option to deselect all objects on the Checkout page that are selected for locking.
The following options are available for setting the lateral views on the top frame of the Checkout page.
Document Version Options. The "Document Version" drop-down contains the names of user-configured programs in ENOVIA that automatically apply some lateral navigation rule to a selected design node and refresh its underlying structure.
Manual lateral navigation modifies the revision and version of the design by picking the appropriate values in the revision and version drop-down. The program picked from the drop-down applies the user-defined program logic to accomplish the same thing. The following options are available:
- As Stored--Gives you the precise structure stored at the time of checkin
- LatestVersion---Finds the latest version of all nodes of a selected node and its underlying structure
- LatestRevision--Finds the latest finalized revisions of all nodes of the selected node and its underlying structure.
- LatestReleasedRevision--Finds the latest revision which is in the Release state of the selected node and its underlying structure. If no object is in the Release state, then the latest revision of the object is displayed.
Related Documents Options. The "Related Documents" drop-down contains the names of user-configured programs in ENOVIA that will retrieve related documents of each document node displayed in the checkout dialog. The particular document node/s to apply the selected program to will have to be selected before the program is selected. Designer Central delivers:
- Related Drawing: finds and displays for each design mode the associated drawing, if it exists. This drawing can now be selected for checkout, if needed.
- RelatedCGRDerivedOutput: finds and displays the associated cgr file, if it exists. The cgr can be selected for checkout, if needed.
Administrators may configure additional programs that look for other kinds of related documents.
Default values for both "Related Documents" and "Document Version" programs can be configured in the GCO which applies the lateral views by default as the Checkout page is initially rendered.
Refresh Selected. Click Refresh Selected to refresh the view of the selected components after you change the views through the Document Version and Related Documents options. Only the views of the selected components are refreshed.
Refresh All. Select the Refresh All option to refresh the view of all the components listed in the Checkout page.
Reset To As Stored. Select this option to reset the view to the "As Stored" type for the selected objects on the Checkout page.
The following options are available in the bottom frame of the Checkout page:
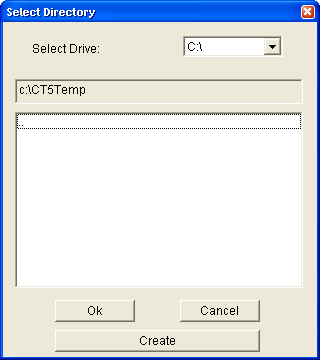
Checkout directory. This shows the default checkout directory. If you want to check out to a different directory, click Choose on the Checkout page, which opens the Select Directory dialog box. Select the directory where you want to check out the objects and click OK. You can also click Create to add new directories to your file structure.

Reset the default directory setting in the Preferences page if you want to permanently change the default directory.
Load files on checkout: Select the Load files check box to load the CATIA V5 objects after checkout. If this option is not selected, the files are stored in the local machine, but not loaded in CATIA V5.
Apply View to Children Only: Check the Apply View to Children Only option to apply the view selected to only the children of selected objects. If not selected, the view is applied to children as well as selected objects.
If during checkout, the files selected for checkout are found in the same directory, then a Confirm File Overwrite dialog is displayed with the list of files already existing on the your machine. Select the files you want to overwrite and click Submit to overwrite the files.
Select First Level Children. Select this option to select only the first-level children when you select the parent nodes.
Select All Children. Select this option to select all the child components when you select the parent node of the child components.
Select the objects in the Checkout page and click Checkout. A message asks you to select Checkout from the ENOVIA V6 menu in the CATIA V5 application.
Click ENOVIA V6 > Checkout > Load in CATIA V5.
The Top-level objects of the selected objects are loaded in CATIA V5.
If you do not select the Load files on checkout option on the Checkout page, the objects you selected for checkout are downloaded to your machine to the location specified in checkout directory field.
During improper checkouts or checkouts where a warning message is displayed, the checkout process is not stopped.