Setting Global Preferences | ||
| ||
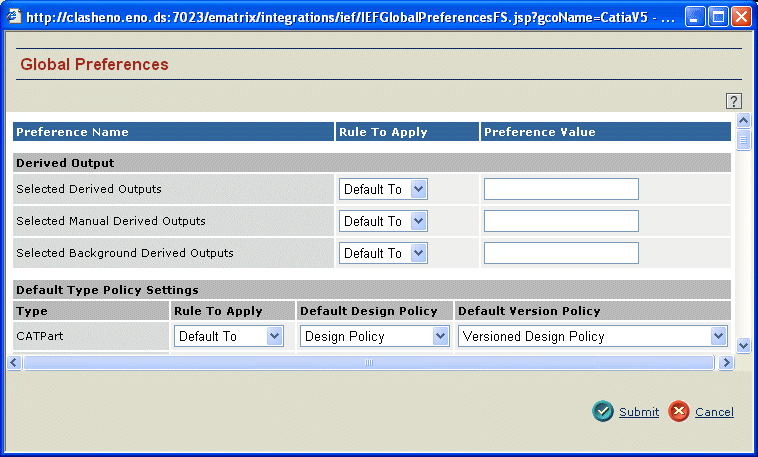
Select Actions > Designer > Global Preferences from the global toolbar. If more than 1 collaborative product is installed, you see the GCO Chooser page.
Select the collaborative product for which you want to set preferences and click Submit.

The Global Preferences page opens.
To set the Derived Output, enter a comma-separated list of the types of output to be generated, such as JPG, TIFF.
For each object listed in the Default Type Policy Settings section, select an option from the drop-down list for:
- The Rule to Apply for policies.
- The Default Design Policy (the policy applied to a major object).
- The Default Version Policy (the policy applied to a minor object).
See the Designer Central User's Guide for details about major and minor objects.
If you create custom types, you must also enter a default policy mapping in the IEF-Pref-MCADInteg_DefaultTypePolicySettings attribute.
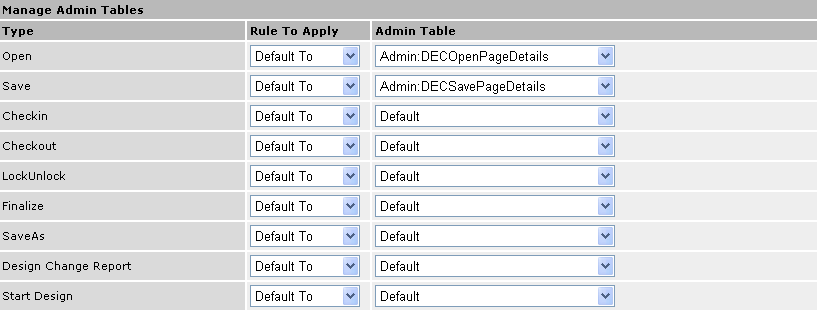
In the Manage Admin Tables section, select a Rule to Apply and the name of a Workspace table.

The Default workspace table is the one installed with Designer Central. Any custom tables you create (as described in the Designer Central User's Guide) also show in the drop-down list and can be selected. Custom workspace tables can be created for these Designer Central pages.
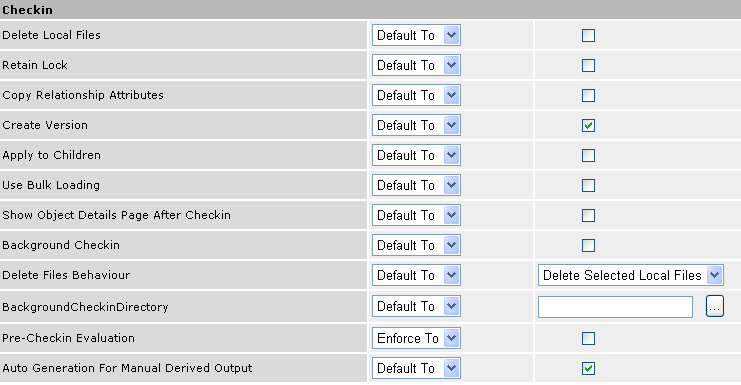
In the Checkin Options section, choose a Rule to Apply and set whether or not check boxes on the Checkin page will be checked or clear by default:

- Delete Local Files
Checked--local files are deleted after checkin
Clear--local files are not deleted after checkin
- Retain Lock
Checked--files remain locked after checkin
Clear--files are unlocked after checkin
- Copy Relationship Attributes
Checked--relationship attributes will be copied at checkin
Clear--relationship attributes will not be copies at checkin
- Create Version
Checked--a new version of the design will be created at checkin
Clear--the current version of the design will be overwritten by the version being checked in
- Apply to Children
Checked--All checkin option values will be applied to the child objects of selected design objects
Clear--Checkin option values will only be applied to the specifically-selected objects
- Use Bulk Loading--only users with the Integration
Bulk Loader and System Administrator roles can access this function;
bulk loading allows major objects to be checked in at a finalized (or
other) state.
The Use Bulk Loading option is applicable only for Collaborative Design for CATIA V5. This option is not applicable for Collaborative products that use native UI.
Checked--Selected files can be checked in using the Bulk Loading function
Clear--Selected files are checked in as usual
Checking in objects in bulk loading mode will always finalize the checked in design.
- Show Object Details Page After Checkin
Checked--After Checkin, Designer Central displays the object details page for the object checked in
Clear--The object details page is not shown
- Background Checkin
Checked--Files are checked in using a background process and the end user can continue to use the CAD tool
Clear--The end user must wait for the checkin process to complete before continuing with any operation in Designer Central or the CAD tool
- Delete Files Behavior
Delete Selected Local Files--files on the user's local computer that are selected on the Checkin page will be deleted after being checked into ENOVIA
Delete All Local Files--When "Delete All Local files" option is selected,
- Files which are selected for Save to ENOVIA / checkin are deleted.
- Additionally, files are not selected for checkin, but which have status as "EXISTS" are also deleted.
- Background Checkin Directory--click
 to select the directory where the log files
for background check in messages are created. Designer Central
creates a BackgroundCheckinSuccessLog_<datetime>.htm
log file for each checkin process.
 - Pre Checkin Evaluation
Checked--The JPO used to evaluate the selected objects on the Checkin page is executed. The return value from the JPO determines whether or not an object can be selected for checkin.
Clear--The JPO used to evaluate the selected objects on the Checkin page is not executed
- AutoGenerationForManualDerivedOutput
Checked--Designer Central automatically generates derived output if the user selected Manual for a format, but a file in that format does not exist in the required location
Clear--No derived output is generated for that object; if the file is not found, the Checkin operation is aborted
- Delete Local Files
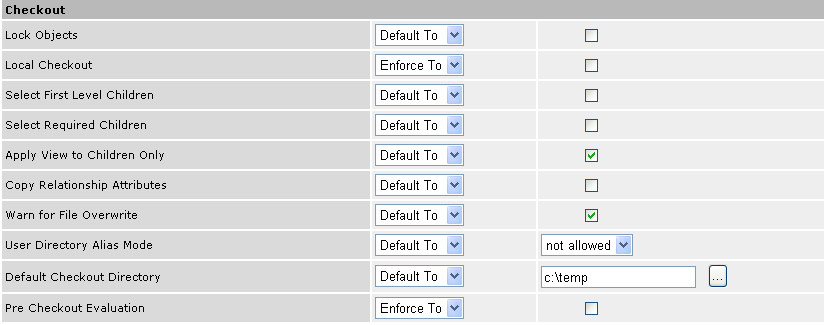
In the Checkout Options section, select a Rule to Apply and set whether or not check boxes on the Checkout page will be checked or clear by default:

- Lock Objects
Checked--After checkout, the object is locked in Matrix and only the user checking out the design can check in a new version
Clear--After checkout, the object is not locked in Matrix and other users can checkin new versions
- Load Objects
Checked--After checkout, the design is opened in the CAD tool on the user's local computer
Clear--The design is copied to the user's computer, but not opened.
The Load Objects option is available only in Collaborative Design for CATIA Global Configuration object.
- Local Checkout. The default value of this option is enforced to FALSE.
Note: When RFA is enabled, design is checked out to the local directory if the design is locked by current user.
The design is checked out to the user's hardlink folder when the design is not locked or is locked by another user.
- Select First Level Children
Checked--When selecting a design in the Checkout page, also select the immediate children of that design (but not grandchildren)
Clear--No children are selected for a selected node
Note: This check box only applies if the Select All Children option is not selected.
- Select Required Children
Checked. When a structure which contains suppressed components which were checked in earlier with the option loadsuppressedlightweightcomponents as FALSE in the settings.ini file is checked out, then the objects in which suppressed components were checked in, are not selected for checkout..
Clear. All the objects are selected for checkout.
- Apply View to Children Only
Checked. The selected lateral / vertical view is applied only to the children of the selected node and not the selected parent.
Clear. The selected lateral / vertical view is applied only all child components of the selected parent.
- Copy Relationship Attributes
Checked--Relationship attributes are copied from the Matrix object to the design file at checkout
Clear--Relationship attributes are not copied
- Warn for File Overwrite
Checked--A message displays to the user when a checkout results in overwriting a file on their local computer
Clear--No warning message displays to the user in this situation
- User Directory Alias Mode--for the CATIA V5 integration only
current--Only the current DLNames directories are displayed when a user browses for the Checkout directory
allowed--The current DLNames directories and system directories are displayed when a user browses for the Checkout directory
not allowed--Only the system folders are displayed when a user browses for checkout directory
- Default Checkout Directory--click
 to select the directory where CAD objects
will be checked out on the user's local system
 - Pre Checkout Evaluation
Checked--Enable evaluation before the check out process
Clear--No evaluation is done on designs before the check out process
Note: Pre-Checkout evaluation functionality is not supported in Collaborative Design products that use immersive UI and therefore will not work in Collaborative Design products which have immersive UI. Pre-Checkout evaluation is supported only for Collaborative Design for CATIA V5 version V6R2012.
- Lock Objects
In the Miscellaneous Preferences section, select a Rule to Apply and preference values for these options:

- Select Children if Parent is Selected
Checked--Automatically selects child objects when a parent object is selected
Clear--Does not select child objects
- Use Zip in File Operations
Checked--CAD files will be zipped for check in and check out; Designer Central uses the Java zip utility to zip and unzip files
Clear--CAD files are not zipped
- Progressive Loading
Checked--Enabled for Checkout and Promote operations
Clear--Disabled for Checkout and Promote operations
- DefaultExpandLevel--The number of levels to automatically expand when retrieving and displaying the Checkin, Checkout, and Promote pages. Default=1.
- DefaultFolder--Click [...] to open the Choose Folder page. Select a workspace folder and click OK to set it as the default workspace folder
- Related View Registry
Select the name of the needed registry from the drop-down list. The names of all MCADInteg-CheckoutViewProgramRegistry objects display in the list. See Creating or Editing Checkout Views Registry for instructions for populating this list.
- Default Vertical View--Select a view from the drop down list to set the default vertical view as RelatedDrawing or RelatedCGRDerivedOutput. Select None to prevent application of Vertical views by default.
- Default Lateral View--Select a view from the drop down list to set the default lateral view as LatestVersion, LatestRevision or AsStored.
- Select Children if Parent is Selected
Click Submit.