Adding Custom Reports | ||
| ||
Display the Report Dialog
You can define a webform to function as the report dialog.
To invoke the custom report, create a menu command and add it to the Metrics menu. The command should invoke emxMetrics.jsp?commandName= <ReportCommandName>. The ReportCommandName specifies the URL parameters and settings for the custom report:
Setting Description Example Target Location
The frame name where the report dialog page specified by the Href parameter will be loaded.
metricsReportContent
Report Type
Mandatory setting
MetricsCustomReport
Report Results URL
URL of the report results page to use for processing and displaying the report.
emxMetricsCustomReportResults.jsp
Label
The name to use as the heading of the report in the metricsReportHeader frame
Custom Report
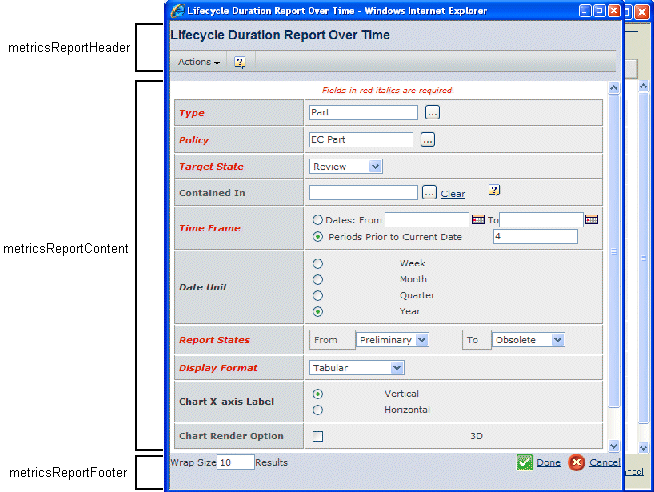
The emxMetrics.jsp file defines these frames:
- metricsReportView. The visible frame, controlled by emxMetricsView.jsp, includes these frames:
- metricsReportHeader. Contains the common header and toolbar used for all Metrics reports.
- metricsReportContent. Contains the dialog box specified by the href URL parameter.
- metricsReportFooter. Contains the common footer functions, including the Wrap every n columns parameter, and the Done and Cancel buttons.
- metricsReportHidden. Used for report processing.
This graphic shows these frames, using the Lifecycle Duration Report Over Time as an example:
![]()
Display Report Results
When the user enters criteria in the metricsReportContent frame and clicks the Done button, the generateReport() function is called. This function should validate the values entered in the metricsReportContent frame.
If validation passes, the dialog page should be submitted to emxMetricsResults.jsp?commandName=<commandName>. The commandName defines the URL parameters for the custom report:
| URL Parameter | Description | Example |
|---|---|---|
mode |
criteriaUpdate--Processes the Save or Save As operation reportDisplay--Displays the report results page |
- criteriaUpdate - reportDisplay |
supportedReportFormats |
A comma-separated list of values that define which graphic formats are supported by the report type. |
- tabular - stackbar - bar - line - pie |
showPercentage |
Used to enable or disable the percent change display for tabular reports (not used with other report formats) |
- true (default) - false |
commandName |
The command of the custom report |
|
reportName |
If the user saved the report (using Save or Save As), the report name defined by that action. |
|
reportTitle |
If the user saved the report (using Save or Save As), the report title defined by that action. |
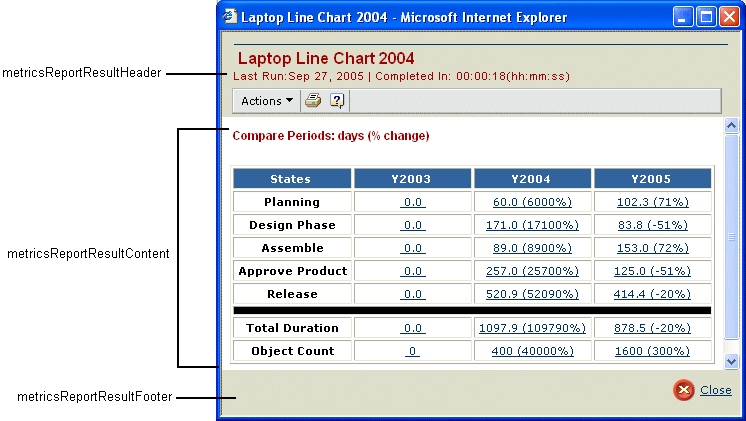
emxMetricsResults.jsp controls the report results window and contains these frames:
- metricsReportResultHeader. Common header for report results and includes the Actions menu and toolbar commands. The Display Format command in the Actions menu lists the chart formats passed using the supportedReportFormats parameter.
- metricsReportResultContent. Displays the result page by reading the Report Results URL setting of the command object passed in to emxMetricsResults.jsp, along with the mode=reportDisplay parameter. The report should read the result data set associated with the hidden webreport .emx<ReportType><TimeStamp>, or the opened webreport and display the results using the specified format (tabular or graphical).
- metricsReportResultFooter. This frame displays emxMetricsResultsFooter.jsp which displays the Close button.
This screen shows a sample report result, using the Lifecycle Duration Report Over Time as an example: