Procedure for Adding a State to a Policy | |||
| |||
Define and program any triggers that should be executed when the object governed by the policy is promoted from this state to the next state. See Designing Triggers for details.
In Business Modeler, locate the policy and open it for editing.
Insert the new state:
- Click the States tab.
- Highlight the state that you want to be immediately after the state you are creating.
- Click Insert.
An Untitled state is added to the list of states.
- Select the untitled state and click Edit.
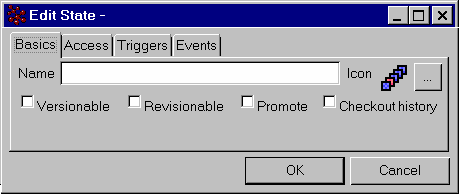
Define the basic information for the new state:
- Name. Enter a name. You also need to define a string resource so that the name can be internationalized, using this syntax:
emxFramework.State.<Policy Name>.<State Name>=<State Name Translated>
where:
- emxFramework.State is the key that groups all the state names with in the FrameworkStringResource file.
- <Policy Name> is the actual name of the policy to which the state is associated. The blank spaces are replaced with "_".
- <State Name> is the actual name of the state for which translation is required. The blank spaces are replaced with "_".
- <State Name Translated> is the translated value for the specified state name.
As an example, to name the Approval state in the Master Document policy, the string resource would be:
emxFramework.State.Master_Document.Approval=Approval
Also add this line to the FrameworkStringResource file (where the other states in this policy are defined), and for each specific language string resource file.
- Versionable. Check this box if you want to allow a file to be checked into the object when it is in this state (if the object allows for check-ins).
- Revisionable. Check this box if you want to allow users to make revisions of the object when the policy is in this state.
- Promote. When checked and a signature (approved or ignored) is applied, ENOVIA Live Collaboration tries to promote the governed object. If all signature and check requirements are satisfied, ENOVIA Live Collaboration automatically promotes the business object. If the state does not have any signatures or check requirements, this setting has no meaning.
- Checkout history. Check this box if you want a history event to be recorded whenever a user checks out a file from this object when it is in this state.
- Name. Enter a name. You also need to define a string resource so that the name can be internationalized, using this syntax:
Click the Access tab.
For each role or group that needs access to the object governed by this policy, follow these steps:
- Click Add.
Business Modeler adds an Access icon for User to the list.
- Select the newly-added access item and click Edit.
- Click the ellipsis button to the right of the For text box.
- Search for and select the role or group.
- Check the accesses you want to assign to the selected role or group.
- Optionally, add a filter in the Filter text box. (See "Using a Filter Expression" in the Business Modeler Guide for details.) When the expression evaluates to “true,” the specified access is granted.
- Click OK to save the access definition for this role or group.
- Click Add.
If you defined triggers, follow these steps for each trigger:
- Click the Triggers tab.
- Click Add. The Trigger chooser opens, including an icon for each legal event for states.
- Select the Trigger state (such as Promote) and click OK. The Trigger state shows in the Triggers tab.
- Double-click the newly-added trigger icon.
The Edit Trigger dialog opens.
- Click
 for the type of trigger you are adding (Check, Override, or Action). The Program Chooser opens.
 - Select the needed program.
- In the Input field to the right of the Check, Override, or Action field, define arguments to be passed into the program. The arguments are referenced by variables within the program. Variables 0, 1, 2, and so on are reserved by the system for passing in arguments.
Environment variable “0” always holds the program name and is set automatically by the system.
Arguments from the Input field are set in environment variables "1", "2", and so on.
See "Using the Runtime Program Environment" in the ENOVIA Studio Modeling Platform Programming Guide for additional information on program environment variables.
- Click OK to save the trigger definition.
If you want notifications to be sent to users, follow these steps:
- Click the Events tab.
- If you want users to be notified when the object reaches this state, click in the Notify Message box and type the message you want emailed to users.
- In the Notify Users box, click the ellipsis button to select roles and groups for receipt of the message.
- If you want a message sent to someone when the object is reassigned to them, click in the Route Message box and, type the message you want emailed to that user.
- In the Route User box, click the ellipsis button to select the select the role or group who should receive ownership and be notified.
Note: Instead of using Check and Action programs, ENOVIA recommends that you use triggers to perform verifications when an object is promoted from one state to the next.
Click OK to save the state definition.
Click Edit to save the changes to the policy.