Mask Customization Process | ||
| ||
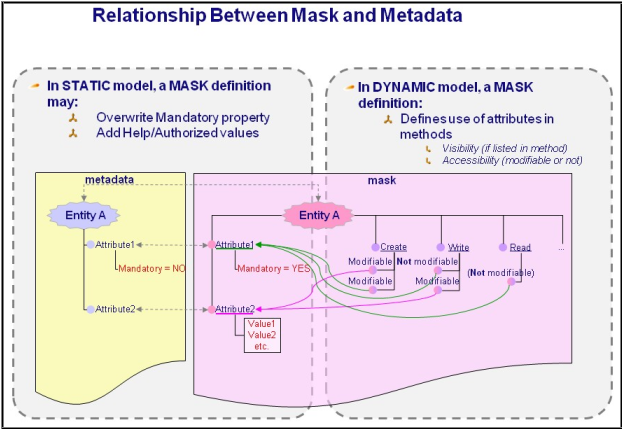
How the Mask and Metadata Work Together
In this diagram, the mask definition overwrites the Mandatory property for Attribute 1 by resetting it to Yes, adds default values to Attribute 2, and sets Attributes 1 and 2 as modifiable or not in different views for Entity A:
![]()
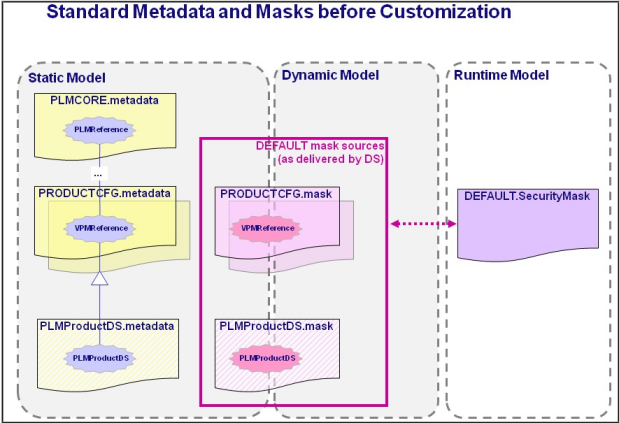
Standard Metadata and Masks Prior to Customization
In this diagram, we can see the default metadata and masks delivered at installation:
- the PLMCORE.metadata file
- the PRODUCTCFG.metadata file and the corresponding PRODUCTCFG.mask file
- the PLMProductDS.metadata sample file and the corresponding PLMProductDS.mask sample file
- the default mask: DEFAULT.SecurityMask.
![]()
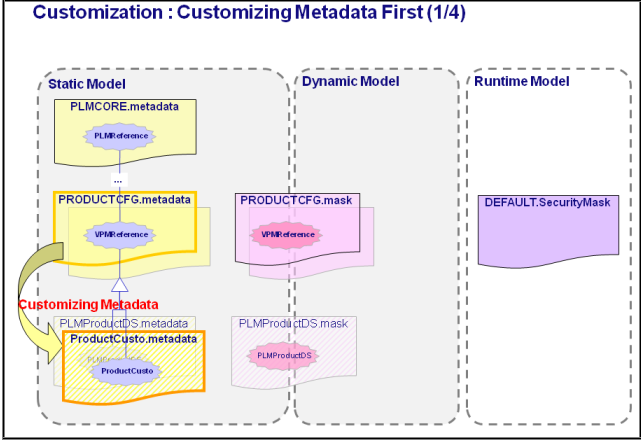
Step 1/4: Customize the Metadata First
In this diagram, you first create a new metadata file for your customization which derives from the PLM model. In our example, this is ProductCusto.metadata:
![]()
Step 2/4: Generate the Mask from the Customized Model
You then use the VPLMPosMaskGenerator tool to generate the corresponding ProductCusto.mask mask file, then edit it if necessary:
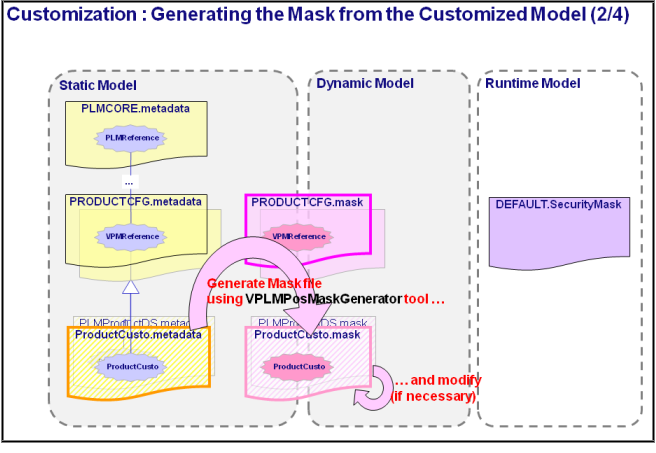
Based on the metadata file which defines certain modeller or customized entities or applicative extensions, the purpose of VPLMPosMaskGenerator is to generate the corresponding mask file from the following inputs:
- this metadata file (and implicitly parent and/or any referenced metadata files)
- the mask file defining the security mask on all the inherited attributes of the parent entities (provided this mask file exists).
By default, the resulting mask is part of the definition of the DEFAULT mask, limited to the attributes (own and inherited) of the entities contained in the metadata file. However, the generated mask file may also be the starting point for a user-defined security mask by just changing the name of the mask in this file (using the MASK keyword ).
Mask files, whether they participate in defining the new DEFAULT mask or any other mask named <ID> (see MASK keyword), have to be delivered in:
<ENOVIAPlatformServer_WEB-INF>/classes/vplm/mask/<ID>
The name of the subdirectory MUST match the name of the mask.
Hence, the mask files participating in defining the DEFAULT mask, as provided by Dassault Systemes, are all delivered in:
<ENOVIAPlatformServer_WEB-INF>/classes/vplm/mask/DEFAULT
![]()
Step 3/4: Compile the DEFAULT Mask
You are now ready to recompile the DEFAULT mask using the VPLMPosMaskCompiler tool:
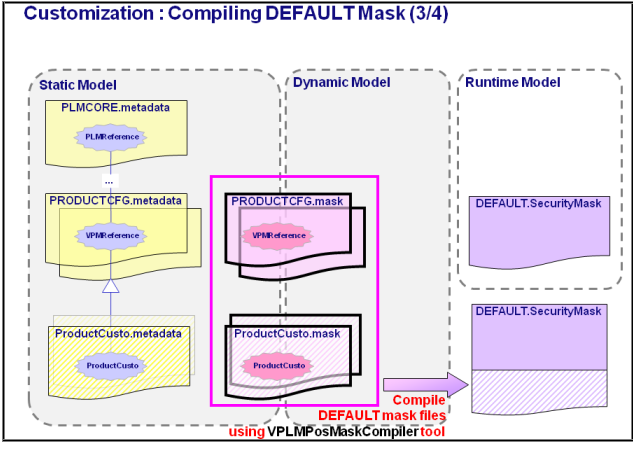
In this step, mask files are the inputs of the VPLMPosMaskCompiler tool. VPLMPosMaskCompiler compiles the .mask files involved in defining the mask <ID>.
The files are located in directory:
<ENOVIAPlatformServer_WEB-INF>/classes/vplm/mask/<MaskID>
Note: If you copy files from DEFAULT to the <MaskID> subdirectory, DO NOT FORGET to modify the name of mask in the MASK command (from MASK DEFAULT to MASK <MaskID>), otherwise a compilation error will be raised.
Note that the additional mask definition information is added to the existing DEFAULT mask.
![]()
Step 4/4: Deploy the Default Mask
You now have to deploy the new DEFAULT mask:
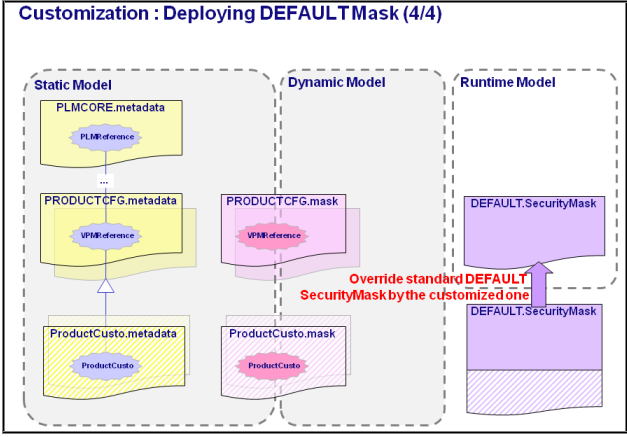
Compiled .SecurityMask files are to be deployed in your ematrix Web Application, depending on your web application server.
For Tomcat, copy the files to:
<apache_root>/webapps/ematrix/WEB-INF/classes/vplm/mask
For WebSphere, the WAS application deployment path is not fixed like in Tomcat.
Run these commands to determine the JAR root path:
cd <app_server_install_path>/profiles/<profile name>/installedApps
find . -type f -name m1jsystem.jar -print
The .SecurityMask file must be copied to the root path's sub-directory: vplm/mask.
A file DEFAULT.SecurityMask is delivered in this directory at installation for the mask named DEFAULT.
.SecurityMask files are taken into account at runtime (which is not the case of mask files), and are formatted to be quickly loaded in memory.
The consequence of compiling mask files is that any modifications to a mask definition must be done in the corresponding mask files first, and then are propagated (copied) to the installation filetree if and only if the related .SecurityMask file has been compiled again.
By default, the DEFAULT mask is always automatically activated at runtime (except if overridden by another mask granted to a context, role, project or organization). This is referred to as mask concatenation.
Note: Customer-defined masks must be granted to a person, context, project, role or organization to override the DEFAULT mask.