Install the Software in Graphical User
Interface (GUI) Mode
This section describes how to perform an installation in GUI mode.
In this mode, the installer prompts you to answer questions in dialog boxes. On UNIX, the dialog boxes are based on Motif (or OpenMotif) and require a graphics card on the UNIX machine.
Go to the directory to which you unloaded the product media (V6_Product_Dir).
For example, if you are installing the ENOVIA Live Collaboration Server product, V6_Product_Dir is: C:\Soft\ENOVIALiveCollaborationServer.Windows64\1 on Windows and: /Soft/ENOVIALiveCollaborationServer.Unix64/1 on UNIX.
Launch the installation by running the appropriate command for your operating system.
On Windows, you must belong to the Administrators group, or have the privileges assigned to the Administrators group. Otherwise, you will not be able to start the installation. On Windows, run the command: setupV6.exe On UNIX, run the command: ./StartGUI.sh Depending on whether the ENOVIA Installer is embedded or not in your product, the procedure differs. If the ENOVIA Installer is embedded, the installation proceeds as normal. If not, you will be prompted to specify the ENOVIA_Installer_Dir directory.
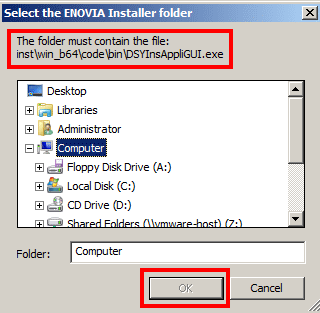
If the ENOVIA Installer is not embedded, a dialog box (on Windows only) is displayed prompting you to select the ENOVIA Installer folder, for example:

Note that the OK button is disabled because the ENOVIA_Installer_Dir folder containing the following path and file, for example on Windows: inst\win_b64\code\bin\DSYInsAppliGUI.exe has not yet been selected. On UNIX, an error message specifies that the ENOVIA Installer was not found and instructs you to read the Readme_UNIX.txt file which contains the appropriate instructions.
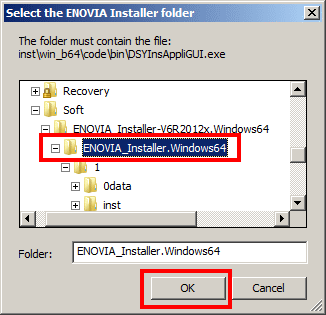
Select the correct ENOVIA_Installer_Dir folder.
Remember that ENOVIA_Installer_Dir refers to the full path of the ENOVIA Installer. Once you select the correct ENOVIA_Installer_Dir folder, the OK button is enabled as illustrated:

Click OK to continue. Note:
You can avoid having to select the folder via the dialog box by launching the installation with the -installerPath parameter which specifies the ENOVIA_Installer_Dir folder as follows: setupV6.exe -installerPath C:\Soft\ENOVIA_Installer.Windows64
./StartGUI.sh -installerPath /Soft/ENOVIA_Installer.SLES64

Install the Software in Text User
Interface (TUI) Mode
This section describes how to perform an installation in TUI mode.
In this mode, the machine does not need a graphics card. The installer prompts you to answer questions in text mode.
Open a Command Prompt window on Windows or a shell window on UNIX. The command must be launched from an elevated command prompt from Windows Vista onwards.
Go to the directory to which you unloaded the product media (V6_Product_Dir).
For example, if you are installing the ENOVIA Live Collaboration Server product, V6_Product_Dir is: C:\Soft\ENOVIALiveCollaborationServer.Windows64\1 on Windows and: /Soft/ENOVIALiveCollaborationServer.Unix64/1 on UNIX.
Launch the installation by running the appropriate command for your operating system.
Depending on whether the ENOVIA Installer is embedded or not in your product, the procedure differs. If the ENOVIA Installer is embedded, the installation proceeds as normal. If not, you will be prompted to specify the ENOVIA_Installer_Dir directory. The TUI mode, although it asks questions in text format, still requires the dialog box prompting you to specify the ENOVIA_Installer_Dir directory. If this is the case, on Windows, run the command: StartTUI.exe -UI and on UNIX, run the command: ./StartTUI.sh -UI The same dialog box as the one displayed using the GUI mode will appear. Note:
You can avoid having to select the folder via the dialog box by launching the installation with the -installerPath parameter which specifies the ENOVIA_Installer_Dir folder as follows: StartTUI.exe -installerPath C:\Soft\ENOVIA_Installer.Windows64
./StartTUI.sh -installerPath /Soft/ENOVIA_Installer.SLES64
Select the correct ENOVIA_Installer_Dir folder in exactly the same way as in GUI mode, then click OK to continue. Text output like the following text is displayed, for example: C:\Soft\ENOVIABusinessProcessServices.Windows64\1>StartTUI.exe -UI
64-bit OS
No installer in the current media
C:\Soft\ENOVIABusinessProcessServices.Windows64\1\inst\common\win_b64.installos found, os win_b64
C:\Soft\ENOVIA_Installer-V6R2012x.Windows64\ENOVIA_Installer.Windows64Installer Media:
"C:\Soft\ENOVIA_Installer-V6R2012x.Windows64\ENOVIA_Installer.Windows64\1\inst\win_b64\code\bin\DSYInsAppliTUI.exe"
....
Logs are located in "C:\Users\ADMINI~1\AppData\Local\Temp\InstallData-2011_06_21-182634\log\2011_06_21-182634\"
Logs are located in "C:\Users\ADMINI~1\AppData\Local\Temp\InstallData-2011_06_21-182634\log\CODE\win_b64\ENOVIA_BPS.media-2011_06_21-182634\"
*****V6R2012x ENOVIA Business Process Services ENOVIA Server installation path*****
Specify where ENOVIA Server Install directory files exists.
Input q and hit Enter to quit. Just press Enter to continue.
Default [C:\enoviaV6R2012x\server]: Answer the questions until the end of the procedure. The questions differ obviously from one product to another.

Install the Software in Silent Mode
In a silent installation, you provide a response file recorded during a previous installation to the installation program. Your product is then installed without any user interaction.
Retrieve the response file from the previous installation. The response file is generated automatically by either a previous GUI mode or TUI mode installation. It contains the responses to questions you were asked during the previous installation. The file name and path is: InstallPath/InstallData/UserIntentions.xml For example, after installing the ENOVIA Live Collaboration Server on Windows, the path would be: C:enoviaV6R2012x\server\InstallData/UserIntentions.xml After retrieving the response file, you can put it in any location you like. Note:
The response file does not capture the location of the ENOVIA Installer core files.
A response file is specific to:
- a particular operating system: response files are different between Windows and UNIX
- a particular application media
- a particular level:
- a response file captured on level V6R2012x GA cannot be applied to a V6R2013 GA or a V6R2012x HF
- a response file captured on a V6R2013 HF1 cannot be applied to a V6R2013 HF2 or a V6R2013 HF1
Edit the response file. The list of variables you can edit is as follows:
- path values
- text values
- port number values
- passwords.
As the installation does not store passwords
in the UserIntentions.xml file, the response file must be modified to provide passwords. Password
keywords are declared in SetVariableProtected XML elements. For example: <SetVariableProtected name = "BBD_PASSWD" setByUser = "true" setType = "default">
<SetText value = "Put your password here."/>
</SetVariableProtected> Replace the text Put your password here by the password, and replace SetVariableProtected by
SetVariable. For example: <SetVariable name = "BBD_PASSWD" setByUser = "true" setType = "default">
<SetText value = "p@ssw0rd"/>
</SetVariable>
Boolean variables must never be changed from TRUE to FALSE or vice versa, because this changes the sequence and the list of the installation questions, and the answers may not be found in the response file. The response file must be:
- XML "well-formed"
- UTF8 encoded.
Launch the silent installation. You launch the silent installation in the same manner as in console mode using the StartTUI program, except that you must specify the --silent option followed by the full path name of the response file. If the ENOVIA Installer core files are embedded in the product, run the following command on Windows: StartTUI.exe --silent C:\UserIntentions.xml and on UNIX: ./StartTUI.sh --silent /UserIntentions.xml If the ENOVIA Installer core files are NOT embedded in the product, run the following command on Windows: StartTUI.exe -installerPath ENOVIA_Installer_Dir --silent C:\UserIntentions.xml and on UNIX: ./StartTUI.sh -installerPath ENOVIA_Installer_Dir --silent /UserIntentions.xml Note:
On Windows, we recommended that you unload / uncompress the media to a directory with a full path length not exceeding 180 characters.
|

