Viewing Where Used Objects | |||
| |||
From the Categories menu, click Where Used. The Where Used page opens.
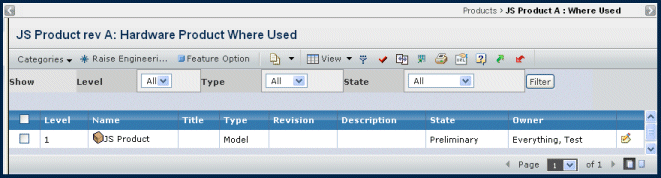
If you want to limit the number of objects in the list, select options from the filter bar at the top of the page
- From the Level drop-down list, select 1 to show only immediate parent objects or select All to show parent objects up to all possible levels.
- From the Type drop-down list, select the type of objects you want displayed. The default is All.
- From the State drop-down list, select the lifecycle states you want displayed. The list contains all the current lifecycle states of all items in the list. The default is All.
- Click Filter.
The page contains the following columns:
The check box in the first column is used with the Raise EC link in the page Actions menu or page toolbar when performing a mass change. It allows you to select objects that require changes.
Level. Specifies the level of the object within the parent assembly. By default, the level signifies levels back from the current level. Your system may be configured otherwise.
Name. Name of the object where the part is used.
Type. The type of related object.
State. The current state of the object in its lifecycle.
Owner. Person who is currently assigned responsibility for the object.
Edit icon. Click
 to edit the details of any object except rules. For compatibility rules the Edit Compatibility Rules page opens. For inclusion rules the Edit Inclusion Rule page opens.