About Tabular Pages | ||
| ||

![]()
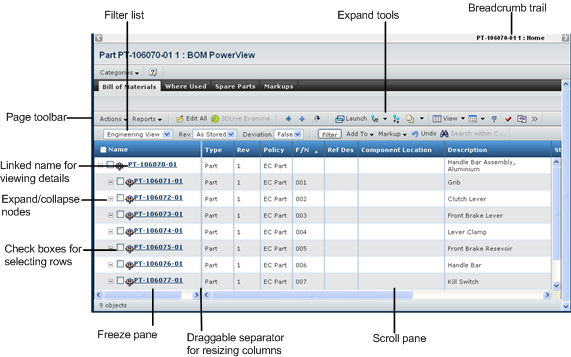
Page Toolbar
The menus and buttons let you perform actions related to the items in the table or to the page in general.
When you select a category from the Categories menu on the page toolbar, the table shows items in that category for related to the context item. For example, when a buyer selects for an RFQ called RFQ-200, the table page that opens shows all line items for RFQ-200. The heading for the table page shows the name of the item in the category list (RFQ-200) and the type of information in the table (Line Items).
Some toolbars include a drop-down list in the upper right corner that lets you filter the displayed list. For example, buyers can use the filter list on the RFQs page to see only the RFQs they own or co-own, that have been routed to them, or that are in workspaces they belong to.
![]()
Column Sorting
To sort by a single column, click the column heading for that column. Click once to sort in ascending order; click twice to sort by descending order. For tables: when you sort on a table page, the system returns you to the first page of the table.
The up or down arrow after a heading indicates that the table is sorted by that column in ascending or descending order. You could see up to 3 columns with arrows.
Tables cannot be sorted by columns that contain data that you can edit on that page.
If you want to sort by multiple columns, see Sorting Pages.
![]()
Sliding Panes
Pages that show structured data contain 2 sets of columns separated by a freeze pane. The left side of the page lists the object names and is frozen in position.The columns on the right side of the page can be resized and you can use the bottom scroll bar to view more columns, without losing the information on the left side of the page so you know what object that information applies to. Changes the size of the freeze pane and scroll pane.
![]()
Expanding/Collapsing the Structure
When expanded, the node shows related child nodes. Some pages are designed so that the nodes do not expand. That is, the page has a freeze pane, but no +/- symbols in front of object names.
When you click the + symbol in front of an object's name, the page expands that row by one level. You can use the expand tools on the toolbar to expand more rows at one time:
 for a page with a single root node, lets you choose how many levels to expand all rows; if the page contains multiple root nodes, select the nodes to expand first, then this button expands those nodes to all levels to the number of specified levels
 immediately expands all nodes to all levels; for pages with multiple root nodes, select the rows to expand first, or you can click the right mouse button and use Expand All to expand only that node to all levels
Note: You can also right-click on a row (opens the shortcut menu) and click Expand > All.
![]() opens the Expand box where you can select how many levels to expand when you clickApply. For example,
if you select 2, then up to 2 levels of child nodes are shown. If you
select All, then the entire structure is expanded (the same as if you clicked
opens the Expand box where you can select how many levels to expand when you clickApply. For example,
if you select 2, then up to 2 levels of child nodes are shown. If you
select All, then the entire structure is expanded (the same as if you clicked ![]() ).
).

Not all structured pages include the Expand tools. In addition, the expand function is disabled in Edit mode so that you do not lose any changes.
If you select All for a deeply-nested or large structure, it may take a while to expand and display a node's structure. During the expansion, the page updates you with how many rows have been retrieved, for example:
Rows retrieved for 3 levels(2): 3300
The message includes a Stop button if you need to stop the expansion. If you stop the expansion, this message displays:
Expand stopped by user with level 3 partially expanded. Please wait for
window to update with the rows already received. This may take several
seconds?
You cannot work with the data until the expansion is complete.
Some structured pages allow you to expand the branches based on a relationship. After choosing a relationship, you choose the to or from check boxes. When you expand a branch, the pages shows objects on the to or from (depending on the selected check boxes) side of the relationship that connects the parent and child objects.
If you want to expand the structure browser to all levels, choose either to or from, but not both. When expanding on a relationship, you cannot choose both the to and from checkboxes and All as the expand level. If you do, an error displays.
![]()
Pagination Controls
Some pages show data in pages instead of including all rows of data on the same page. Typically, these types of pages do not have a structure.
You can click ![]() to turn off pagination,
listing all rows on a single page, or click
to turn off pagination,
listing all rows on a single page, or click ![]() to paginate the data.
By default, most tables create a new page every 11th row, but you can
changes the number of items displayed per page in Preferences. For details,
see Choosing a Pagination Preference.
to paginate the data.
By default, most tables create a new page every 11th row, but you can
changes the number of items displayed per page in Preferences. For details,
see Choosing a Pagination Preference.
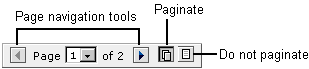
Some tables do not remember rows that you select across pages within the table. For example, suppose a table spans 2 pages. You select an item on the first page, move to the second page and select an item, and then click Delete Selected. The system only deletes the item selected on the current table page. It does not remember the row that you selected on the first page. If you want to select items that are listed on different pages within a table, click in the lower right corner of the page to remove pagination.
![]()
Selecting Rows
To select or deselect all check boxes in the current table page, click the check box in the header row. Some tables contain an icon in the heading instead of a check box. You can click the icon to select and deselect all rows.
To select a range of rows:
- Click the check box for the first row.
- Shift-click the check box for the last row.
- The page checks all rows between the first and last row.