Filtering Page Data

The filter drop-down list and the Filter tool let you control which items display in a table. A table page can have one, both, or neither filter. Some table pages might also have a custom filtering option.

The filter drop-down typically filters rows not based on the column data. The filter tool lets you filter table rows based on the column data.

If a table page contains both types of filters, the page applies the drop-down list filter first, then the toolbar filter. Both filters are temporary. If you go to another page and return to the table page, the filter is removed and all items are displayed again.

For pages showing structured data, the filter icon only shows for pages that have multiple root nodes. If the page has a single root node, this icon is not available. For multiple root nodes, the filter only works on the root nodes, not on any expanded nodes.


Before you begin:
Related Topics
Sorting Pages
  1. To use a filter drop-down list:


    • Choose an option in the filter drop-down list. For information on the filter drop-down for a specific table page, click on that page.
    • To redisplay all items, choose All from the filter list.

  2. To use the page filter tool, click on the page toolbar. The Auto Filter Selection page opens.


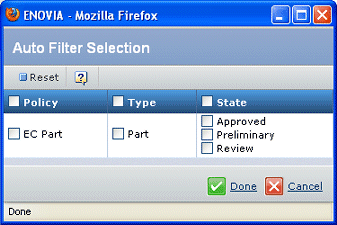
    This page contains a list of the unique values in each filterable column. The values include only those actually used in the table, including on any pages not currently visible. For example, if an item could be in the Sent state but no items are, then the Sent state does not show in the filterable list. If the column values contain mxLink (hyperlinks to ENOVIA objects) data, the link is converted to text and cannot be clicked except for specially-configured columns.

  3. Click in the check boxes for each value you want to filter by. If filters are available for more than one column, each row in the table must meet the filter criteria for all the columns to be displayed. For example, suppose you check the Sent filter option under the State heading and the AcmeVault1 filter option under the Vault heading. Only items in the Sent state and in AcmeVault1 will show in the table.

    Use the check box at the top of the column to select all items in that column. For example, if you only want to filter based on Vault, select all of the items for other filterable columns and then select only the vaults you want to see.

  4. Click Done.

    The page refreshes to display only the rows that contain the selected values. If you were viewing a structure browser page with expanded nodes, all nodes are collapsed and only those that meet all filter selections show in the page.

  5. To remove the filter and redisplay all rows again (the filter is removed automatically when you go to another page and return):

    1. Click again.
    2. From the Auto Filter Selection page, click Reset.
    3. Click Done.

The page is filtered by the selections and shows the filter icon next to any column name that was filtered on: .