Designing Your Own Page Views | |||
| |||
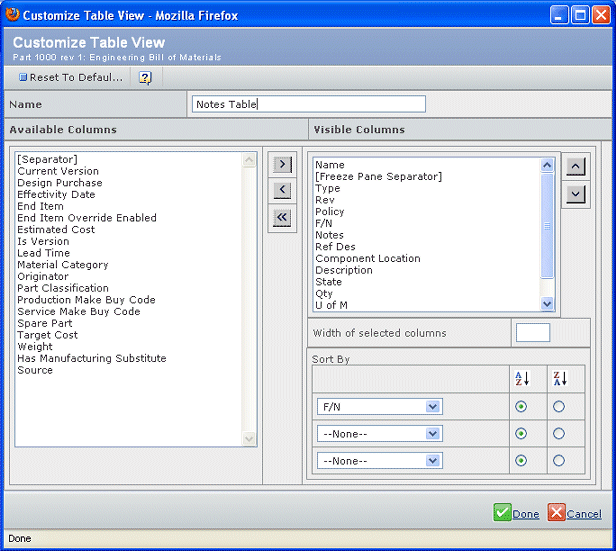
Design a Page View
Click in the page toolbar.
The View menu on the page toolbar shows either
 or
or  . indicates that the page shows a customized view;
indicates that the system default view is shown.
. indicates that the page shows a customized view;
indicates that the system default view is shown.
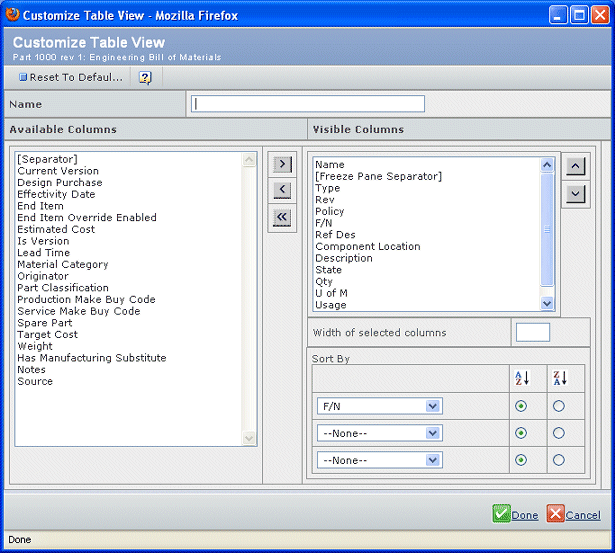
The Visible Columns box lists the columns to be shown in the page in the order listed; the Available Columns box lists all columns that can be added to the page.
If you see a column name starting with <img, that column shows an image.
Some columns may not be used by your installation although listed in the Available Columns list. These columns will not contain data, and will not cause problems if added to a custom view.
The Available Columns list may include dynamic columns. These types of columns do not have any special indicator in the list. Dynamic columns add 1 or more columns to the page depending on certain criteria. For example, additional columns could be added depending on the user's role, or if an object is in a certain state, or for other business logic. If you add a dynamic column to a page view, it may contain no data if the criteria defined for that column are not met.
These column names have special meaning:
Name Meaning Name (Col Group Header) A header for a group of columns (not all pages include this column name). You do not have to use the group header, and if you do, the columns grouped in the default page do not have to be grouped in your custom page, and the header will show above each column if not next to one another. (Separator) A separator column that inserts empty space between columns. (--Pane Separator--) For a structure browser page, places the freeze pane divider. All columns above this separator show in the freeze pane; all columns below this separator show in the scrollable pane. At least one column must be defined above the separator. Checkbox Adds the checkbox used to select items on the page. Picture The columns shows the primary image associated with the object described on that row. Icon Shows  that allows you to click it to open the default page (usually the Properties page) for the object described on that row in a new window.
To add a column to the custom view, click the column name in the Available Columns list and click
 . You can add as many separator columns as needed.
To remove a column from the view, click the column name in the Visible Columns list and click
 . To remove all columns from the table view, click
 .
.
To arrange the columns in the table, click a column name in the Visible Columns list and click
 or
or  until it shows in the needed location. (The first listed column shows in the leftmost position of the table, and so on.)
To define the column used to sort the page when you open it, select the needed column from the first drop-down list in the Sort by section, then select ascending sort (
 ) or descending sort (
 ).
).
If the Sort by section shows in gray, you cannot define sort orders for the page.
Click Done.
If the ENOVIA product adds columns to the table your custom view is based on, the new columns appear at the top of the custom view list. You can edit your custom view (see Edit a Custom Page View) to reset the column order.
After creating a custom table view, the URL button disappears because of how the code needs to update the page for the new view. You can re-view the page (such as selecting it from the
 menu) and the URL button becomes available.
![]()
Select a Page View
- Click the View arrow in the page toolbar, and select a custom view that you created or System Table. If you have defined more than 5 custom views, the View menu lists the first 5 custom views, then a More menu to access the additional views.
You can also click the View icon (without selecting the arrow):
- . The system table view is active; click to load the most recently-used custom table view.
- . A custom table view is active; click to load the system view.
The page refreshes to show the selected custom view.
![]()
Edit a Custom Page View
Click View > Edit Current Table View in the page toolbar.
If you define a custom view for the indexed search results, the system may add additional columns to the Available Columns list when you choose attribute values to narrow the results. You can add these columns to the Visible Columns list, and set width and sorting options for them. The column then shows in the results table whether or not you select values for that attribute during a specific session.
You cannot edit the System table view. The Visible Columns box lists the columns you previously selected.
To add a column to the table, click the column name in the Available Columns list and click
.
To remove a column from the table, click the column name in the Visible Columns list and click
.
To rearrange the columns in the table, click a column name in the Visible Columns list and click
or
until it shows in the needed location. (The first listed column shows in the leftmost position of the table, and so on.)
To change the default sort method, select the needed column from the first drop-down list in the Sort by section, then select ascending sort (
) or descending sort ().