Editing a Structured Data Page | |||||
|
| ||||
Click Edit All or Mode in the page Actions menu or toolbar.

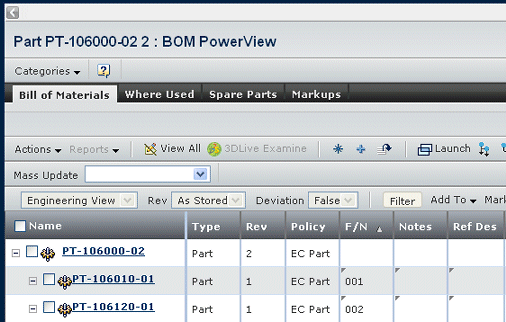
The Mass Update toolbar displays beneath the page toolbar. The columns you can edit show gray triangles.
If you make changes, you cannot change the Expand level for the page. You can change the Expand level after you apply your changes.
You can use the tab and arrow keys to move from cell to cell:
- Tab and right arrow keys move to the next cell
- Shift-tab and left arrow keys move to the previous cell
- Up arrow moves to the cell above the current cell
- Down arrow moves to the cell below the current cell
If you want to use the arrow keys within a cell, click in the cell and then the arrow keys move around the characters in the cell; then you can tab to the next cell.
To update a single table cell:
-
Click in the cell.

An edit box pops up over the selected cell. Depending on the type of data for the column, you could also see a drop-down list of choices.

- Type or select the new value.
-
Tab, or click in another cell.

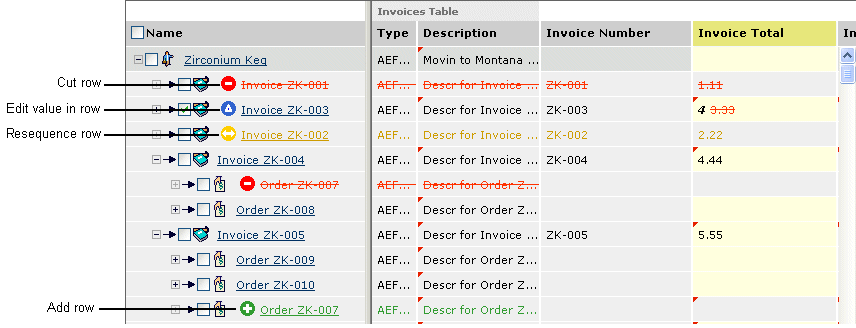
The proposed change shows in bold italics with the prior value redlined, and the edit box closes. You can make any number of proposed changes to any combination of cells prior to applying them. Until you apply the changes, the database is not updated.
-
Click in the cell.
To update multiple cells:
- Check the objects you want to update.
-
Select the column you want to update from the Mass Update drop-down list.

The Structure Browser opens an edit window beneath the Mass Update toolbar. Click the X to close the edit window without making changes.
- Enter a value for that column. Depending on the type of data used for that column, you could see a text box, a drop-down list, a check box, or an ellipsis button to search for the needed object.
-
To apply the change, click:
- Apply to Selected. Only updates those objects that are checked
- Apply to All. Updates all objects on the page whether or not checked

The proposed change is shown in italics and the row is marked with the "contains edits" symbol. You can make any number of changes to any combination of cells prior to applying them. Until you apply the changes, the database is not updated.
To add an existing object to the structure, follow these steps:
If the toolbar does not include the
 button, the specific page does not support this feature.
If the page does not contain any existing rows, you can still insert a new row. For a page designed to show a flat list (that is, a list of objects that do not expand), you can add multiple new rows. For a page designed for multiple root nodes (that is, expandable lists with multiple objects at the "top" level), you can add a single new row. After entering data for the row and saving it, you can then continue to create new rows.
- If you want the object to be a child of a row, check that row. Do not check more than one row.
-
Click one of these items:
 Where the page inserts the row depends on the type of list:
 - For a flat list of objects (not a tree page), the new row is inserted at the top of the page.
- For a single root page (one expandable item at the top, called the parent), the new row is added as the first child of the parent
- For a multiple root page (a series of objects that can be expanded), the new row is added as a root node at the top of the list
 >Insert Above
 >Insert Below
For Insert Above and Insert Below, you must select a row first. The new row is inserted either above or below the selected row, at the same structured level as the selected row (that is, not a child or parent).
-
In the blank row (marked with a
 ) just added, enter search criteria for the needed object.
- Click Lookup Entries.
-
For all rows that the criteria resolves to a single database object, that object is added. For rows that did not resolve to a single database object,
 shows for that line. You can hover the cursor over the symbol to view the exact error.

The most common errors will be "No object found" and "Multiple objects found". Edit the values for any error rows, or add additional criteria, then click Lookup Entries again.
You cannot save changes to the structure (by clicking Apply) until all added rows have been resolved to a single object.
When the needed object has been found, it shows as an added row using the markup icons.

Some columns that show on the page are not used as search criteria. The value you enter may be different from the value saved in the database, but is still a match based on the other values you entered. In this case, the cell shows as though you had edited the value.
-
When finished adding rows, click Apply.
If Lookup Entries shows instead of Apply, the page did not find a unique matching object. Either remove that row, or find the object as explained above.
To create a new object within the structure, follow these steps:
If the toolbar does not include the
 button, the specific page does not support this feature.
If the page does not contain any existing rows, you can still insert a new row. For a page designed to show a flat list (that is, a list of objects that do not expand), you can add multiple new rows. For a page designed for multiple root nodes (that is, expandable lists with multiple objects at the "top" level), you can add a single new row. After entering data for the row and saving it, you can then continue to create new rows.
- If you want the new object to be a child of a row, check that row. If no rows are checked, the new row is inserted at the top of the page. Do not check more than one row.
-
Click one of these items:
 Where the page inserts the row depends on the type of list:
 - For a flat list of objects (not a tree page), the new row is inserted at the top of the page.
- For a single root page (one expandable item at the top, called the parent), the new row is added as the first child of the parent
- For a multiple root page (a series of objects that can be expanded), the new row is added as a root node at the top of the list
 >Insert Above
 >Insert Below
For Insert Above and Insert Below, you must select a row first. The new row is inserted either above or below the selected row, at the same structured level as the selected row (that is, not a child or parent).
If the object type is defined with default values for any columns, those default values are automatically added for you (you can edit them).
-
In the blank row (marked with a
 ) just added, enter the data for the new object.
-
To remove an inserted row that you do not want to keep, select the row and click
 . You cannot use this button to remove rows that you did not add using
  or
or  .
.
-
When finished adding rows, click Apply.
If you created new objects but an error occurred,
 shows for that line and an error message displays explaining the problem. For example, an error occurs if an object already exists with the same name as the one you are trying to create.
Use the Actions menu to (you may need to click Mode or Edit All to enable the Actions menu):
The menu items in the Actions menu mark the rows for the selected operation. The actual operation (cut, remove, and so on) is not executed until you click Apply.
Action Menu Item Description Undo Reverts changes to existing values on the current row. You must confirm this selection. If you made changes to child objects of the selected row, those changes are also removed. Cut Marks the selected row(s) for removal from its current location and keep in memory (for use with one of the Paste commands). You can cut multiple rows at a time. The text in the row shows crossed-out in red to indicate it is marked for removal. Copy Makes a copy of the selected rows and keep them in memory (for use with one of the Paste commands). If you select copy again, the prior copied rows are cleared from memory. Paste As Child Inserts rows cut or copied as children of the selected row. If you need to define an order for child rows, use Paste Above or Paste Below. Paste Above Inserts rows cut or copied above the selected row as child objects to the selected row's parent object. Pasted rows show in green if the row was cut or copied from a different parent object, or orange if the pasted rows were cut (not copied) from a different location in the list of that parent object. Orange indicates a resequencing of rows. Paste Below Inserts rows cut or copied below the selected row as child objects to the selected row's parent object. Pasted rows show in green if the row was cut or copied from a different parent object, or orange if the pasted rows were cut (not copied) from a different location in the list of that parent object. You cannot edit fields in a row that is marked for cutting, pasting, or deleting. You can edit relationship attributes for newly-added rows.

On a marked up structure browser, you could see any of these symbols:
 . Row is marked for deletion.
 . One or more values in the row were changed, shown as 20 10.
 . New row added. Child objects of an added row do not show this symbol unless they have also been added in this edit session. You can edit added rows (and their children).
 . Row was moved (cut and pasted) from another location in the structure for the same parent.
Click Apply Edits.
The database is updated, and the changes show in normal text.
To select multiple rows, click a check box, then shift-click another check box. Those rows and all rows between them are selected. In edit mode, the background color of selected rows does not change.
Click View All in the page Actions menu or toolbar after making changes or if you do not want to make changes.