Creating a Product Configuration | |||
| |||
In the page toolbar, select Create > Create.
The Step 1 of 2: Specify Details page appears.
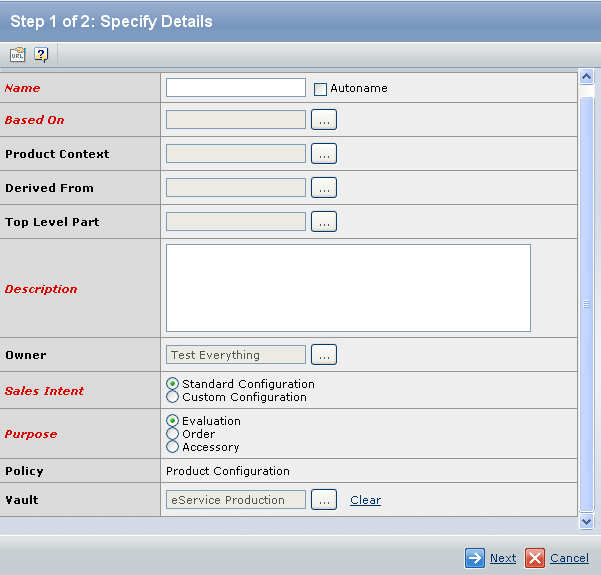
Enter details about the product configuration, including the following:
Fields in red and italics are mandatory attributes.
- Click
 corresponding to the Based On, to select the base product or feature the new product configuration.
 - Click corresponding to the Product Context, to select the contextual product or feature.
- Click corresponding to the Derived From, to select the Product Configuration from which the new Product Configuration will be derived.
- Click corresponding to the Top Level Part, to select the Top Level Part for the new Product Configuration.
- Click corresponding to the Owner, to assign an owner for the new Product Configuration.
- Click corresponding to the Vault, to specify the locations where the object will be stored in the database. You can also use the default location.
- Click
Click Next.
The Step 2 of 2: Create SKU POA page appears with all features and default options of this Product Configuration in a single table.
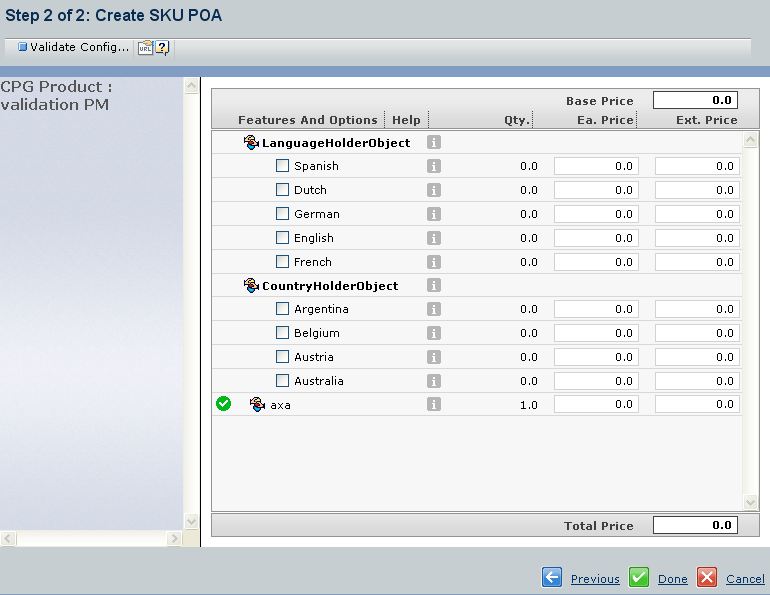
At the top of the table is the base price for the product configuration. By default, if a product configuration is selected for the Derived From column, the table consists of the available options for this product configuration.
Enter further details about the product configuration. The following can be updated using in-cell editing:
Features and Options: Select the options for each of the features.
Quantity: Type the base quantity for the selected feature or option. The default is 1.0. This will update the external price for the feature and total price of the new configuration.
Note: The Ea. Price and Ext. Price fields are not editable.
Click Validate Configuration from the Actions menu or page toolbar. If the product configuration is invalid, an error icon appears before the option that caused the validation to fail. On mouse over, the Option Conflict tool tip opens and shows the error description. Below the current error there is a list of past errors. You can edit only the current error for the feature option.
 : All selections made for the feature are valid.
 : A change has been made to a feature option. The change icon is shown if you make a selection and it is changed to an automatic selection or if a default selection is changed to an automatic selection. An automatic selection is made for a feature according to rules for that feature.
 : An invalid selection has been made for the feature. The error icon is shown if a rule for the feature has been violated due to selections made for other features in the product configuration. If a change has been made to a feature option and that feature option is also an invalid selection, only the error icon is shown.
Note:
- When you create a Product Configuration, it will be in the Preliminary state. If you open the Product Configuration in the Preliminary state, the Power View page will appear.
- When you assign the Route Templates to the Artwork Elements and Promote the Artwork Package to the Work In Process state, the state of Product Configuration will change from the Preliminary state to the Generate BOM state. If you open the Product Configuration in the Generate BOM state, the Bill Of Materials page will appear.