About PowerView Pages | ||
| ||
PowerView Page
The configurable JSP emxPortal.jsp creates PowerView pages. This JSP accepts parameters that define the content and behavior of the page. These parameters are passed to the JSP through the href URL.
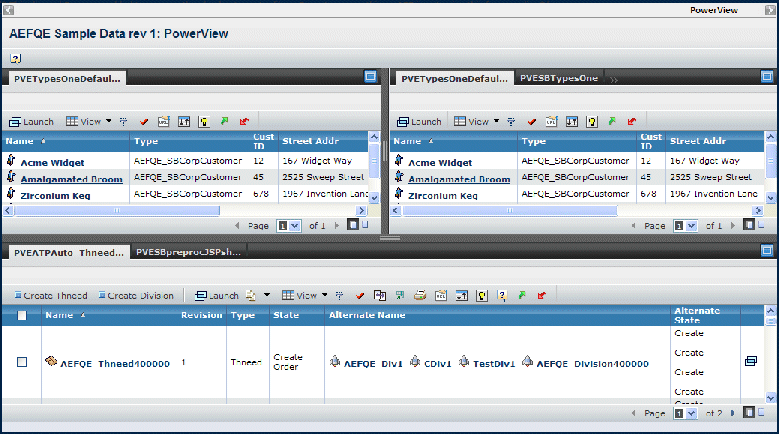
When the PowerView page is opened, each tab shows at its default size. Users can click the maximize button so that the tab takes up all the area within the PowerView page (hiding all other tabs); then the user can click the minimize button to return to the default size. The grabber between groups of tabs can be used to resize the channels as needed.
If a toolbar action within a channel targets a slide-in frame, then that channel is automatically maximized. When the slide-in window is closed, the user must minimize the channel.
![]()
PowerView Layout
PowerView pages are composed of channels and tabs. This graphic shows the main components of a PowerView page.
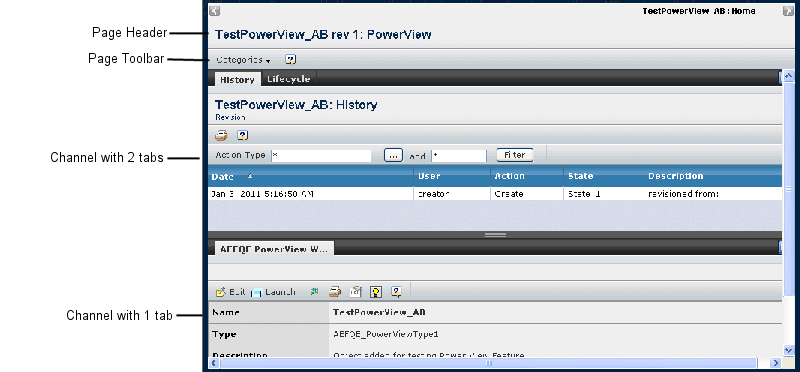
The channel tabs contain the content for users to work on or view. The tabs contain information typically displayed on an application page. Examples include: an Actions menu, a configurable table with pagination controls and filter list, a read-only or editable configurable form, a custom JSP, or any Web page.
The height of channels must be defined using percentages and the total of all channels must equal 100%. If not, emxPortal.jsp equally distributes the heights of the channels to equal 100%. the width cannot be specified; it is automatically equally distributed using the available area. If the browser window is resized, the heights and widths are resized proportionally.
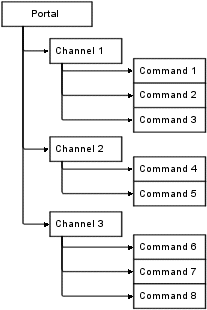
This graphic shows the administrative objects required to define a PowerView page. The main components of the PowerView page are defined as portal, channel, and command administrative objects. The names of the top-level PowerView portal object and the toolbar menu object (not shown below) are passed to the emxPortal.jsp through its URL parameters.
The above administrative objects would create a PowerView page like the one shown below.
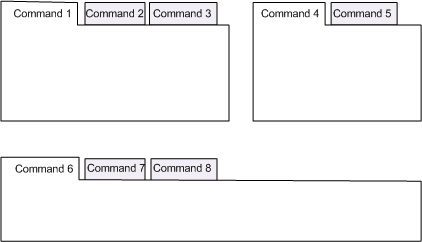
You need a portal administrative object for each unique PowerView page and one or more channel administrative objects for each unique portal. You can assign channel administrative objects to more than one portal object.
A form field or column can use the Target Location = command name setting, where the command name is a defined tab, so that when clicked, that specified tab is loaded into the PowerView.
![]()
Channel Layout
A channel can contain one or more tabs. There is no limit for the number of channels that you can display in a row or on a single PowerView page, but displaying more than 2 channels in a row or more than 3 rows can make the page difficult to use. You cannot add a multiple page wizard as a channel. The Portal component does not support multiple page commands.
The row a channel appears in is determined by how it is assigned to the portal object. If you are using Business Modeler to create portal objects, channels can be arranged in the Items tab to reflect how they will appear on the page. In MQL, use the Channel clause of the Create Portal or Modify Portal command to arrange the channels. See the Business Modeler Guideor MQL Guide for details.
For example, channels can appear one below the other, or they can be grouped to appear side by side.
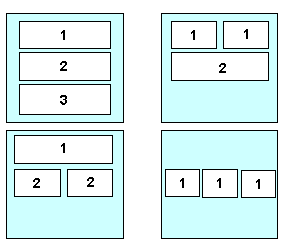
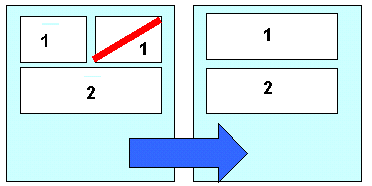
The PowerView page automatically compensates if the user does not have access to any of the tabs in the channel by hiding the channel and rearranging the display of channels. For example, if the user does not have access to the second channel in the first row, as shown in the left of the figure below, the layout shown on the right displays instead.
Displaying table or structure browser components in half page-width channels typically causes the user to scroll horizontally to the view all columns in the table, but you can create an alternate table with fewer columns for display specifically within a channel tab. See URL Parameters Accepted by emxTable.jsp and emxTableEdit.jsp.
![]()
Tab Layout
The tabs within channels contain the actual content to be viewed or worked on. The display order of the tabs within a channel is determined by the order you add the tab commands to the channel object.
You can display up to 4 tabs on a full, page-width channel and 2 tabs for half page-width channels. For channels with more tabs, the system displays a small arrow tab. This tab provides a drop-down menu of the remaining tabs. When the user selects one of the items in the drop-down menu, the system replaces the currently-selected tab with the newly-selected tab. The system puts the previous selection in the drop-down menu.
This graphic shows a channel that has 3 tabs. The 3rd tab is accessed using the >> drop-down menu. When the 3rd tab is selected...
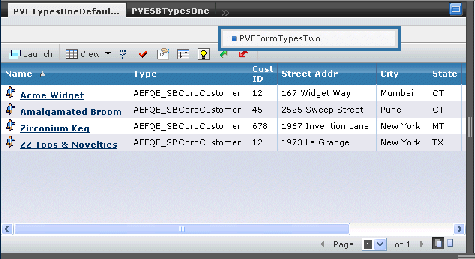
...it replaces the previously-selected tab. The previously-selected tab is then listed in the >> drop-down menu.

![]()
Application Link to the PowerView Page
The PowerView component allows you to link it to an application as a desktop or object PowerView.
ENOVIA Business Process Services installs the portal administrative object called AEFPowerView, and the first channel of the Desktop PowerView page, called AEFPowerViewChannel. To add to that channel, use the command called AEFCollections. Each installed ENOVIA product can add channel objects to this object to define channels appropriate for that application. For example, Sourcing Central might add a channel that contains tabs for collections, RFQs, and Buyer Desks. You can configure the channels and tabs assigned to AEFPowerView as needed but this object must be used for the Desktop PowerView.
Users typically access the Desktop PowerView page by clicking from the global toolbar or by clicking the Home tool from the global toolbar (if the Home page preference is set to PowerView). The component that calls the Desktop PowerView page must specify the configurable JSP for PowerView pages, emxPortal.jsp, in the href parameter. The href must include a parameter that specifies AEFPowerView. Make sure the href includes any other parameters needed to configure the page, such as a toolbar menu object, as described in Parameters and Settings for Portal Objects.
The order in which the channel objects are assigned to the portal object determines the order in which the channels display on the PowerView page. For example, the channels added for the first ENOVIA product installed listed first on the Desktop PowerView page, the channels for the second application installed are listed next and so on. To change the display order you must change the order in which they are assigned to the portal object.
For example, when entered in the href parameter for an appropriate command administrative object, the following URL creates a PowerView page:
${COMMON_DIR}/
emxPortal.jsp?portal=AEFPowerView&toolbar=AEFPowerViewToolbar&H
elpMarker=HelpMarker&header=PowerView
You can also link to an object PowerView.
Users typically access the PowerView page for an object type by clicking an object name from a table or by searching for a specific object. For example, in Engineering Central, clicking the name of an ECO from a table or search results displays the ECO PowerView page for that object.
The component that calls the object PowerView page must specify the configurable JSP for PowerView pages, emxPortal.jsp, in the href parameter. For example, when entered in the href parameter for an appropriate command administrative object, the following URL creates a PowerView page:
${COMMON_DIR}/
emxPortal.jsp?portal=SPCSCOPortal&toolbar=SPCSCOToolbar&header=
SummaryView&HelpMarker=emxhelpscosummary
![]()
Portal Mode
When users access the PowerView page, the system displays the data in portal mode where the page is divided into separate channels and each channel has separate display data associated with it.
Every page configured inside the PowerView includes the parameter portalMode=true, so that the page can read this request parameter and behave differently if required.
When a configurable table page is used in one of the PowerView channel tabs, the portal may display an alternate table instead of the regular table to conserve space. This alternate table can contain fewer columns than the regular table. You can pass the names of both the alternate table and the regular table as parameters when generating the PowerView page. The alternate table name is passed into the command href as portaltable=PORTAL_TABLE_NAME. So if you pass both the portalMode is true and the portaltable parameter, the channel displays using the alternate table.
![]()
PowerView Launch Maximize
In many cases, the tabs shown on the PowerView page correspond to pages opened using the Categories menu. You can configure the PowerView tab to conserve screen space so that the it contains a subset of columns from the Category page.
The system provides a Launch button to launch the currently displayed channel tab in a maximized popup window that contains all the columns for the item. When a user clicks the Launch button, it passes the parameters launched=true and portalMode=false to the new window. The portalMode value must be read from the Request Object.
The Launch button is available in all the channels of the PowerView page regardless of whether the channel is a configurable table, configurable web form, or custom JSP.
When the user clicks on an object name hyperlink in the launched popup window, the page for that object opens in another popup window. Any edit operations performed in that page are reflected in the same popup after refresh. Neither the launched window nor the parent PowerView page are refreshed. As a general guideline, any update that happens in the application refreshes only the page in the first level.
In the normal summary page, if the user deletes an object, the system refreshes the summary page. In the portal view page, if the user deletes any object, the system refreshes only the summary page inside the channel. When the user deletes any object in the launched popup window, the system refreshes only that page. It does not refresh the PowerView page.
To force an update of the launched pop up window, you need to pass the Target Location setting on the command:
Target Location = formViewHidden
For example in the custom JSP that the command points to, use the following code to reload the page.
parent.document.location.href = parent.document.location.href
![]()
Details Channel
You can configure a master channel and a details channel. The tabs in the master channel could contain table or form pages that when you click a object defined with an href, the details channel is updated depending on the clicked object.
All the data in all tabs in the details channel pertain to the selected object in the master channel. In this example, when a user clicks a name in the Line Items tab, the tabs at the bottom of the PowerView are updated with the details for that line item.
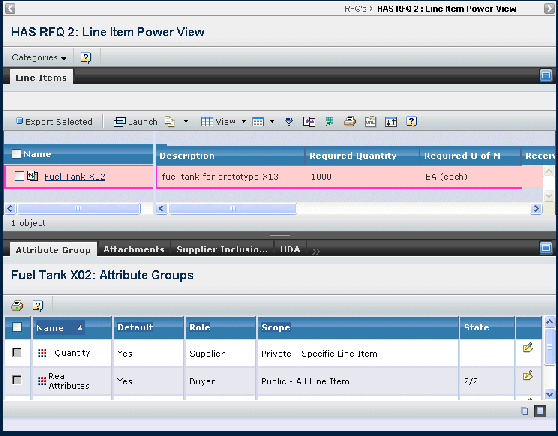
To create master/details channels, you would (in addition to defining the actual contents (form or tables) for each tab and the steps in Building and Linking a PowerView Page):
- Define a column in a tab in the master channel with:
href=emxRefreshChannel.jsp?channel=NameofDetailsChannel
- Define the details channel with a single dynamic command.
- When the PowerView is initially loaded (no object selected in the master channel), the details channel is empty. On initial load, the refresh flag is not passed and the JPO does not return any dynamic commands without that flag.
- When object in master channel is clicked, pass the JPO method for the dynamic command with the objectId and the refresh flag. The JPO returns the required dynamic commands for the selected objectId.