Running a Search | ||||||
|
| |||||
To search for an object, do one of the following:
- From
the global toolbar, click the Search icon
 .
. - From
the global toolbar, click the down arrow next to the Search icon
 , then select the type of object you are interested in searching for under the Variant Configuration section heading (for example, Manufacturing Features).
 - Click
 next to the field in the page where you need to search for objects.
 - From the page Actions menu or page toolbar, click Add Existing, if you are adding an existing object to a list of objects.

Note: You can click Reset at any time to clear all criteria fields.
- From
the global toolbar, click the Search icon
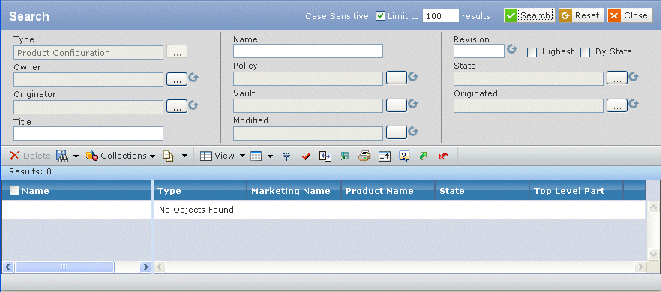
Enter criteria as needed; you can use wildcards and enter multiple values (separated by commas or line breaks) in any text field. Depending on your installation setup, you may see additional or fewer fields:
Field Description Type Enter or click  to select the object type. If you change the type, the values available for the Policy field are updated to list only those policies that support the selected type. See also Selecting a Type.
Name Enter the name of the object. Revision Enter a specific revision level, or: - Check Highest to search for the most current revision of the object.
- Check By State to search for revisions in a specific lifecycle state.
Owner Enter or click  to select the name of the user who owns
the object.
to select the name of the user who owns
the object.Policy Enter, or click  to select, a policy. Not all types support more than one policy. Select the needed policy, and
click
  .
If you change the policy, the values available
for the Current field are updated to list the states in the selected
policy.
.
If you change the policy, the values available
for the Current field are updated to list the states in the selected
policy.State Click  to restrict the search
to objects in a specific lifecycle state. Select the needed state, then click
  .
.Originator Enter the name of the user who created the object. Vault Click  to specify the vault
in which to search. See also Selecting a Vault.
to specify the vault
in which to search. See also Selecting a Vault.Originated To search for objects created within a specified time frame. Title Enter the title of the object (may be different from the name). Modified Click  to search for objects
modified within a specific date range. This field works the same as Originated.
to search for objects
modified within a specific date range. This field works the same as Originated.Check the Case Sensitive check box to limit the search results to case-sensitive matches.
Use the Limit to to text box to specify how many items should be shown in the search results. For example, if you limit the results to 50, the system will get only the first 50 items from the database that match your criteria. The maximum is by default 1000, but may vary depending on your installation setup.
Click Search.
The bottom of the page displays the results that meet your criteria. For each object that matches the search criteria, the results list these details:
Column Description Display Name The display name of the object. Name The name of the object. Type The object type. Revision The revision level of the object. Parent Configuration Feature The parent configuration feature. Note: This column appears only for objects of type Configuration Feature or Configuration Option.
Owner The name of the user who owns the object. State The lifecycle state of the object. Policy The object policy. Not all types support more than one policy. Originator Enter the name of the user who created the object. Vault The vault in which the object is stored. Originated The time frame during which the object was created. Part Family The GBOM part family to which the object belongs. Note: This column appears only for objects of type Logical Feature or Manufacturing Feature.
To delete one or more objects from the search results, check the desired items and then click
 Delete in the page toolbar. This option is available only if you clicked directly on the Search icon (not the down arrow next to the Search icon, which allows you to select an object type) from the global toolbar.
To save the search criteria, including the Type and Attribute selections:
-
Click
 Saved Queries > Save As.
- Enter a name for the search, or select an existing search to overwrite it.
- Click Done.
-
Click
To re-execute a saved search, click
 and click the name of the search.
To add selected items to a collection, click Collections, and then click:
- Add to Clipboard Collection--Adds the items to your clipboard collection.
- New / Add to Collections--Opens the Select Collection form.
See Working with Collections for more information.