Running an Indexed Search (Navigation Mode) | |||||||
|
| ||||||
Click Search > Product Line from the global toolbar.
- Click
 next to the field in the page where you need to search for objects.
 - If you are adding an existing object to the a list of objects, click Add Existing from the page Actions menu or page toolbar.
If you are accessing the search page from an ellipses button or Add Existing command, the search page opens showing search results in the right part of the page appropriate to the action you want to perform.
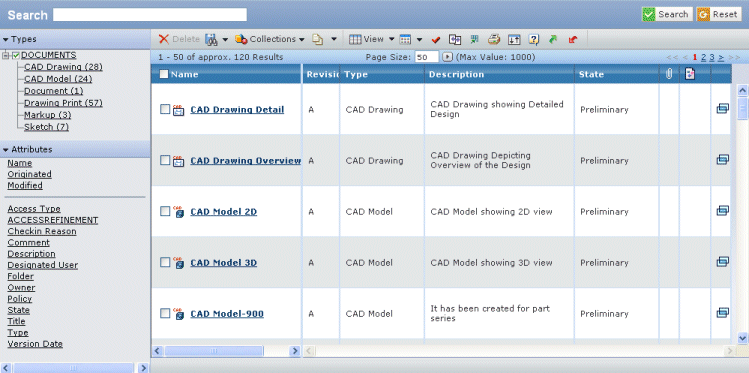
The page loads all objects that you can search. Depending on where you initiated the search, the page may have criteria (types and attribute values) that you cannot change. The Results value shows the number of objects found. The value may display like this: Results: 1000 of 89076.
If so, your system is configured to limit the number of objects returned. The total count (89076 in this example) is a predicted estimate. By using a prediction instead of an exact count, the results page loads faster.
Note: If you print or export this page, only the results list is included; the Type, Library, and Attribute list is not included.
For each object, this page lists:
Name. The object's name.
Rev. The revision of the object.
Type. The object type, such as Part or Model.
Description. The object's description.
State. The current lifecycle state for the object.
 . Shows this icon if files are checked into or connected to the object. See "Quick File Access" in the Common Components Help.
 . Shows the primary image for that object, if defined. See "Image Management" in the Common Components Help.
 . Opens a window showing the Properties page for that object.
- Click
To filter the result list based on object type:
If your system includes ENOVIA Library Central, your page may show a Library list below the Types list. Selecting libraries works the same way as selecting types.
- Click a type name in the Types list. The Type list is updated to show only the selected type and its children, and the result list is updated to show only objects with that type. Selecting a type is the same as searching for that specific type.
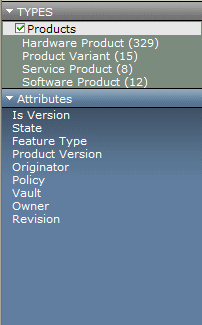
For example, if you click on Products, types that are not Products or children of Products are removed from the list. If you then click on Hardware Product, the list removes all other children types of Products. The check box shows your choices.
- Click a type name in the Types list. The Type list is updated to show only the selected type and its children, and the result list is updated to show only objects with that type. Selecting a type is the same as searching for that specific type.
To filter the results list based on attribute values:
- Click an Attribute name.
If the attribute allows text input, a box opens where you type the needed value. Also, if the attribute contains a numeric value, select a compare operator (== is equals, > is greater than, < is less than) and enter a value.
If the attribute contains a range of values, a list box of values for that attribute pops open and you can click the needed value(s)

Some attributes allow you to select more than one value. Use shift-click to select a range of values; use control-click to select individual values.
If the attribute contains numbers or dates (and there are many values) you can select Before, After, In Between, or Equals a specified value. Use the calendar tool to enter date values. If there are fewer than a system-set value (the default is 10), the values show as a list.
If the attribute contains yes/no values, click the option button for Yes or No.
If the attribute includes a unit of measure, enter a value and select the units.
- Click
 . The results are filtered based on objects that have that value for that attribute.
- Click an Attribute name.
To search for specific text in any attribute of an object:
- If you see a "Did You Mean?" message, the search tool has found one or more terms that are close to but more common than the one you entered. Click a word or phrase to search for it.
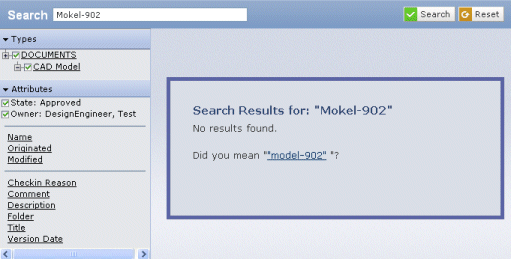
The results section is updated to show objects that contain that text as any attribute value. Note that the search is not case-sensitive and includes in the results all matches based on pieces of the given string. Non-alphanumeric characters are not recognized by the search engine.
- If you see a "Did You Mean?" message, the search tool has found one or more terms that are close to but more common than the one you entered. Click a word or phrase to search for it.
To save the search criteria, including the Type and Attribute selections:
-
Click
 > Save As.
- Enter a name for the search, or select an existing search to overwrite it.
- Click Done.
-
Click
To re-execute a saved search, click
and click the name of the search.