Creating a WBS Task from Scratch | ||
| ||
From the Work Breakdown Structure page, click Edit from the Actions menu or page toolbar.
For a project template, the Edit WBS page opens. For a project or task, the page toggles to Edit mode.
If the task you want to add a task under isn't visible, use the page expand or filter tools to display it.
To add or insert tasks and their calendars, select the needed option from the page Actions menu or toolbar:
Insert Task Above. Adds a task on the same level as the selected task, as a sibling task.
Add Subtask Below. Adds a child task to the selected task.
If you are not a Project Lead, you can only add subtasks to your assigned tasks. You cannot add siblings for your assigned tasks.

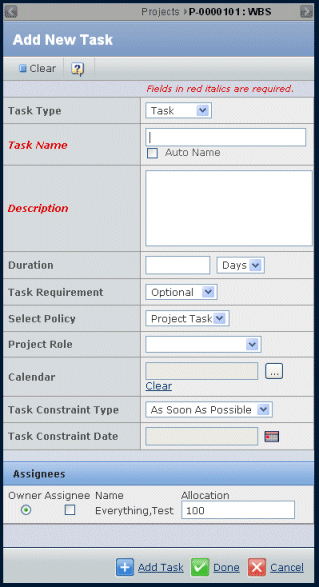
Enter these details for the task:
Task Type. Select the type from the drop-down list. You can choose Task, Phase, Gate, or Milestone.
If you are using the VPLM Program Management Integration, you can choose VPLM Task.
Task Name. The name of the task, which must be unique and limited to 127 alphanumeric characters. Click Autoname to have the system assign the task name.
Description. A brief description of the task. Must be alphanumeric characters.
Duration. An estimate of the task length. The Duration must be less than 10000 days. Enter a number (can include a decimal value) and select units, days or hours, from the drop-down list. If a Duration Keyword is specified, the value for the Duration is populated with the default duration value defined with the keyword.
Task Requirement. Indicate whether this is an optional or mandatory task. The system's default behavior requires all tasks, even optional ones, to be completed before the project can be completed.
Select Policy. Select from the policy for the selected task type. Date and Milestone task types are governed by the Project Review or Project Task policy. If you are using the VPLM Program Management Integration, and have selected a VPLM Task Type, choose a policy specific to VPLM tasks.
Project Role. From the list of existing project roles, choose the role responsible for completing this task. Project members having that role display in the Assignees list below. When the page initially loads, the Project Role pull-down will be blank by default and all the members of the current project are listed in the Assignees column. When a project is created from a project template, the project roles will also be copied from the template WBS tasks to that of the created projects.
Calendar. You can select the work calendar defined for the company for which the project is created. You can also select a calendar from another company as well.
Scheduling of tasks is based on calendars that are attached to WBS tasks when calculating project start and end dates. If there are not any calendars attached to the WBS task, then the current calendar is used to determine non-working days.
Task Constraint Type. The type of constraint for this task, which specifies when the task should be completed within the project.
For non-summary tasks, values can be "As Late as Possible", "As Soon as Possible", "Start No Earlier Than", "Finish No Earlier Than", "Start No Later Than", "Finish No Later Than", "Must Finish On", or "Must Start On".
For summary tasks, values depend upon whether the project schedule is from the start date or finish date.
Task Constraint Date. Constraint Types other than "As Soon as Possible" or "As Late as Possible" have a constraint date.
Duration Keyword. This field displays only if the project has duration keywords defined. Keywords for WBS tasks and all duration values are configurable settings in projects. See About Duration Keywords.
VPLM Action Type. This field is available and required only if VPLM Task is selected as the Task Type when using the VPLM Program Management Integration. It represents the type of VPLM action to create.
VPLM Instance. This field is available and required only if VPLM Task is selected as the Task Type when using the VPLM Program Management Integration. It identifies the external vault that represents the specific VPLM instance where the Action is to be created.
Assignees. The Assignees list is displayed only when inserting/adding tasks for a Project Space or Project Concept. From the list of potential assignees for the task, based on the Project Role selected, set these items:
- Owner. Check the radio button if you want to make the task assignee the owner of the task. Only one assignee can be the owner. If you do not choose this option, you will become the owner but you will not be included in the assignees list.
- Assignee. From the list of persons in the project role selected, choose the person(s) you want to assign this task to. You do not have to assign the task now. After creating the task, an assignee from outside the project can be added.
- Name. The name of the assignee is displayed.
- Task Allocation. The percentage of that person's time allocated for completing the task allocated to the assignee.
To add another task at the same level in the structure, click Add Task from the Actions menu or page toolbar.
A message displays at the bottom of the page telling you that the task has been created. The information you entered for the task remains so you only need to edit the information that needs to change to add the second task. If the new task has very different information, click Clear to clear the previous task's information.
Repeat this to add as many tasks as you wish. Each new task is added relative to the selected task. Each task name must be unique.
Click Done.