Viewing and Editing the Project Template WBS | |||
| |||
Click the Name of the needed template.

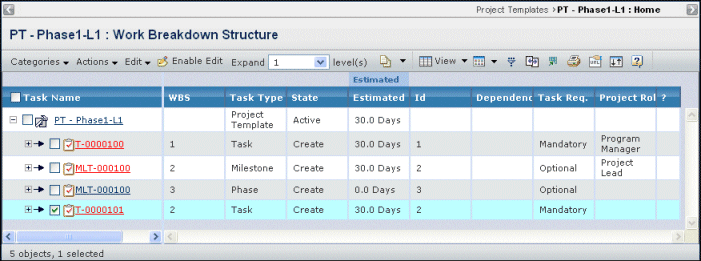
For each task, this page lists these details:
Task Name. The name of the task. Click to view the WBS for that task in a new window.
WBS. The task's order in the hierarchy. Integers represent top level tasks. Second level tasks have one decimal, third level tasks have two decimals, and so on.
Task Type. The type is Task for all tasks and subtasks. Your system may be set up with additional task types.
State. The lifecycle state of the task.
Estimated Duration. The duration estimate for the task, which is expressed in days or hours. If a Duration Keyword is entered from Actions, this field is populated with an estimate based on the entered keyword.
Id. An integer that represents the task for the purposes of identifying dependencies. Unlike the WBS number, the ID does not represent the task's level in the hierarchy. Because it's an integer, the ID is a more concise way to identify the tasks.
Dependency. Lists any dependencies defined for the task. The dependencies are abbreviated using this convention:
Task ID: [Dependency Type] [Number of Slack Days, if any]
For more details about dependencies and the syntax, see About Task Dependencies.
Task Req. Whether the task is Optional or Mandatory.
Project Role. The project role that is assigned to the task.
?. The red check mark shows if this task is associated with a question. Click to view the Properties page for the question. See Viewing Question Properties.
To see the subtasks for a task, click the
 next to the task. To contract a list of subtasks, click
 . next to the parent task.
To edit cells in the WBS (for more details, see Editing the Template WBS.):
-
Click Enable Edit on the page toolbar.
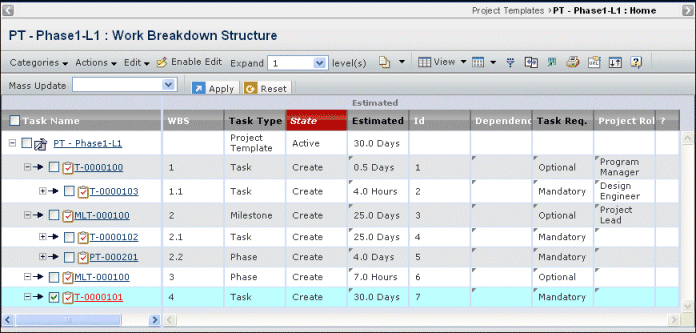
While editing, ENOVIA Program Central visually displays the proposed changes but does not make those changes until you click Apply. On a marked up WBS, you could see any of these symbols:
 . Row has been cut using the Edit menu.
 . Row was added using a Paste option in the Edit menu. Tasks added using the Actions
menu do not show this symbol.
 . One or more values in the row were changed, shown as 20 d 30 d.
 . Row was moved (cut and pasted) from another location in the structure for the same
parent.

This page is also used to show the WBS for a specific task (and its subtasks).
The red triangle indicates which cells are editable and the Edit menu becomes active.
-
To edit a cell, click the cell and change the value. Depending on the type of data, you can edit
the cell:
- Select an option from a drop-down list.
- Type a new value.
- Click
 to open a chooser window.
- For a dependency, type the value (can be a comma-separated list) following the syntax defined in About Task Dependencies.
-
To update the Estimated Duration for multiple rows:
- Select the column name from the Mass Update drop-down list in the page toolbar.
- Type the new value and select days or hours, in the data entry box.
- To apply the value to one or more selected cells, click the check boxes for the tasks/ subtasks in the left pane, and then click Apply to Selected.
- To apply the value to all cells, click Apply to All.
- Click Apply, or to reset cells back to their original values without making changes, click Reset.
-
Use the Edit menu to work with tasks:
Undo. Reverts changes to existing values on the selected row; click OK to confirm.
Cut. Mark the selected tasks for removal from the current location and keep in memory (for use with one of the Paste commands). You can cut multiple rows at a time. The text in the row shows crossed-out in red to indicate it is marked for removal.
Paste As Child. Inserts rows cut or copied as children of the selected row. If you need to define an order for child rows, use Paste Above.
Paste Above. Insert rows cut or copied above the selected row as child objects to the selected row's parent object. Pasted rows show in green if the row was cut or copied from a different parent object, or orange if the pasted rows were cut (not copied) from a different location in the list of that parent object. Orange indicates a resequencing of rows.
- To exit Edit mode, click Disable Edit.
-
Click Enable Edit on the page toolbar.
Use the page Actions menu or toolbar to work with the tasks:
Duration Keywords. A keyword which specifies the duration for the task. The default WBS view of a template does not show the Duration Keyword column unless the project has duration keywords defined. For more information about keywords, see Working With Duration Keywords.
Insert Task Above. Adds a task on the same level as the selected task as a sibling task. See Creating a WBS Task from Scratch.
Add Subtask Below. Adds a child task to the selected task. See Creating a WBS Task from Scratch.
Copy WBS to Selected Task. Copies an existing WBS to the selected task. You then select and import the WBS. Not available in Baseline View. See Creating WBS Tasks by Copying from Another Project.
Create Question. Creates a question that defines whether this task is added to a project. See Creating and Assigning a Question in the WBS.
Add/Remove Selected Dependency. Opens the Dependencies page where you can define the dependencies (adding, removing, updating). See Adding a Dependency for a WBS Task.
Delete Selected. Deletes the selected tasks, click OK to confirm.