Importing from MS Excel | |||
| |||
From the Requirement Capture toolbar, click
 (Import).
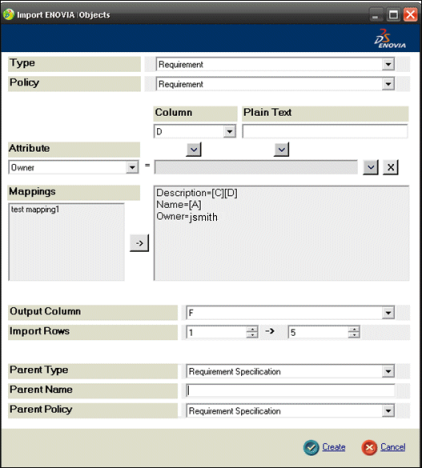
Use the following fields to specify the import from Excel:
Type. The type of object to create. By default, Requirement types and all their sub-types are available.
Policy. Based on the Type selection, the Policy drop-down displays the corresponding policies to allow you to select the policy to apply for the created objects.
Attribute. A drop-down list of attributes that correspond to the Type that was selected. You use the Attribute field along with the Column and Plain Text fields.
Column. Once the attribute selection is done, you must now map a column in the Excel spreadsheet where the attribute value(s) is defined. You can later select the range of rows where the data is located, so that the Attribute value is taken from a cell (row, column) in the spreadsheet.
Click the Column drop-down button to select the column that will map to the attribute value. Once selected, click the
 button to add this information to the gray field below.
This gray field is a placeholder field that is used to append multiple
column values together to make up the attribute value. The gray field
cannot be edited manually.
button to add this information to the gray field below.
This gray field is a placeholder field that is used to append multiple
column values together to make up the attribute value. The gray field
cannot be edited manually.
If the mapping is final, you can select the
button to add this to the mapping list, or if you want
to start over, you can clear the selection with the
 button.
Plain Text. This field allows you to add static strings to the attribute value. You can type plain text here and click the
button to add it to the gray field below. Below are
some examples of using this field:
- If you want to import the same string value to a particular attribute, you do not need to add the same string value in multiple cells and then map the column to the attribute name; instead you just this value in the Plain Text field and create the attribute name-value mapping.
- If you want to append, prepend, or add a static string to the text value that comes from the Excel column (and row), you could do that here. Let's say you want to prepend the static string "Created By" followed by a text in a particular column: you could just type "Created By" in the Plain Text field, followed by an Excel column mapping, which adds both of them in the correct order to the gray field below.
- If you want to append values in the cells of two or more columns but want to have a separator between the values, you could use the Plain Text field to create the separator text.
Mappings. Once the attribute name-value mapping is complete, you can select the
 button to add the mapping to the list area below.

This mapping list is used during the Import process. It can be cleared by clicking the right mouse button and then selecting Clear.
Below are the right mouse button commands that are available in this area:
Multiple attribute name-value mappings can be created. Once this mapping set is complete, you can start importing data from a selected range of rows.
Output Column. Allows Excel integration to output the success or failure status after the import process. You can select an empty column in the Excel spreadsheet where the status of creation will be shown for each object (row data).
An example of how this column might look like after an import is shown below.
Shown in green are the cases where create succeeded. A URL link to the newly created object is displayed, so you can directly launch the Properties view of the object in Requirements Central from MS Excel. Failure cases are shown in red with an appropriate error message.
Import Rows (Start and End). After the attribute mapping is completed, you can select the Start and End rows in the Excel spreadsheet that will be used to import data.

Parent Type, Parent Name, Parent Policy. If you need to associate the imported Requirements to a root context such as Requirement Specification, you can create a new Requirement Specification by specifying Parent Type, Parent Name, and Parent Policy information.

If no name is entered, the Requirement Specification will be autonamed.
The allowed parent type is specified in the emxRequirement.properties file.