Changing Requirement Capture Settings | |||
| |||
From the Requirement Capture toolbar, click
 (Settings).
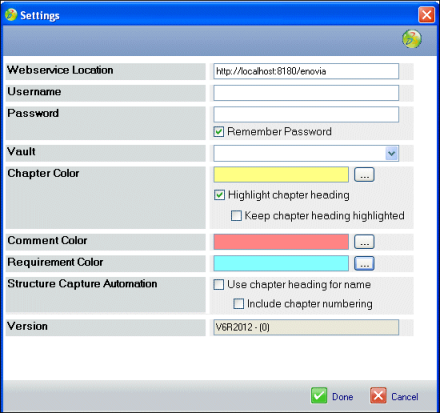
Change any of these Settings page fields:
Webservice Location. Type the URL for your Requirements Central application.
Username. Type the user identifier for the Requirements Central application.
Password. Type the user password for the Requirements Central application.
Remember Password. Click to have the system save the password.
Vault. Select the database location to which specifications are stored. Leave this field blank to use the default vault.
Chapter Color. Click
 to change the background
color for Chapter text selections.
to change the background
color for Chapter text selections.
Highlight chapter heading. Click to have MS Word highlight topic headings in structure view using default highlight color.
keep chapter heading highlighted. Click to have MS Word retain highlighting whether background color is toggled on or off.
Comment Color. Click
to change the background
color for Comment text selections.
Requirement Color. Click
to change the background
color for Requirement text selections.
Use chapter heading for name. Click to use highlighted structure topics as Chapter names during structure capture. Default is to have the system autoname Chapters.
Include chapter numbering. Click to include numbering with the Chapter name. Default is to exclude numbering.
Version. Shows the current version number of Requirements Central.