Working with Saved Searches

If you performed a search and saved the search criteria, you can use the Saved Searches option to recall the search criteria.

For details on saving searches, see:


Before you begin: You must have previously defined and saved a search. See Working with Saved Searches.
  1. From the global toolbar, click > Saved Searches.

    Or

    From any traditional search page, Search Types > Saved Searches. The Saved Searches page opens.

    The traditional search pages (not indexed or combined criteria/results search pages) used in some ENOVIA products include Search Types, Save, and Save As on the page toolbar.
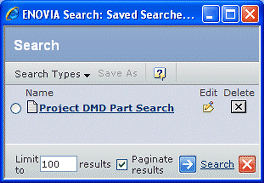


    The page shows a table of saved searches with following columns:

    Name. Click any name to run the search, or click the button in front of the search name and click Search.

    Edit. Click to edit the search criteria for the saved search. A search page opens, appropriate to the content of the saved search.

    Delete. Click to delete the saved search from the database.

  2. Specify result options:

    1. Use the Limit to text box to specify how many items should be shown in the search results. For example, if you limit the results to 50, the system will get only the first 50 items from the database that match your criteria. The maximum is by default 1000, but may vary depending on your installation setup.
    2. Click Paginate results to show the results with a limited number of items per page, based on your defined pagination preference.

  3. If you do not see an appropriate saved search, click Search Types > Saved Searches from the page toolbar and select the type of search you want.

    The Search Types menu and page toolbar on the Saved Searches page is also used for traditional search pages; the Save and Save As items have no effect if used here.

  4. Click the name of the saved search and the Search Results page opens. The search results page that opens depends on the type of page the search was saved from: