Defining a Person | |||
| |||
In the page toolbar, click Categories > People.
From the page toolbar, click Actions > Create New.
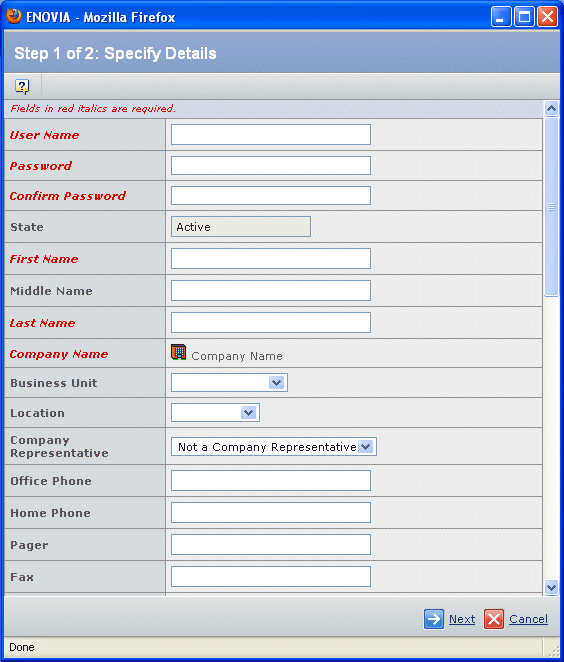
Enter the information for the person:
Field Name Description User Name Login that the person will use to access the application(s). Use the standard naming convention for your company. For example, you may want to use the first letter of the person's first name followed by the last name (gwashington) or the first name followed by a period and then the last name (george.washington). Usernames are case-sensitive. Password/Confirm Password Type the Password that the person will use to access the application(s). The password is case-sensitive. Type the same password in the Confirm Password text box. First Name The person's first name. Middle Name The person's middle name or initial. Last Name The person's last name. Business Unit Select a Business Unit from the drop-down list. Location Select a Location from the drop-down list. In Program Central, the person will use the calendar for this location. Company Representative Specify the Company Representative status, if applicable.
- Not a Company Representative
- For the Selected Company
- For the Selected Business Unit
A representative for the company has full administrative rights except for assigning the role of Organization Manager. A representative is given the most menu choices for working with company information.
Office Phone Telephone number where person can be reached at work. Home Phone Home telephone number. Pager Pager number. Fax Fax number. Email Address Add the person's Email Address. This address appears on the People page and provides a direct link from that page to create a new email message for the person. Your system must be set up with SMTP to use email for notifications.
System Generated Mail Preference Select the language to use when sending system-generated emails. Web Site Add the URL for the person's web site. Login Type Choose Secure ID or Standard. Host Meetings Choose whether or not the person can host an online meeting. Meeting Username Type the person's username for meetings. Can be different than the username for logging in. Meeting Password Type the person's password for meetings. Address Street address. City City State/Region State or region. Postal Code Zip code, or other postal code. Country USA, or other country name. Absence Start Date Usually entered by the person when they will be out of the office. Select a start date from the calendar. Absence End Date Select an end date from the calendar. Absence Delegate Choose the person to act in this person's behalf during an absence. Vault If you want to use a Vault other than the default, select one from the drop-down list to specify where the person will access database objects. This field is displayed only if more than one vault is available to the context user. Site Choose a site from the drop-down list. JT Viewer Preference Choose a viewer application from the drop-down list. Date Format Choose format used to display dates to the person from the drop-down list. List Separator Choose None, comma, or semi-colon from the drop-down list. Mail Code Enter any internal mail code for the person. Title Enter the person's title, which may be their job title. Click Next. See Assigning Roles to a Person When Creating the User.