Setting Up Task Due Date Notifications

The owner of a route or workspace can have the system notify people as task due dates approach and the tasks have not yet been completed. The owner can choose to notify task assignees, route owners, and/or workspace leads and can specify when these notifications should be sent. People receive notifications in IconMail and email. These settings apply to all routes for the workspace and all of its folders. For other ENOVIA products, these settings apply to the route they were created on.

The system indicates that tasks are late by changing the task status from green to red if the assignee does not complete it by the due date. When at least one task is late, the route's status changes from green to yellow. If the last task in the route is overdue, the route status changes to red.

A timer servlet allows you to set the interval at which the system checks to send task due notifications. For more information on the timer servlet, see "Configuring Task Alerts" in the Business Process Services Administrator's Guide.


Before you begin: Access a Routes list or the Properties page for a specific route. For details, see Routes Page or Route Properties Page.
  1. From the page Actions menu or toolbar, click Set Task Escalation.


  2. Check the group(s) of people you want to send notifications to.

    The Task Assignees include anyone who is currently the task assignee, which could be the original assignee or a delegate. The Project Lead(s) include the workspace owner and all Workspace Leads and project owners (for Program Central only).

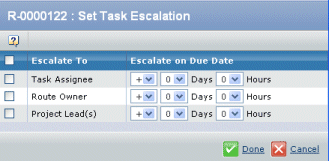
  3. Choose the notification times and dates:

    Accept the default notification time and date for all checked groups. The default is the exact due date and time for the task (0 hours and days from the due date/time).

    Or

    Define the relative time before or after the task due date/time that the notifications should be sent, use the Escalate on Due Date drop-down lists.


    • Use the first list to indicate if the time should be added (+) or subtracted (-) from the due date/time.
    • Use the Days list to choose the number of days to add or subtract from the due date.
    • Use the Hours list to choose the number of hours to add or subtract from the due time.

    For example, suppose you want to notify task assignees 2 days before the task due date; route owners, 6 hours before; and Project Leads, 1 day after. You would fill in the page so it looks like this:

       Task Assignee    - 2 Days 0 Hours
    
       Route Owner      - 0 Days 6 Hours
    
       Project Lead     + 1 Days 0 Hours
    

    The host company configures how frequently the system should check the task due dates. Depending on the specified frequency, the notifications may be later than the time offset established. For example, if the system only checks every two hours, the notifications could be as much as two hours later than the time set here.

  4. Click Done.