Creating a Quantity Rule | |||
| |||
To create a new quantity rule, do one of the following:
- From the page Actions menu or page toolbar, click Create .
- To edit an existing quantity rule, click
 at the end of the row for the rule you want to edit.
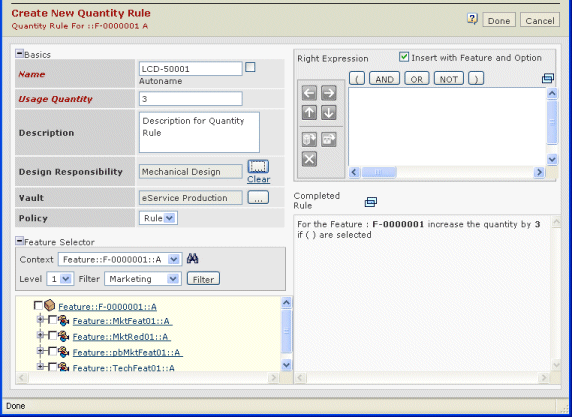
The Create New Quantity Rule page opens.

Type details as necessary. The following can be defined:
Name. Type the name of the new quantity rule or check Autoname for the system to assign a name automatically.
Usage Quantity. Type a numerical value for the usage amount. This number is inserted into the completed rule, indicating the amount to increase the quantity dependent on the rule.
Description. Type details that describe the rule
Design Responsibility. Click
 to assign the organization
or project that has design responsibility for the rule. By default, the
design responsibility is populated with the design responsibility associated
with the feature in context. See Assigning Design Responsibility.
to assign the organization
or project that has design responsibility for the rule. By default, the
design responsibility is populated with the design responsibility associated
with the feature in context. See Assigning Design Responsibility.Vault. Click
 to select a different vault than the default to specify where the information is stored in the database. See Selecting a Vault
Policy. The policy is Rule.
The Basics table and the Feature Selector tables in the Create Boolean Compatibility Rule page can be collapsed
 and un-collapsed
  to provide additional space for creating rules. Any data entered in the tables is saved when the table is collapsed and reappears when the table is un-collapsed.
Click
 to search for and select the source objects for the rule. Only one object from the search results can be selected at a time. This object is added to Context drop-down list. You can search for and select an object to add to the list as many times as needed. Each object
remains in the list.
The feature structure of the object selected from the Context drop-down list is shown. Select filter criteria for the feature structure:
- From the Context drop-down list, select the object to display it's feature structure.
- From the Level drop-down list, select a number from 1 through 10 to show associated features or select All to show features for all possible levels.
- From the Feature drop-down list, select the type of features you want to show: marketing, technical or manufacturing.The default is All.
- Click Filter.
Check the Insert with Feature and Option box if you want features to insert in the expression fields in full context.
Select one or more features from the Feature Selector and click
 in the Right Expression field. The feature is added
to the right expression.
Additionally, you can use the selector next to a feature to view and add that feature's subfeatures to either the left or right expression in the rule:
- Use the Name and Limit filter criteria. Click Refresh.
-
Click either Add to Left or Add to
Right to add the subfeature to the rule.
Each time the rule is modified, the Completed Rule field is updated.
Click any of the following buttons to form the left expression:
-
Click one of the boolean operators:
 ,
,  ,
,  . Use
. Use  and
and  to form the boolean expression.
-
Click
 to remove an item from the expression.
-
Click
 or
or  to navigate through the expression.
-
Click
 to remove a feature.
-
Click
 to remove option.
-
Click
 to clear the expression.
-
Click one of the boolean operators:
Repeat steps 7 and 8 until the required rule is formed.
Click Done.