Creating an Image

This task shows you how to create an image. Images are created in the context of a product line, model, product, or feature. By default, only Product Managers, Marketing Managers and System Engineers have access to create an image. The Image Create wizard allows you to check in a single file to depict the related object. Once created, images cannot be edited through Product Line Management, though they can be removed or deleted even if related to other business objects. In such cases, a warning message is displayed.

When the first image is created for an object, it is made the primary image by default. Subsequent creations/additions are secondary images. Any image can be made the primary image by changing its sequence number to 1 using the Move Up and Move Down commands on the Images list page.

Only GIF, JPG, PNG, GIFF and JPEG files can be checked in. During the final check in of an image, it will be converted to JPG only. After successful check in of image files, various formats of these image files can be generated including generic, mxImage, mxLarge Image, mxMedium Image, mxSmall Image, mxThumbnail Image. These file formats are used to display the images in various formats, for example: large, medium, small, thumbnail, etc. You can use property file settings to specify the format in which the image should be displayed. For details, see Setting Image Properties in the Configuring Properties Files chapter of the Studio Modeling - BPS Administration Guide.


Before you begin: View the list of images. For details, see Viewing Images.
Related Topics
Viewing a Slide Show
Viewing Image Properties
Changing the Order of Images in a Slide Show
  1. From the page Actions menu or toolbar, click Create.

    The Create New Image page opens.

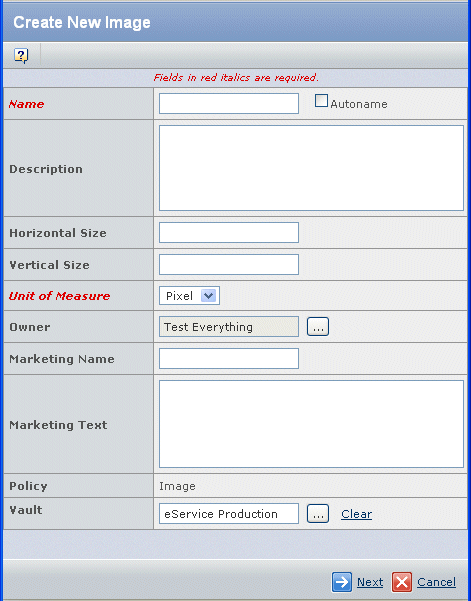
  2. Enter the details of the image, including the following:

    Name. Type a name for the image, or check Autoname to have the system assign a name.

    Description. Type details about the image.

    Horizontal Size. Type the horizontal size of the image.

    Vertical Size. Type the vertical size of the image.

    Unit of Measure. Select the unit of measure of the image size: pixels or inches.

    Owner. Click if you want to assign a different owner of the image. By default the creator is the owner of the image.

    Marketing Name. This field is automatically populated with the same value as the Name field. You can accept the default or specify a different name.

    Marketing Text. Type the text used in the marketing description of the object.

    Policy. This is a read-only field that displays the policy that controls the image.

    Vault. Click 
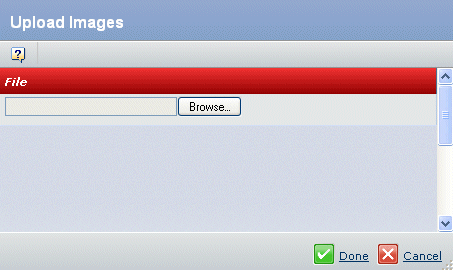
to specify where the object will be stored in the database. This field is displayed only if more than one vault is available to you.

  3. Click Next.

    The Upload Images page opens.

  4. Click Browse to select the image file to be checked in. Use the standard operating system file chooser to select the file to check in.

  5. Click Done to confirm your selections.