Creating a Product | ||||||
|
| |||||
To create a product, do one of the following:
- From the global My Enovia
 menu, under the heading Product Line, click . For details, see Products Page.
 - From the global Actions
 menu, under the heading Product Line, click Create Product.
- From the global My Enovia
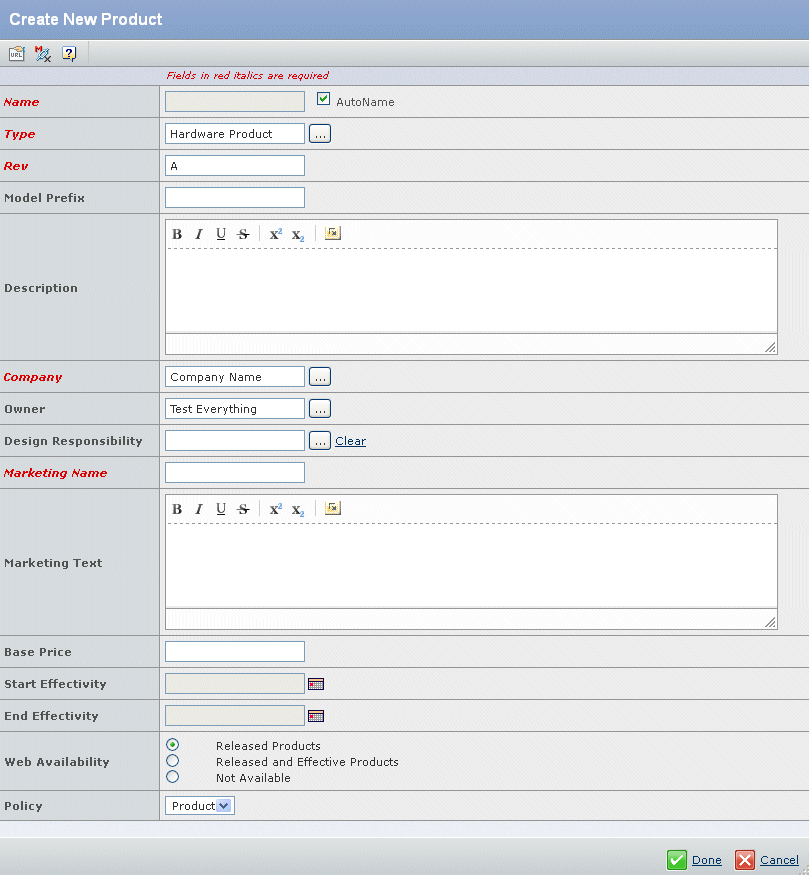
Enter details about the product, including the following:
Field Description Name Type the name of the new product or check Autoname for the system to assign a name automatically to this product. If Autoname is not used, the value of this field is copied to the Marketing Name field (see below) when the Name field loses focus. Note: Certain special characters are not allowed in names. The emxFramework.Javascript.NameBadChars property determines which characters are not allowed. See "Special Character" under Installation and Configuration > ENOVIA > Unified Live Collaboration > Studio Modeling - BPS Administration > Configuring the Properties Files > emxSystem.properties for details.
When an initial revision of a product is created, a model is automatically created with the same name and connected to the product.
If you are creating a product under the context of a model, the name field is automatically populated with the name of the model and is read-only.
This field is required.
Type Click  to select the type of product you want to create. By default, the choices are Hardware Product (default), Service Product, or Software Product. Your system may be set up for others.
This field is required.
Rev Type a revision number or code. This field is required.
Model Prefix Type the model prefix to be inherited by all products and product configurations created under the model. Use alphanumeric characters. The prefix is case-insensitive. In other words, regardless of the case entered (lower or upper case), all values are converted to upper case and stored. The maximum prefix length is determined by a property setting. If ENOVIA X-BOM Unit Tracking is installed, the Model Prefix field is mandatory by default. You can use a property setting to change the Model Prefix field to not mandatory. See the ENOVIA X-BOM Unit Tracking Administrator's Guide for details.
The prefix must be unique across the database. This is to ensure that the shortform notation of the product can uniquely represent it for other downstream processes. If you enter a model prefix that already exists, the error message Prefix already exists is displayed. You are prompted to enter a different prefix before being allowed to continue.
Description Type details that describe the product. Formatting buttons are available to allow you to add some formatting to the text. Certain special characters are not allowed. See Name, above. Company Click to assign a different company for the new product. By default, the company is set as your company.This field is required.
Owner Click to assign an owner. By default, the person who creates a product is its owner.Design Responsibility Click to assign the design responsibility for the product to a different organization or project.Click Clear if you want to remove the design responsibility. Once design responsibility is removed, the product line becomes accessible by all Product Managers and System Engineers of the company. This change takes effect only after you click Done. If responsibility is assigned to a group to which you do not belong, you will no longer have access to the data.
Note: The Responsible Design Organization (RDO) can be updated as long as the product is in the Preliminary state. Once the product is promoted past the Preliminary state, the RDO can no longer be changed and the Clear icon is no longer available.
Once a product has been assigned a design responsibility, all new revisions carry the same.
Marketing Name This field is automatically populated with the same value as the Name field. You can accept the default or specify a different name. Certain special characters are prohibited (see Name, above).
This field is required.
Marketing Text Type the marketing text of the new product. Base Price Type the initial base price of the product. Start Effectivity Click  to select the Start Effectivity date of the product, the date beginning from which the product is available for configuration sessions. The date must be selected if the Web Availability is set to "Released and Effective Products".
If the Start Effectivity date is empty but the End Effectivity date is not, an error message is displayed. You are prompted to enter a Start Effectivity date before being allowed to continue.
If the Start Effectivity date is greater than the End Effectivity date, an error message is displayed. You are prompted to correct the Start Effectivity date before being allowed to continue.
End Effectivity Click to select the End Effectivity date of the product, the date up to which the product is available for configuration sessions. The date must be selected if the Web Availability is set to "Released and Effective Products"If the End Effectivity date is empty but the Start Effectivity date is not, an error message is displayed. You are prompted to enter an End Effectivity date before being allowed to continue.
Web Availability Select the web availability status: Released Products, Released and Effective Products, or Not Available. Note: If a product has not been released, there may be errors in the product structure that are not checked for until the product moves to the Released state.
If Released and Effective Products is selected and both the Start Effectivity and End Effectivity dates are empty (see above), an error message is displayed. You are prompted to enter Start Effectivity and End Effectivity dates before being allowed to continue.
Policy This is a read-only field that shows the policy that controls the product.