Creating a Product Line | ||||||
|
| |||||
To create a product line, do one of the following:
- From the global My Enovia
 menu, under the heading Product Line, select Product Lines, then click Create from the page toolbar. This opens the Create New Product Line page in a slide-in window.
Note: If a product line is selected when you click Create, the new product line is created as a sub product line of the selected one.
- From the global Actions
 menu, under the heading Product Line, select Create Product Line. This opens the Create New Product Line page in a new popup window.
 - From the Categories menu of a Product Line Properties page, select Sub Product Lines, select a product line, click Enable Edit, then from the Actions menu select Create. This opens the Create New Product Line page in a slide-in window.
- From the global My Enovia
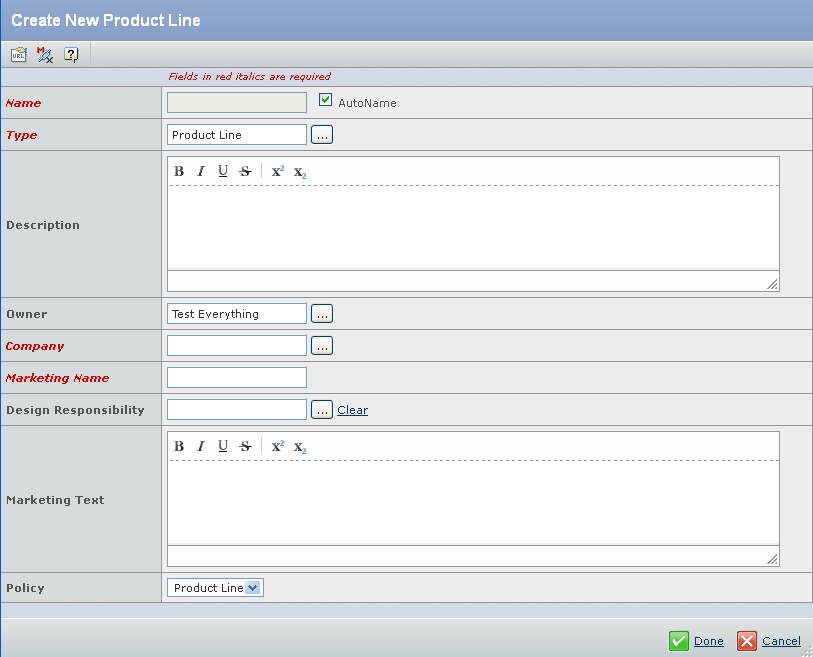
Enter details about the product line, including the following:
Field Description Name Type the name of the new product line or check Autoname for the system to assign a name automatically to this product line. The autonames are of the format PL-nnn, where nnn represents a sequential number. In general, product lines are named using a short descriptive string. This is a required field. Note: Certain special characters are not allowed in names. The emxFramework.Javascript.NameBadChars property determines which characters are not allowed. See "Special Character" under Installation and Configuration > ENOVIA > Unified Live Collaboration > Studio Modeling - BPS Administration > Configuring the Properties Files > emxSystem.properties for details.
Type Enter the name of the type or click  to choose the product line type or subtype. The default value is Product Line. This is a required field.
Description Type details that describe the product line. You can use the editing buttons to apply formatting to the entered text (bold, italics, underline, strikethrough, superscript, or subscript), if desired. Owner Click to assign an owner. By default, the owner is set as the person who is creating the product line.Company Click to assign a different company or business unit to relate to the new product line. By default, the company is set as your company. This is a required field.Marketing Name This field is automatically populated with the same value as the Name field. You can accept the default or specify a different name. This is a required field. Note: Certain special characters are prohibited in marketing names (see Name, above).
Design Responsibility Type or click to assign the design responsibility for the product line to a different organization or project.Click Clear if you want to remove the design responsibility. Once design responsibility is removed, the product line becomes accessible by all Product Managers and System Engineers of the company. This change takes effect only after you click Done. If responsibility is assigned to a group to which you do not belong, you will no longer have access to the data.
Note: The design responsibility must be assigned before the product reaches the Released state. Once a product has been assigned a design responsibility, all new revisions will carry the same. Once the Design Responsibility has been set, the Clear icon is no longer available. Hence, it will no longer be possible to change this property once it has been set.
Marketing Text Type the marketing text of the new product line. Policy This is a read-only field that shows the default policy that controls the product line.
- The global Actions menu, the Properties page of the newly created product line opens.
- The global My Enovia menu, the current Product Lines structure browser is refreshed with either the new product line or the new sub product line in markup for the attribute update.
- The Product Line Categories menu, the current Product Lines structure browser is refreshed with the new sub product line in markup for the attribute update.