Creating a Logical Feature | ||||||
|
| |||||
To create a logical feature, do one of the following:
- From the global My Enovia
 menu, under Variant Configuration > Logical Structures, select Logical Features, then from the Logical Features page Actions menu, select Create Logical Feature. This creates a stand-alone logical feature that can be reused across multiple contexts using the Add Existing option.
 - From the global Actions
 menu, under Variant Configuration, select Create Logical Feature. This creates a stand-alone logical feature that can be reused across multiple contexts using the Add Existing option.
 - In the context of a product or logical feature, from the Categories menu of the Properties page, select Logical Structures. In the Logical View tab of the Logical Structures page, select the desired product or logical feature, click Enable Edit, then from the page Actions menu, select Create Logical Feature.
- In the context of a model, from the Categories menu of the Properties page, select Logical View. In the Candidate Logical Features tab of the Logical View page, from the page Actions menu, select Create Logical Feature.
In all cases except from the global Actions
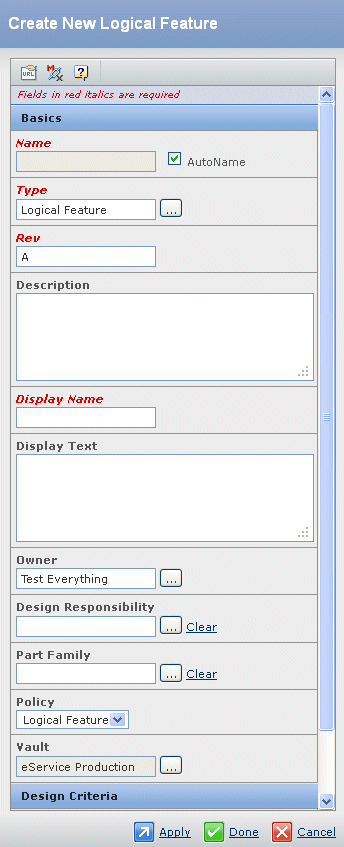
 menu, a Create New Logical Feature slide-in window opens on the right side of the screen. In the case of the global Actions menu, a popup window opens.
- From the global My Enovia
Edit the fields as follows:
- Basics section:
- Name
- This field is required. Uncheck the AutoName check box to enable the Name field for editing. Leave the box checked if you want to allow the system to assign a name automatically.
The following special characters are prohibited in names.
Special Character Description @ Commercial At Sign , Comma * Asterisk ? Question Mark [ Left Square Bracket ] Right Square Bracket # Number Sign $ Dollar Sign { Left Curly Bracket } Right Curly Bracket \ Backslash " Double Quotation Mark < Less-Than Sign > Greater-Than Sign | Vertical Line % Percent Sign ; Semicolon & Ampersand = Equals Sign Note: If you should need to use any of these special characters in a name, you can edit the emxFramework.Javascript.NameBadChars property in the emxSystem.properties file located in SERVER_INSTALL\managed\properties\ (Windows) or SERVERHOME/managed/properties/ (UNIX).
- Type
- This field is required. The default type is Logical Feature. Click
 if you want to select a subtype, such as Software Feature.
 - Revision
- This field is required. The default is based on the policy definition (see Policy field, below).
- Description
- Enter a description for the new logical feature.
- Display Name
- This field is required. The default is the same text that was entered in the Name field. See above for rules regarding use of special characters.
- Display Text
- Enter any text to be used for display purposes in the product configuration.
- Owner
- The default owner is the current user. Click
 to select a different owner.
 - Design Responsibility
- Enter the Responsible Design Organization (RDO) for the logical feature. Click
 to select an RDO from a list of available organizations. Click Clear if you want to to erase the field and start over. The default design responsibility is based on the context. If there is no context (i.e., the page was accessed from the global MyEnovia or Actions menu), then this field is initially blank.
 - Part Family
- Type or click
 to select a part family to be associated with the logical feature in the GBOM.
 - Policy
- The policy (lifecycle) is that defined for a Logical Feature object. This cannot be changed.
- Vault
- The vault in which the new logical feature will be created is displayed. Click
 if you want to select a different vault.
- Design Criteria section:
- Selection Type
- Select Single or Multiple.
- Basics section:
Click Done to save your selections.
If any required field is not filled in, an error message is displayed instead and control is transferred to that field where you must provide the missing information.