Creating a Workflow

When you create a workflow, you specify the name and description and indicate whether or not the workflow should autostart. You can add content to the workflow when you create it, or you can add content anytime before the workflow is completed.

You can create a workflow from the Workflows page or from the Process Details page. In either case, you can select different processes and see a graphical representation of each, which can help you decide which process to base your workflow on.


Before you begin: View the process definition page (see Process List Page) or the workflows list (see Workflows Page).
  1. Click Create Workflow or Create New from the page Actions menu or toolbar.

    The Select Process page opens, showing a list of all the processes that have been defined in Business Modeler by the Business Administrator.


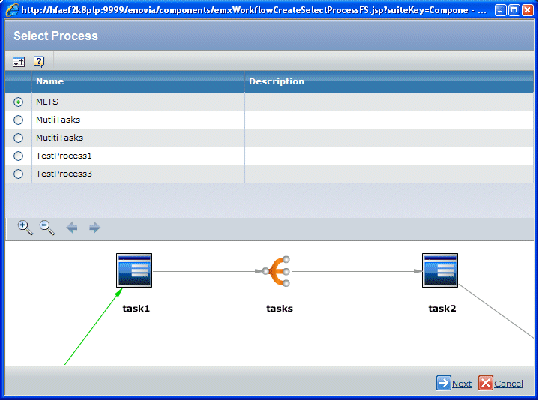
    You can use the magnify and arrow icons to view the process definition.

  2. Click the button for the process you want to base the new workflow on and click Next.


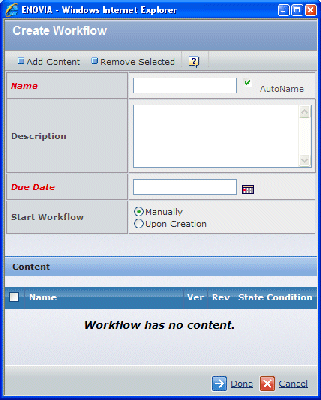
  3. Enter these details:

    Field Name Description
    Name The name you want to use for the new workflow, or check Autoname to have the system assign a name. When a workflow is autonamed, the system assigns a sequential number for the name.
    Description Enter a brief description that indicates the workflow's purpose.
    Due Date Click to select a Due Date when all tasks in the workflow should be completed.
    Start Workflow Specify when to start the workflow:
    • Upon Creation. To start automatically as soon as you are done creating it.
    • Manually. You must specifically start the workflow. See Starting a Workflow.

    If you create a workflow based on a process that includes autostart, this field is read-only.

    Promote Connected Object Indicate whether or not to promote the related content when the workflow is complete. Click the Yes or No button. This field is not shown if there is no related content.

  4. Select Add Content from the page Actions menu or toolbar to search and select an object to add. See Adding Workflow Content.

    If you accessed the Create Workflow page from within the context of an object, that object is added to the workflow content automatically.

  5. To specify a block promotion state for an item, choose the state from the drop-down list in the State Condition column. If you do not want to specify a state, choose (none).

    If you specify a block promotion state for an item, the system prevents the item from being promoted from that state until the workflow is completed. For example, suppose you connect a drawing to a workflow and it needs to be reviewed by the Product Manager before the workflow can continue. You can ensure that the workflow does not continue until the review is complete by specifying Review as the block promotion state. State-based blocking must be enabled by the Business Administrator. See the Business Process Services Administrator's Guide for details.

  6. Click Done.

    A workflow is created. If the Upon Creation option was selected for Start Workflow, the workflow starts immediately, creating first-level tasks.

    If the process that the workflow is based on has not been validated by the Business Administrator, an error message is shown.