Editing the Manufacturing Plan Breakdown | ||||||
|
| |||||
Select a manufacturing plan and click Edit Manufacturing Plan Breakdown from the page Actions menu or toolbar.
Before the Edit Manufacturing Plan Breakdown page opens, the application verifies that the manufacturing plan represents the product's logical feature structure. If the plan does not represent the product's logical feature structure, a warning message is displayed. For example, if a manufacturing plan includes a low-level manufacturing plan for a logical feature that is no longer included in the product's logical feature structure, a warning message will be displayed. You can click Ok to remove the conflicted low-level plan or Cancel to cancel the action. Conflicts can be viewed in more detail from the Manufacturing Plan Matrix page. See Viewing the Manufacturing Plan Matrix.
The Edit Manufacturing Plan Breakdown page opens for the selected plan.
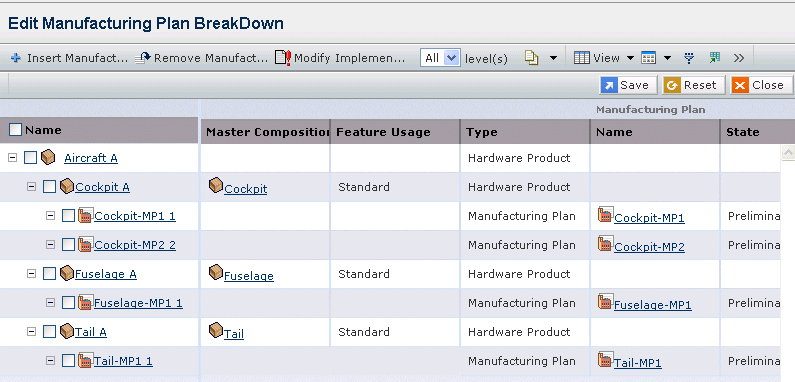
It contains the following columns:
Name. The root node is the context product and the second level shows its logical feature structure. This column contains highlighted links. Click on any name in this column to view the Properties page for that object.
Master Composition. The master feature associated with the logical feature.
Feature Usage. The logical feature's usage in the product. Valid values are:
- Standard - the logical feature revision is included in the product by default but can be removed.
- Optional - the logical feature revision is available for selection in the product.
Type. The object type.
The Manufacturing Plan section contains the following columns:
Name. Name of the low-level manufacturing plan selected for the logical feature in the high-level manufacturing plan for the product.
State.The current state of the manufacturing plan in its lifecycle.
Planned For. The product or logical feature for which the manufacturing plan is planned.
Check. Whether the manufacturing plan breakdown is compliant with the design information:
 means compliant;
  means non-compliant.
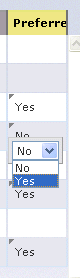
Preferred. In the case of an OR manufacturing (see item b under the next step), this attribute defines which manufacturing plan is preferred. The first sub assembly manufacturing plan added to the breakdown is set to preferred. Any subsequently added plans are set to non-preferred. To edit the preferred status of a plan, click the small triangle in the upper left corner of the Preferred cell and select Yes or No from the drop-down list. Changing the preferred status of one plan to Yes causes all of the other plans in the same OR manufacturing to be set to No.
To insert or remove a manufacturing plan for a logical feature, do the following:
Note: Changes are only committed after you click Apply in the page.
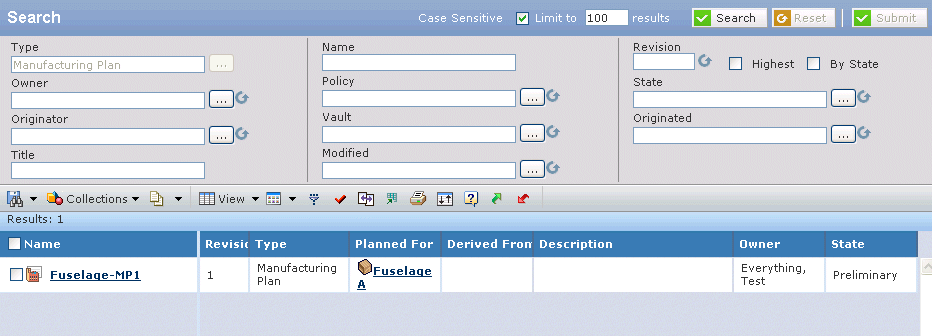
- To insert a manufacturing plan, select a logical feature and click
 Insert Manufacturing Plan from the toolbar.
The Search page opens with the list of manufacturing plans defined for that logical feature.
- If the context manufacturing plan intent is Regular, only manufacturing plans associated with the selected subassembly are available.
- If the context manufacturing plan intent is Retrofit, manufacturing plans associated with the selected subassembly and all previous revisions are available.
- To remove a manufacturing plan from the breakdown, select one or more logical features and click
 Remove Manufacturing Plan from the toolbar.
The associated manufacturing plans are highlighted in red with a line through them.
- To insert a manufacturing plan, select a logical feature and click
To modify the manufacturing plan resolution, click
 Modify Implementation from the toolbar.
Note: You can modify the manufacturing plan resolution at any time as long as it is not yet released.
The Manufacturing Plan Resolution dialog is displayed with all OR designs. Implemented subassembly revisions are selected by default. If you make any changes in the resolution, the Edit Manufacturing Plan Breakdown window is refreshed and the Check column is reprocessed to reflect the new resolution breakdown compliance.