Creating a Project

You can create a project or add/insert a project as a task in a WBS.

Only people assigned to the Project Lead and External Project Lead roles can create a project (although any Program Centraluser can create a project concept). When you create a project, you automatically become the owner but you can then assign ownership to someone else.

If you want to associate the project with a business goal or program, it might be faster to create the project from within the goal or program. Choose Projects from the item's Categories menu and then click Create New Project. The new project is automatically assigned to the item.

The pages used in the wizard vary depending on the source selected on the first page of the wizard:

This task shows you how to:

Selecting the Source

  1. From the global toolbar, click Actions > Program > Create Project.

    Or:

    1. From the global toolbar, click > Program > Projects.
    2. Click Create New Project from the Actions menu or page toolbar.


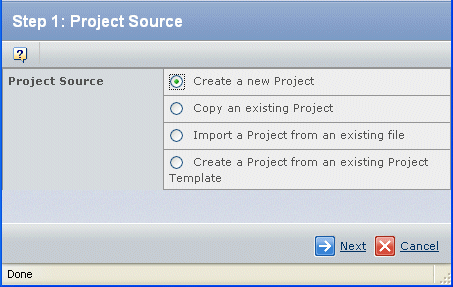
  2. Select how the project will be created:


    • Create a new Project. This option creates a project from scratch. You specify all the details of the project you are creating.

    If your company has created a similar project, uses Microsoft Project or Excel to maintain project data, or uses project templates to standardize project processes, it may be easier or better to create the project by using another option for copying, importing, or using a template.


    • Copy an existing Project. Components in the original project are copied to the project, including all tasks, subtasks, dependencies, folders, documents, and project members. Copying does not include assignees, routes, approvals, or discussions. When creating the copied project, you enter new basic information for it, such as name, description, visibility, etc.
    • Import a Project from an existing file. Import the project and associated WBS structure from a comma or tab delimited file that contains the information.
    • Create a Project from an existing Project Template. Project Leads can create a project based on any Active project template created for their company. When you create a project based on a template, the system copies the following items from the template:
    • Folders and folder content
    • Bookmarks
    • WBS tasks and associated items such as dependencies, deliverables, and checklists; for tasks that are associated with questions, the tasks are included or not included based on your response to the questions

  3. Click Next. If you selected:

    Create a new Project, continue with Selecting the Source.

    Copy an existing Project, continue with Selecting a Project.

    Import a Project from an existing File, continue with Importing a Project and WBS.

    Create a Project from an existing Project Template, continue with Selecting a Template.

Selecting a Project

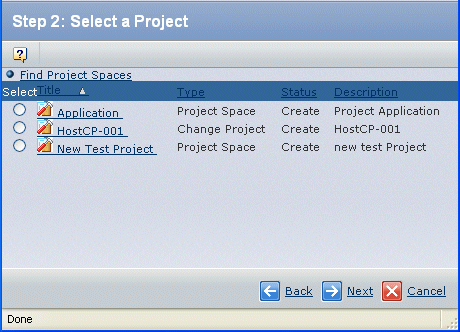
This page of the wizard only displays if you selected to copy an existing project.

  1. Click the option button for the project you want to copy. You can click the name of a project to view all details about that project.

    If your list shows many projects, you can click Find Project Spaces to search for a specific project.

  2. To refine your search for project spaces, click the Find Project Spaces link near the top of the page.

  3. Click Next.

Importing a Project and WBS

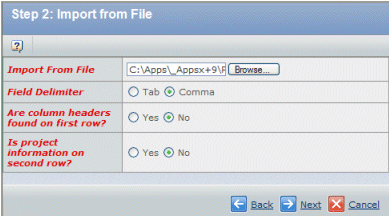
This step in the wizard only displays if you selected to import a file. The file must have been previously exported from a project management application using the format defined in Project Import File Format. If exported from Microsoft Project, see Exporting from Microsoft Project.

  1. Make sure you have a comma or tab delimited file with the correct fields and field order, as described in Project Import File Format.


  2. Click Browse and select the file.

  3. Choose how the fields are separated in the file: Tab or Comma.

  4. Choose Yes or No depending on whether the file you are importing contains column headers in the first row. If you choose Yes, the header information will not be imported. This lets the application know that the first row should be skipped.

  5. Choose Yes or No depending on whether the file you are importing contains project information in the row above the task information. (If the file doesn't contain column headers but does contain project information, then the project information will be on the first row. If this is the case, choose Yes for the question.)

  6. Click Next.

    Program Central reads the import file. Some of the fields are reformatted to fit the Program Central format. Some Microsoft Project features are not supported (for example, dependency floats must be integer values).

    If any of the fields encounter problems on import, an error message appears at the top of the page. An Error column is added to the right side of the table and the problem field is described.

    To resolve the problem, correct the import file as needed and then click Next. See Viewing File Details When Importing.

Viewing File Details When Importing

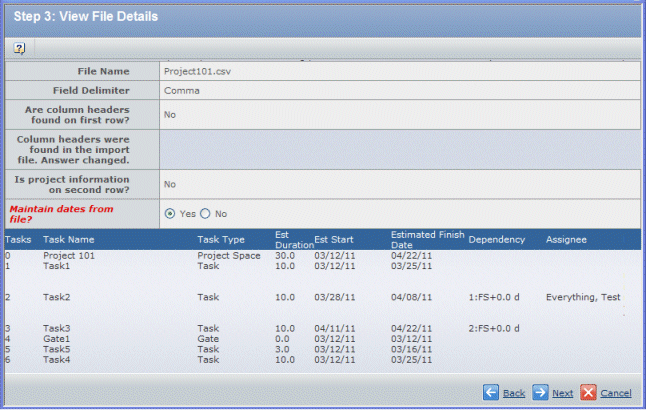
This page in the wizard only displays if you are importing a file to create the project.

  1. Review the View File Details page, which shows the tasks in the newly created project.


  2. In response to Maintain dates from file?, choose whether you want to maintain the estimated start and finish dates defined in the import file:

    If you choose Yes, you cannot set the schedule from value to Project Finish Date while creating the project (although you can edit it after the project is created.

    To maintain all the dates as specified in the import file, choose Yes. The project start date will be set to the date specified in the import file and you will not be able to change the Project Start Date on the next page of the wizard. You can change estimated start dates using the Edit WBS page after you finish creating the project.

  3. Click Next. See Specifying Project Details.

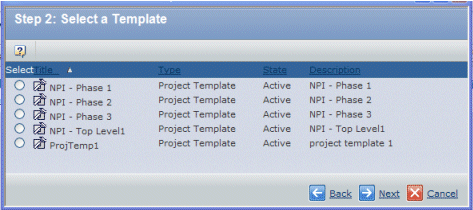
Selecting a Template

This page of the wizard only displays if you are using a template to create the project.

  1. Choose the template you want to base the project on.


  2. Click Next. See Selecting a Question.

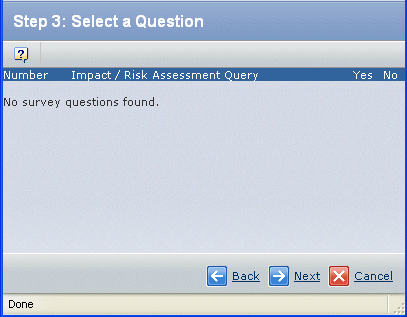
Selecting a Question

This page of the wizard only displays if you are using a template to create the project.

  1. For each question on the "Select a Question" page, choose either Yes or No.

    Based on your answers to these questions, specific tasks will either be added or not added to the project.

  2. Click Next. See Specifying Project Details.

Specifying Project Details

  1. Enter details for the project:
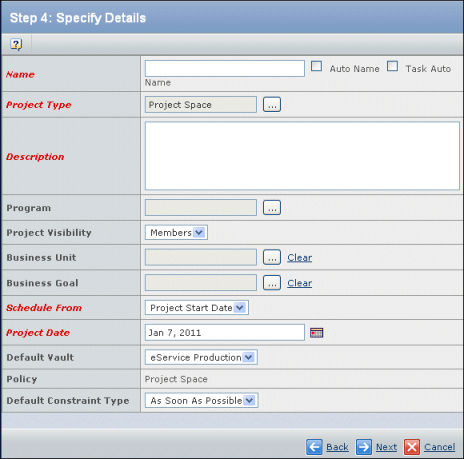


    If you are copying a project, its details are defaulted from the copied project. If creating a project from scratch, you must enter its details.

    Name. Enter the name of the project. Click Autoname to have the system assign the project name. If you are creating a project from a project template you can click Task Autoname to autoname all the tasks being copied from the project template. If Task Autoname is not checked, all the tasks in the project will get the same name as in the project template.

    Project Type. Shows as Project Space. If alternate types or subtypes have been defined for your system, click to select a subtype. Only one subtype can be selected. The type selected determines the policies made available in the Select Policy field and corresponding attributes on the page. The type chooser is available only when there is more than one type. If there is only one project type, this field becomes a read-only field showing the project type.

    Description. Enter a brief description of the project.

    Program. Select one or more programs to be associated with the project. Click and then search for the program(s). For help, see Searching for Programs.

    Project Visibility.


    • Company. All Program Central users in your company can view the project by searching for it.
    • Members. Only people added as project members can view the project.

    Business Unit. The business unit. Click to select a business unit.

    Business Goal. The business goal that this project fulfills. Only the host company can work with business goals so the field is only shown for host company employees. To associate a business goal with the project, click . For help, see Searching for Business Goals.

    Schedule From. Select an option from the drop-down menu:


    • Project Start Date. Schedule the project based on when you start.
    • Project Finish Date. Schedules the project based on when it must be finished.

    If you imported a file and maintained the dates to create the project, you cannot change the Schedule From or Project Date values. You can edit these values after the project is created.

    Project Date. The date the project is estimated to start or finish, based on the value of the Schedule From field. To change the date, click (see Entering Dates Using the Calendar). When using a start date, the default is today's date. Depending on how WBS tasks are added to the project, the tasks may take on this date by default. For example, if you add tasks from scratch, they automatically have the same estimated start date as the project. For more information on estimated start dates, see Rules for WBS Task Fields.

    Copy Options. Check "Include All Related Projects" if you want the related projects copied to the new project. This field appears only when copying a project.

    Policy. Select the policy to govern the project from the drop-down list. The policies in the list are for the Project Type selected. If the type only has 1 policy, this field is read-only.

    Attributes. Depending on the policy selected in the Policy field, one or more attribute fields may display.

    Server. (Available only for the Semiconductor Accelerator for Enterprise Project Management) The sync server to associate your project with a DesignSync vault. For example, your DesignSync/ProjectSync server might be wiz.my_company.com:2647.

    Path. (Available only for the Semiconductor Accelerator for Enterprise Project Management) The URL to your DesignSync vault, which must include the Projects directory. The Path field is concatenated to the Server field. There could be a case where the dsStore (Server) already has "Projects" in its own Path.

    Selector. (Available only for the Semiconductor Accelerator for Enterprise Project Management) The DesignSync selector, which displays "Trunk:Latest". Not editable.

    Default Constraint Type. The default constraint type for project tasks. If this is set to "As Soon As Possible" the constraint type for tasks will default to "As Soon As Possible". Otherwise, the default constraint for tasks will be "As Late As Possible".

    Copy Resource Plan Template. If a resource plan template exists for the template, you can select it, which will copy the resource plan when creating a project from the project template.

  2. Click Next. See Reviewing Project Details.

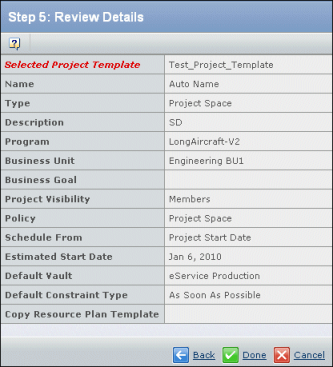
Reviewing Project Details

  1. Review the information you entered.


  2. If everything is correct, click Next. Otherwise, click Back to make changes, or Cancel and recreate the project.

Refining a Project Space Search

  1. To search for project spaces, enter the following fields:

    Name. The name of the project space.

    Description. The description of the project space.

    Owner. The owner of the project space. Click to select an owner.

    Originator. The originator of the project space.

    Company. The company responsible for the project space. Click to select a company.

    Business Unit. The business unit. Click to select a business unit.

    Search Vaults. Select the vault that contains the project space. Values are User Default, Local, Selected (click to select a vault), or All.

    Program. The program associated with the project space. Click to select a program.

    State. The current lifecycle state of the project state.

  2. To use more search fields, click the More link and fill out the following fields using the Operator and EnterValue fields when appropriate. You can select dates by clicking the icon. See Entering Dates Using the Calendar.

    Name. The name of the project space.

    Description. The description of the project space.

    Revision. The revision level of the project space.

    Owner. The owner of the project space.

    State. The current lifecycle state of the project state.

    Originator. The originator of the project space.

    Notes. Any notes about the project space.

    Task Actual Duration. The actual duration of the task.

    Task Actual Start Date. The actual start date of the task.

    Task Actual Finish Date. The actual finish date of the task.

    Task Estimated Duration. The estimated duration of the task.

    Task Estimated Start Date. The estimated start date of the task.

    Task Estimated Finish Date. The estimated finish date of the task.

    Schedule Duration Units. The schedule duration units.

    Constraint Date. The constraint date.

    Percent Complete. The percent complete of the project.

    Title. The title of the project space.

    Project Visibility. Defines who can see the project space.

    Baseline Initial Start Date. The baseline initial start date.

    Baseline Current Start Date. The baseline current start date.

    Baseline Initial End Date. The baseline initial end date.

    Baseline Current End Date. The baseline current end date.

    File Store Symbolic Name. The symbolic name of the file store.

    Effort Notifications. The name for effort notifications.

    Schedule From. The schedule from date.

    Format. The file format.

  3. Click Find.

    See Viewing Project Space Search Results.

Viewing Project Space Search Results

  1. View the list of project spaces on the Project Space Search Results page.

    Name. The name of the project space. Click the name to view its details in a PowerView page.

    Description. The description of the project space.

    Status. The current lifecycle state of the project space.

    Owner. The owner of the project space.

    Originated. The date on which the project space originated.

  2. From the list of project spaces, click the radio button before a project space name to select it.

  3. Click Done.