Creating a Route Using a Wizard | ||
| ||
Enter Basic Information
Select
 > Routes > Create Route Wizard.
or
Navigate to the Routes page of an object and select Actions > Create Route Wizard.
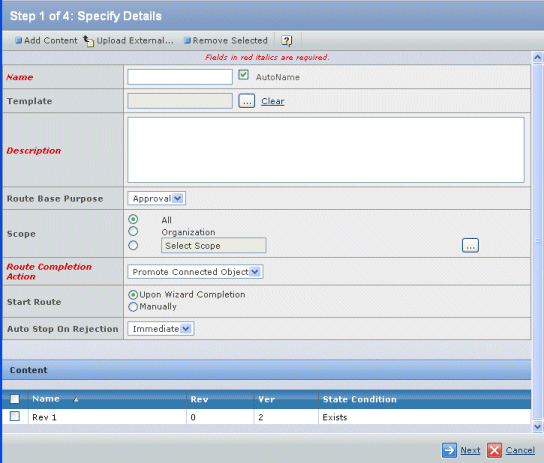
The first page of the wizard opens, the Specify Details page.

Enter these details:
Field Name Description Name The name you want to use for the new route, or check Autoname to have the system assign a name. When a route is autonamed, the system assigns a prefix and a sequential number for the name, such as R-000305. Visible to Parent Route Owner These options are not shown unless the route is a sub-route.
For sub-routes that you are creating to complete another route's task, use the options to choose whether you want the sub-route to be shown to people who can access the parent route. This includes the parent route owner, all members of the parent route, and Workspace Leads.- No. Others cannot see the sub-route
- Yes. Others can see the sub-route.
Template If you want to base the route on a template, click the Template  . See Selecting a Template for a Route.
 Description Indicates the route's purpose. If you base the route on an existing template, the description is already entered. You can edit it as needed.
Route Base Purpose Determines the kind of tasks included in the route. - Standard. The route can include tasks that require the assignee's approval or comment or tasks intended only for notification or information.
- Approval. The route includes only tasks that require the assignee's approval.
- Review. The route includes only tasks that require the assignee's comment.
Scope All or Organization. You can click  to choose a specific workspace or folder.
For details, see The Scope of a Route.
Route Completion Action Determines the events that will occur when the route is complete: - Notify Route Owner. When the route is complete (all tasks are completed), the system sends a notification to the route owner.
- Promote Connected Object. This option is for routes with content for which the route owner has defined lifecycle block states. If this option is selected, the system automatically promotes the object when the route is completed, assuming no other routes or requirements are blocking promotion. The route owner is also notified of the route completion.
Start Route - Upon Wizard Completion. if you want the route to start automatically when you finish defining it using the route wizard.
- Manually. if you want to explicitly decide when to start the route.
Auto Stop on Rejection Define what happens when a task in the route is rejected: - Immediate. The route stops immediately.
- Deferred. The route stops after other tasks at the current level are completed or rejected.
Add content for the reviewers:
- To select an item from the database, select Add Content from the page Actions menu or toolbar. See Adding Content to a Route. If the route's scope is a workspace folder or subfolder, the content is limited to the content of the folder and its subfolders.
- To upload a file from your computer, select Upload External Document. See Uploading Files with the Applet or Uploading Files without the Applet.
- To remove any added content, check the item and click Remove Selected.
If you began the route by selecting items from a folder Content page, then that content is listed in the Content section at the bottom of the Specify Details page. If you base the route on a template that includes content, this content is listed. You do not have to add any content or any additional content.
To specify a State Condition to block promotion for non-document items (only for items that have more than one state in their lifecycle), choose the state from the drop-down list in the State Condition column. If you do not want to specify a state, choose (none).
If you choose a state, the system prevents the item from being promoted from that state until the route is completed.
Click Next.
![]()
Add Members and Define Access
Complete the steps above. The Select Route Members page of the wizard opens. See Add Members to a Route Page for details about this page.
Use the commands on the page toolbar to add members to the route.
- Click Add People, Add Group, Add Member List, or Add Role.
-
Enter search criteria and click Search.
All members who meet the criteria you entered are shown. The check box for those already added to the route is grayed.
- Check the members you want to add.
-
Click Done.
The members you chose are added to the Select Route Members page.
Choose the access for each person. See Route Members and Access for more details.
Click Next.
![]()
Define Tasks
This page is used when creating a route and when adding a task to an existing route.
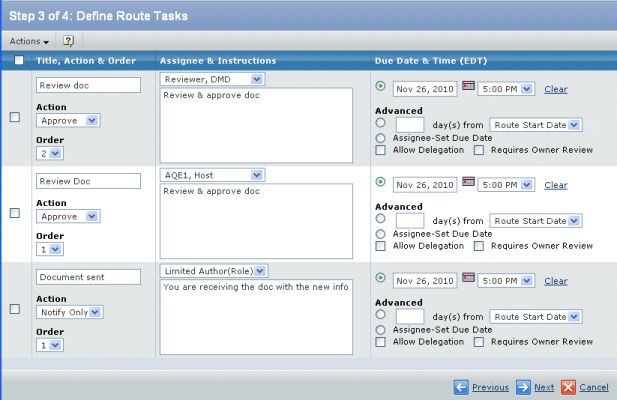
Complete the steps in above. The Define Route Tasks page of the wizard opens.

One task is included for each member added in the previous page.
If you create the route based on a route template, the tasks from the template have a (t) next to the task name. Depending on how the template was defined, you may not be able to make many changes to the task list, or you may have full editing ability. See Routes Based on Route Templates.
For each task, specify these details: the Name, Action & Order information:
Field Name Description Name Enter a short name to let the assignee know what the task is about. Action Choose the type of taks you want the task assignee to perform. The action does not affect the person's access to the route's content. - Approve. Task assignee must fill in the Comment box and choose an approval status: Approve, Reject, or Abstain. If the task assignee chooses Approve or Abstain and then completes the task, the route continues as usual. If the task assignee chooses Reject and then completes the task, the route is stopped and the route creator is notified. The system does not create the next task in the route until the route creator resumes the route. Whether the Comments field for the Approve action is displayed can be configured by your ENOVIA Administrator.
- Comment. The recipient must enter a comment before completing the task.
- Notify Only. The task is automatically completed without the recipient taking any actions.
Order The numerical order in which you want the tasks to be performed. For concurrent tasks (do not depend on the completion of other tasks), choose the same order number for each task. For example, suppose you want one person to complete a task and then you want two people to work on a task simultaneously. You would choose an order number of 1 for the first task. The other two tasks should have order number 2.
For a route that has already been started, if you add a task at the current order value, the task is started or activated as soon as you complete the wizard.
Assignee & Instructions Choose the person, group, or role who should receive the task from the drop-down list. You can leave the task unassigned until you are ready to start the route. If you assign a group or role to a task, the system notifies all people in the group or role when the task is created. The first person to accept the task is then assigned to the task and is the only person who can complete it.
Provide a detailed description of what the person should do to complete the task. For example, you may want to indicate which file or section they should review or comment on.
Due Date & Time Choose one of the following options: - Specific date and time:
- Click the first button under the Due Date & Time column.
- Choose the date by clicking the Calendar
 icon and choose the time from the drop-down
list.
 The calendar shows the current date as the default. If you open the calendar again within the same session, the default date is the last date you selected. For instructions on using the calendar, see Entering Dates Using the Calendar.
- Number of days:
- Choose the first button in the Advanced section.
- Enter a number of days.
- Select Route Start Date or Prior Task or Now if first from the drop-down list.
When calculating the due date, the system includes weekends and holidays so factor that into the number of days you enter. The maximum number of days is 365. For example, if you want to give the task assignee 10 working days to complete the task, you should enter 14 from the Task Create Date because it's likely there would be 4 weekend days within a 10-day working period. If you want the task to be complete 30 calendar days following the start of the route, you should enter 30 days from Route Start Date.
- Let the task assignee enter a due date: by choosing Assignee-Set Due Date. The task assignee can enter a due date, although the system does not require one. If no due date is entered, the system does not display a status for the task.
If the assignee does not complete the task by the due date/time, the task is marked as late (red) and the route's status is changed from green to yellow. If late task notifications have been set up, the system sends out notifications to the appropriate people. For sub-routes, the system makes sure none of the task due dates are later than the parent task's due date. If they are, you must make the due dates earlier.
Allow Delegation Allows the assignee to delegate the task to another person. If a task allows delegation, the assignee can delegate the task to another member to complete. See Reassigning (Delegating) a Task to Someone Else. The delegate will temporarily inherit all accesses that the assignee has for the route and its content. The system may also delegate the task automatically if the recipient receives the task during a defined absence period and the person has designated an Absence Delegate on the person profile. When the system automatically delegates a task, it also notifies the route owner.
The Tasks page will show a Delegate
 icon for the tasks.
Requires Owner Review Check this box if you want to review a task after the assignee completes it. After the assignee completes the task, the system notifies you. After reviewing the task, you must enter a review comment and then either promote the task to indicate approval or demote it to indicate rejection. The system does not create the next task in the route until you promote the task. Demoting the task changes its state back to Assigned and the assignee must recomplete the task based on your comments. When demoting the task, you can reassign it to someone else to work on.
The Tasks page will show a Requires Owner Review
 icon for the task.
To define additional tasks, click Add Task from the page Actions menu or toolbar. A new task row is added. Repeat step 2 to define the task.
To assign one member to several tasks, check those tasks and click Assign Selected from the page Actions menu or toolbar. Then choose the member from the Assign Tasks page and click Done.

To assign multiple tasks to a single individual (or role or group):
- Check the needed tasks.
- Select Assign Selected from the page Actions menu or toolbar. The same page as Step 4 opens.
- Select the person, role, or group.
- Click Done.
Work with the tasks as needed:
- To remove a task, check it and click Remove Selected from the page Actions menu or toolbar.
- To sort the list of tasks based on ascending order number and then by task name, click Sort Task List from the page Actions menu or toolbar.
Click Next.
![]()
Set Action Required
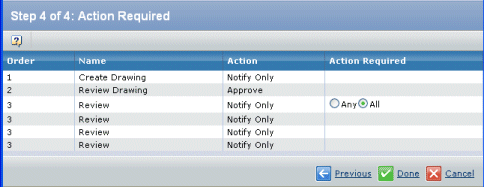
Complete the steps above. The Action Required page of the wizard opens.

If there are no concurrent tasks in the route, the Action Required column is empty.
For each set of concurrent tasks, choose whether any or all must be completed before the next task(s) becomes pending.
- Any. When one person completes a task in the set of concurrent tasks, the task or tasks in the next order level become pending and the remaining incomplete tasks in the current order level are deleted. For example, if you assign three concurrent tasks to three people and ask that they approve a document in the route, but you only need approval from one of them so as soon as one of them completes the task, the other tasks can be deleted and the next task in the route can proceed.
- All. All tasks in the set of concurrent tasks must be complete before the next order level tasks become pending.
If this is a sub-route that you are creating to complete another route's task, use the Visible to Parent Route Owner options to choose whether you want the sub-route to be shown to people who can access the parent route. This includes the parent route owner, all members of the parent route, and Workspace Leads.
- If you do not want others to see the sub-route, choose No.
- If you want others to see the sub-route, choose Yes.
If this is not a sub-route, these options are not shown.
Click Done.
If you chose the Start Route on Wizard Completion option on the first page of the wizard, the route starts immediately. Otherwise, the route's status is Not Started. You can edit it as needed and then start it when ready. See Starting or Resuming a Route.
If you started the route, the system changes the route to the Started status and creates each task that has an order number of 1. The task recipients will see the task listed in their tasks list and they will receive notification that the task is pending. If the task is assigned to a group or role, all people assigned to the group or role receive the notification. If you receive a message that says no persons were notified, there were no people assigned to the role who have Read access to the route content. Assign the task to someone else. See Defining the Tasks in a Route.
Members in the route who were not assigned a task are removed from the route when you start it.
When you start a sub-route, the system makes sure none of the task due dates are later than the parent task's due date. If they are, you must make the due dates earlier.
When all tasks are completed, the system changes the route status to Finished and notifies you that the route is complete. You should then remove the files from the route so other workspace members can edit and route them. See Processing Completed Routes.
If a person chooses Reject for the approval status (approval status is only available if the task action is Approve), then the route is stopped and the system notifies you via email and IconMail. The system does not route the files to anyone else unless you resume the route. See Processing Rejected or Stopped Routes.