Managing Defects | ||
| ||
From the global toolbar, select
 > Defect Management > Defect Assessment Dashboard.
Or:
View any of the category pages listed above.
If you do not see the needed defect, you can search for it. See Searching for Defects.
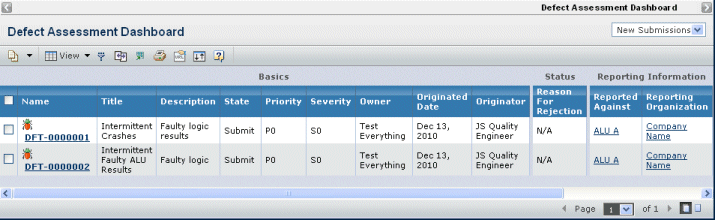
For each Defect, this page lists these details:
Basics
- Name. The name of the Defect (usually an autoname). Click to view the Properties page for the Defect. See Viewing Defect Details.
- Title. A brief description of the defect.
- Description. A more detailed description of the Defect.
- State. The current lifecycle state of the Defect.
- Submit. Additional details need to be provided for the defect.
- Evaluate. All the needed details have been entered and the Defect is ready for assessment.
- Open. The Defect is being worked on and there are one or more Defect Actions associated with the Defect.
- Closed. All Defect Actions associated with the Defect have been completed and the Defect is considered resolved.
- Rejected. The Change Board determined that the problem is not considered a Defect.
- Priority. The priority of the Defect, a value from P0 (the highest priority) to P3 (the lowest priority).
- Severity. How severe the Defect is, a value from S0 (the highest severity) to S3 (the lowest severity).
- Owner. The person responsible for managing the defect and its fix. This is the person who has lead responsibility for the Development Manager role for the organization that has Design Responsibility for the Product.
- Originated Date. The date the Defect was created.
- Originator. The person who created the Defect. Click to view the Properties page for that person (see Person Properties).
Status. Does not show for the Duplicate Defects or Related Defects category.
Reporting Information:
- Reported Against. The primary Product, Feature, Requirement, or other object that the Defect is reported against. Click to view the object's Properties page. View the Reported Against category for the Defect to see additional objects that the Defect affects.
- Reporting Organization. The organization of the person who reported the Defect. Click to view the Properties page for the listed organization.
Defect Change Board. Does not show for the Duplicate Defects category.
- Change Responsibility. The organization responsible for implementing and verifying the fix for the Defect. Click to view the Properties page for the organization.
 . Click to view the list of people on the Change Board. See Managing the Change Board for a Defect.
 (Edit). Click to open the Edit Details page for the Defect. See Editing a Defect's Details.
 (New Window). Click to open the Properties page for the Defect in a new window. See Viewing Defect Details.