Creating a Pass Through RFQ

A company that receives an RFQ can create a pass through RFQ to send to its suppliers to source line items in the RFQ. You must have the Buyer and Supplier roles to create a pass through RFQ.

See About Pass Through RFQs for background details. The company that originated the RFQ has no visibility into the pass through RFQ process.

Note: For a Private Exchange, only people in the host company who have Buyer and Sales Engineer roles can create pass through RFQs.

This task shows you how to:


Before you begin:

Specify Details

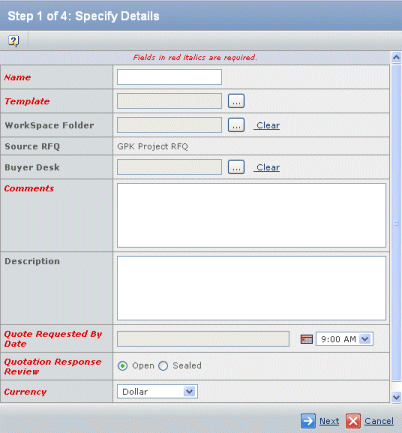
The first page of the create wizard lets you enter details for the pass-through RFQ.

  1. From the page Actions menu or toolbar, click Create New.

    If you do not see this action, you do not have the required roles. Assign the quotation to someone who has both a Supplier and Buyer role as co-owner so that person can create the pass through.

    Create Pass Through RFQ

  2. Enter these details:

    Name. The name of the pass through RFQ. Names must be unique within your company.

    Template. Click Browse to choose the template on which to base the pass through RFQ. See Selecting from Lists.

    Workspace Folder. Click Browse add the RFQ to a workspace folder. See Selecting from Lists. Adding an RFQ to a folder lets workspace members route the RFQ, share and manage documents and other attachments relevant to the RFQ, and participate in discussions about the RFQ.

    Buyer Desk. Click Browse to select the buyer desk that has sourcing responsibility for line items in the RFQ. See Selecting from Lists. The RFQ will be listed in the Assigned RFQ list for the Buyer Desk.

    In a Private Exchange, customer-created RFQs cannot be associated with a Buyer Desk so the Buyer Desk field is not available. After creating the RFQ, the host company is automatically added as the supplier and no other suppliers can be added.

    Comments. Enter any notes about this RFQ, such as ad hoc comments about the RFQ. For example, instructions for completing the quotations or a note about why a change to the RFQ occurred.

    Description. Enter the intent or purpose of the RFQ.

    Quote Requested by Date. Click Calendar to choose the date and time all quotations are due by clicking the Calendar icon and by choosing a time. By default, the date must be at least 30 days after the current date, although your system may be set up with a different number of minimum days or may not perform a date check.

    Note: If your system is set up to display dates in a short format (for example, 12.13.52 3:30 pm), the year must be between 1950 and 2049.

    If suppliers don't return quotations by this date/time, the buyer can promote the RFQ to Response Completed and begin evaluating the quotations that were returned. Once the RFQ is promoted to Response Complete, suppliers can no longer work on or return quotations.

    Note: To find out what the minimum number of days is set to for the Quote Requested by Date, choose today's date and then click Next. The system displays a message that gives the grace period set for your company. Change the date so it's after the grace period and continue as usual. If the message doesn't appear, your system is set up so there is no date checking when the RFQ is created or edited. The date may still be checked when you promote the RFQ.

    Quotation Response Review. Choose whether the process should be open or sealed. Open means the buyer can review the quotations they own or co-own, as they are returned from suppliers. Sealed means the quotations cannot be reviewed until all quotations are returned or until the Quote Requested by Date is reached, whichever comes first.

    Currency. Select the currency you want the quote to use from the drop-down list.

  3. Click Next.

Select Buyer Header Attributes

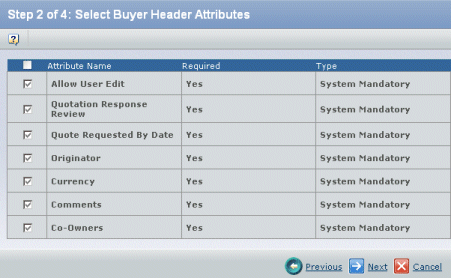
The second page of the wizard lets you enter buyer header attributes.

  1. Complete the first page of the wizard. See Creating a Pass Through RFQ.

    This page lists the attributes to be included on the RFQ and filled in by the buyer, as defined by the RFQ template.

  2. To include an optional attribute:

    1. Check the needed attributes that you want the buyer to complete for the RFQ. To select all the attributes, check the check box in the heading. Mandatory attributes are automatically added to the RFQ and cannot be removed.
    2. For optional attributes, choose Yes in the Required column to force the buyer to enter a value; choose No if a value is optional.

  3. Click Next.

Select Supplier Header Attributes

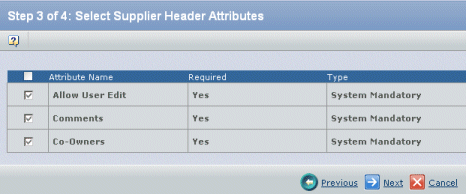
The third page of the wizard lets you enter supplier header attributes.

  1. Complete the first 2 pages of the wizard. See Creating a Pass Through RFQ.

    This page lists the attributes that the suppliers fill in on quotations, as defined by the RFQ template.

  2. To select optional attributes:

    1. Check the needed attributes that you want the supplier to complete for the quotation. To select all the attributes, check the check box in the heading. Mandatory attributes are automatically added to quotations and cannot be removed.
    2. For optional attributes, choose Yes in the Required column to force the supplier to enter a value; choose No if a value is optional.

  3. Click Next.

    Note: In a Private Exchange, for customer-created RFQs, which are single-supplier RFQs, the system automatically adds the host company.

Select Line Items

The last page of the wizard lets you select which line items from the original RFQ to include in the pass through RFQ.

  1. Complete the first 3 pages of the wizard. See Creating a Pass Through RFQ.

    The Select Line Items page lists all line items in the source RFQ. If a line item has already been added to another pass through RFQ, its check box is gray and unavailable.

  2. Check the line items and line items split you want to include in the pass through RFQ.

    All basic information about the line items, including attachments, are copied from the source RFQ to the pass through. Attribute groups, UDAs, and connected parts are not copied. Splits for a line item are not automatically included when you include a "parent" line item.

  3. Click Done.

Complete the Pass Through RFQ

After completing the wizard, follow the steps in this section.

  1. Add suppliers. At least one of each is required before the RFQ can be reviewed and sent to suppliers.

  2. Enter any required attributes for the RFQ (see Editing Details of a Pass Through RFQ).

  3. Add any needed attachments to the RFQ or specific line items (see Attachments and Folder Contents List).

  4. Add any needed attribute groups or user-defines attributes to line items.

  5. Optionally, add line items not originally selected when you created the pass through RFQ (see Adding Line Items to a Pass Through RFQ).

  6. Optionally, choose suppliers to exclude from bidding on specific line items.

  7. Optionally, split the volume for line items across different receiving plants.

  8. If the RFQ is related to a group of other RFQs, add it to a package.

    Note: When you've finished assembling it, you can have it reviewed and then sent to suppliers.

You may want to review all components of the line items carefully to make sure references to the original buyer company are removed. For example, attachments to line items, which are copied along with line item information, may include the name and logo for the original buyer company.