Using Structure View for a Specification | ||
| ||
From the list of specifications, click the specification name, or click
 .
.
Object Placement Rules
- You cannot create new objects if the specification is reserved by another user. Use the Status View filter to identify any restrictions.
- The final placement of an object in the listing is based on these rules.
Selection Level
To create a new
Inserted at
Root Specification
Chapter, Requirement, or Comment
At end of specification
Sub or Derived Requirement Invalid Action Requirement
Chapter, Requirement, or Comment
Before selected requirement
Sub or Derived Requirement At end of Requirement Chapter
Chapter, Requirement, or Comment
At end of chapter (Inserts Chapter as Sub-chapter)
Sub or Derived Requirement Invalid Action Comment Chapter, Requirement, or Comment
Before selected comment Sub or Derived Requirement Invalid Action The Structure View page column details are as follows:
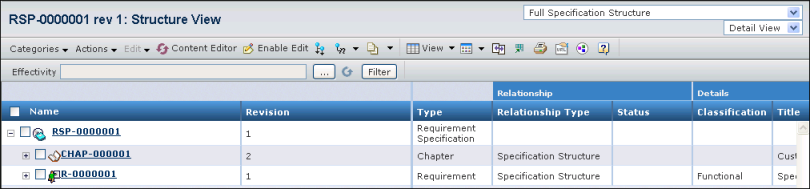
Name. The Name of the specification and the Requirements, Comments, and Chapters are listed in this column. Clicking the name or the
icon at the end of the row will open the Structure View for that specification in a separate window.The navigation tree lists each object in the specification hierarchy. Click the plus or minus to expand or collapse the listing. The right pane displays object attributes, and acts as a work area while editing. Selecting an object or attribute from either pane, highlight the corresponding row in both locations.
To make selections, in the navigation tree, click the column header, check box to select, or deselect, all objects. A green check mark displays
 . Use the row check boxes to select, or deselect, individual
objects.
. Use the row check boxes to select, or deselect, individual
objects.Revision. The revision level of the object.
Type. The type and sub-types of the specification (design specification, requirement specification, etc.).
Relationship Type. How this object is related in the object hierarchy. For example, a requirement is identified as part of the "Specification Structure". Sub and derived requirements are identified respectively as a "Sub Requirement" and "Derived Requirement".
Status. The link status for sub and derived requirements. Values can be "Suspect", "Valid", or "Invalid".
Classification. Identifies the requirement classification--non, functional, etc.
Title. Displays the title of the specification.
Description. The specification description.
Priority. Indicates the project to which the requirement specification belongs.
Click to open the specification in a new Structure View window.Structure Effectivity. The effectivity defined for this object. You can edit the effectivity in this cell. See Edit the Effectivity.
Item Effectivity. Not used.
To switch to the Structure & Content Editor, click the
 button.
Use the table filter, which is below the expand filter, to determine which columns should display:
Detail View. Shows the details of the objects in the specification.
Content View. In addition to showing object details, this shows a description about the content of each object.
Status View. In addition to showing object details, these icons show the status of each object:
 Lifecycle Status. These icons identify the lifecycle
state of the object:
Lifecycle Status. These icons identify the lifecycle
state of the object: Preliminary state for a requirement specification; Propose state for a requirement.
 Draft or Review states for a requirement specification; Approve, Validate, or Review states for a requirement.
 Release
 Obsolete
 Active Engineering Change icon appears in this
column if the object has a related active EC that is not in the Complete,
Rejected or Closed state. For details about ECs, see Working with Engineering Changes.
Active Engineering Change icon appears in this
column if the object has a related active EC that is not in the Complete,
Rejected or Closed state. For details about ECs, see Working with Engineering Changes. Higher Revision icon appears in this column if
a higher revision of the object exists.
Higher Revision icon appears in this column if
a higher revision of the object exists. Reserved icon appears in this column if an object
is reserved by another user.
Reserved icon appears in this column if an object
is reserved by another user. Allocation Status. These icons represent the allocation status if child sub or derived requirements are connected to the requirement:
Status Requirement object connected at "From" side Requirement object connected at "To" side Valid 

Suspect 

Invalid 

Double arrows indicate requirement objects connected at both the From/To side, such as
 . Double arrows can express a mixed status, such as
  .
. indicates that no derived or sub requirement is available and no source requirement is available.
Clicking on any allocation icon will display the Full Traceability view. See Viewing Full Traceability for a Requirement.
To edit the details of a specification and its Requirements, Chapters, and Comments, click the Enable Edit button on the toolbar.
Fields that can be edited are indicated with flags in the upper-left corner, as shown below.
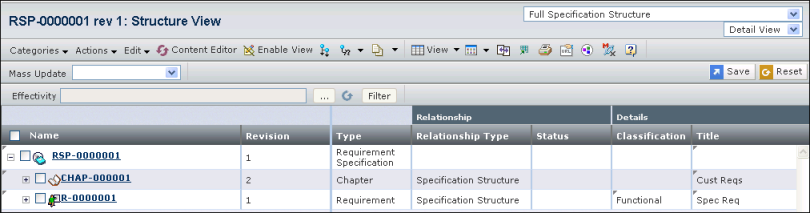
To change the value in an editable field, click anywhere inside the field and then type or select the updated value. When finished editing, to apply the changes, click the Save button on the toolbar. To reset the fields to their original values, click the Reset button.
You can also edit the object tree of the specification, by selecting one or more objects in the Name column, clicking Edit, and selecting one of the following options:
Undo. Reverts the current changes for the selected row to the previous condition. A form opens for confirming the undo. If a row was edited using cut and paste, then undo must be applied to both rows in order to fully reverse the operation. Select undo for the pasted row, green, and then the cut row is displayed in red strike-through.
Cut. The selected row is copied and marked for disconnect with a red strike through. Used with the paste commands to move one or more rows to a new location.
Copy. Copies the content a selected row(s) for pasting to another location. You can use copy and paste to replace a cut row, which is indicated with red strike-through.
Paste As Child. Pastes cut, or copied, row(s) beneath the selected row as a child. Child rows are indented beneath the parent. The pasted content is highlighted green. Multiple rows can be pasted.
Paste Above. Pastes a cut, or copied, row(s) above the selected row as a sibling, at the same level. The text in the pasted rows is highlighted green. Multiple rows can be pasted.
Paste Below. Pastes cut, or copied, row(s) below the selected row as a sibling, at the same level. The text in the pasted rows is highlighted green. Multiple rows can be pasted.
Cut and paste rows are identified by these colors: Red strike-through identifies a cut row. Orange identifies a resequenced, or rearranged, row under the same parent. Green identifies added rows, not resequenced rows.
The paste may be blocked if the new connection is invalidated by the schema definition. Paste is valid when the schema identifies a relationship match in the editRelationship list. When cut and paste are used to reposition objects of equal level under the same parent, this change in the stacking order is defined as resequencing. If the moved object is a valid resequence, that object is highlighted orange. If the moved object is pasted twice, the first paste is a move (resequence) and is highlighted orange. The second paste is an add (not a resequence) and is highlighted green.
The above edit options can be used to reorder sub/derived requirements in those views that display sub and derived requirements.
Mass Update Menu
While editing, you can use the Mass Update drop-down field to revise the column attributes of any selected or all object in the navigation tree. You can select the objects to edit, and then, from the Mass Update menu, pick the column, the content and the method of update. These columns can be mass-edited:
- Name
- Status
- Classification
- Title
- Description
- Priority
- Structure Effectivity
You can update just the selected objects with the Apply to Selected button or all objects with the Apply to All button. The View Filter setting determines which columns are available for editing.
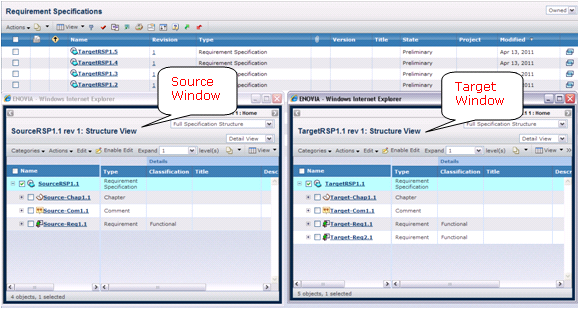
Link a Sub/Derived Requirement in Two Structure Views
Click the
icon for each of the two specifications to open them in separate windows. These are the specifications having the source and target requirements.
Arrange the two windows so they're easy to view and work with, and expand each specification to view the requirements you want to link to. Your screen may look similar to this: